


What Is CPU Overclocking? Zero To 100 CPU Overclock
CPU Overclocking Can Increase The Processing Power Of The Device And Reduce Costs, But If Its Principles Are Not Followed, It Will Damage The Hardware.
Overclocking the processor is not only for those who use their system heavily, such as gaming, But also for regular users; sometimes, overclocking delays the system upgrade and saves money.
In this article, you will learn how to add 10% or more to the processing power of your device with a few simple steps without spending money.
What is overclocking?
Overclock means increasing the clock speed of one of the hardware components. The manufacturer of the chip considers a specific frequency for its operation. When we overclock it, we want to get a higher clock speed than the manufacturer intended.
Clock speed, measured in Hertz, is the number of cycles your CPU can perform in one second. According to this definition, a 4 GHz processor can perform 4 billion clock cycles per second. Overclocking or OC means increasing the processor’s clock speed beyond its limit.
As the clock speed increases, the number of operations performed per second increases, and system performance improves, But more heat is produced, and the piece temperature increases. For this reason, to prevent damage to the hardware, its temperature should be checked carefully, and better cooling equipment should be used if needed.
Only hardware components with an internal clock to synchronize speed can be overclocked. Overclocking is usually done for the central processor (CPU), graphics processor (GPU), and other components such as RAM. In this article, we will specifically talk about the CPU overclocking method.
Important points before overclocking the CPU
There are essential points that you need to consider at the very beginning. Not all processors are easily overclocked. If you’re using AMD processors, it’s easier, But, for example, Intel is among the companies that rarely allow overclocking to users. However, processors from this company that have an X or K suffix, such as the Intel Core i5-7600K, can be overclocked.
Processors show different behavior toward overclocking.
Another point is that CPUs are electronic parts made of silicon. The ability of processors to tolerate higher speeds is different; Even processors with the same model and specifications can show different tolerances. There is no specific reason for this; For this reason, users refer to it as “Silicon Luck.”
A stable overclocks that balances speed and heat. The faster you make your processor run, the hotter it gets. For the system to perform stably after overclocking, you must keep it cool. If your system overheats, it will automatically shut down before it gets damaged.
The cheap coolers that come with most CPUs may not work for you. Try getting a more powerful fan like the Noctua or using liquid coolers that act like a car radiator.
In this training, the UEFI BIOS software is used, which provides the possibility of applying hardware settings. Still, some motherboard manufacturers provide users with efficient programs to safely overclock the processor.
If you think working with this software is difficult, you can use programs such as Dual Intelligent processors five by Nexus, EasyTune by Gigabyte, or Extreme Tuning by Intel. MSI motherboards even have a separate physical button called OC Genie, by pressing which you can increase the computer’s speed.
Basic steps for overclocking
This article uses the Maximus VIII Hero Alpha motherboard and Intel Core i7-6700K processor. Of course, you should change the mentioned items depending on your hardware; But the general principles remain the same for all devices and processors.
It is better to update the BIOS first.
Before starting, be sure to download and install the latest version of the BIOS software for your motherboard from the manufacturer’s website. This is a crucial step to ensure you’re getting the most recent changes available and that your effort isn’t wasted on fixing issues that have already been set. Turn on your PC and press F2 while booting to access the BIOS and start working.
As shown in the picture, our processor has a minimum processing frequency of 4 GHz. Also, it has a Max Turbo option to increase the speed up to 4.2 GHz if needed. This processor has a temperature of 25 degrees when the system is in regular user mode, and the voltage it receives in normal Mode is 1.264.

Press F7 to go to advanced settings. On the right side of the screen, there are two additional settings; the first is BCLK, which stands for Base Processing Frequency and is currently set to 100 MHz. Below that is the Ratio setting, also called the “coefficient.” The speed of your processor is a simple product of the base processing frequency multiplied by the ratio. In this example, 100 MHz times 40 equals 4000 MHz, 4 GHz.
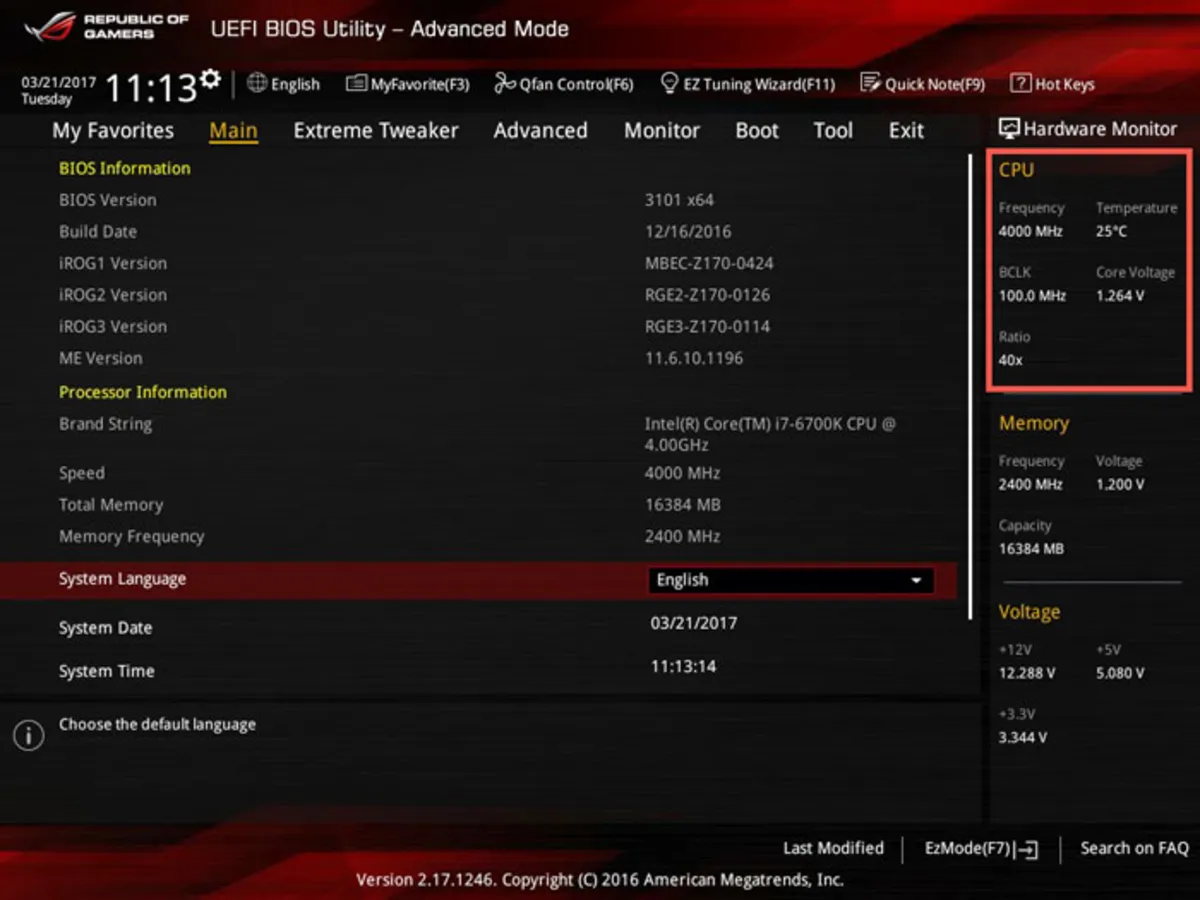
For CPU overclocking, we need to change one of the values related to the CPU, i.e., the base frequency or the multiplier. If we change the multiplier to 42, multiplying it by the base frequency, which is currently 100 MHz, will give us a processing frequency of 4.2 GHz.
Switch to manual settings
Advanced motherboards may be equipped with automatic settings for easy overclocking.
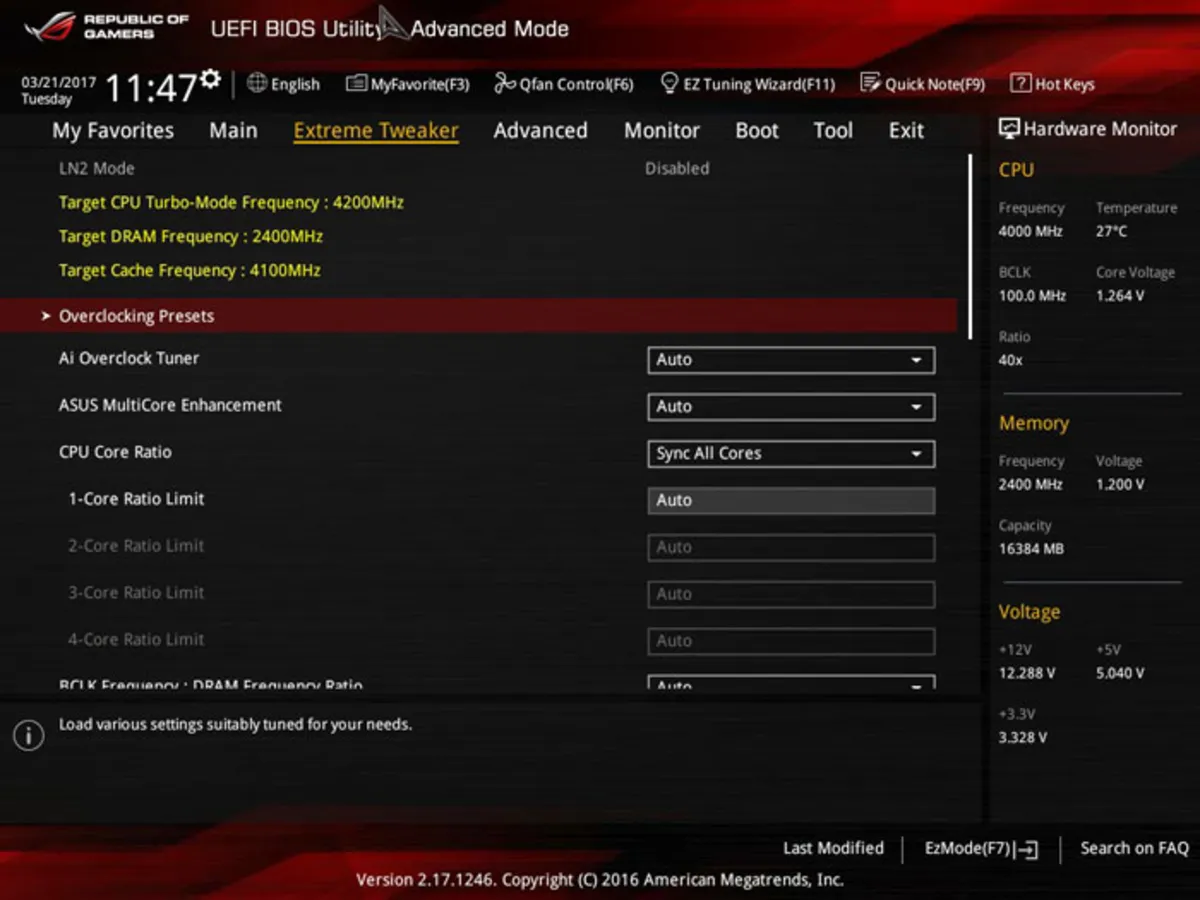
We set the Ai Overclock Tuner option from Auto to Manual in the Asus Extreme Tuner menu. This will allow us to access the fundamental frequency shift.
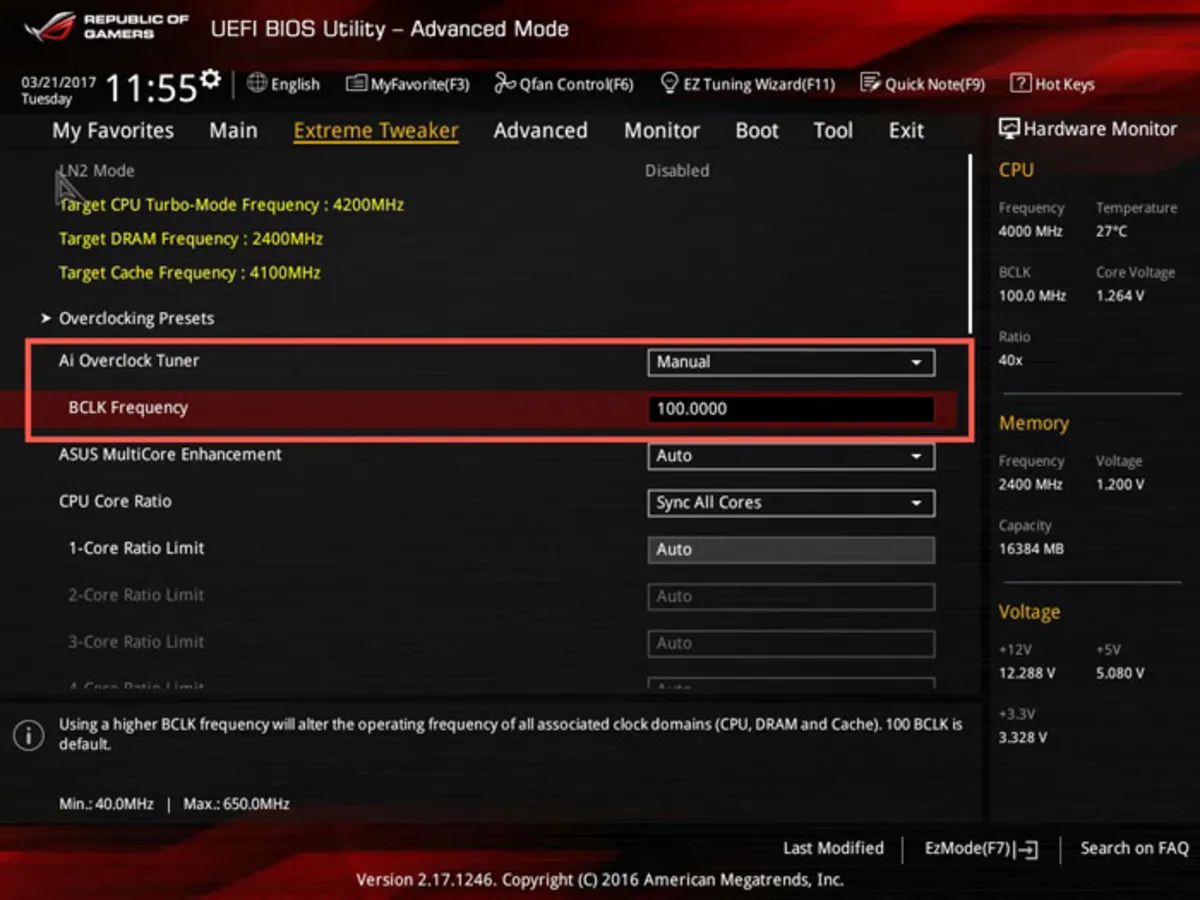
Now you can enter the desired value in the BCLK field, But hold on for now. Below this section, you can see the CPU Core Ratio option, which allows us to set the ratio.
Some motherboards, in addition to general settings, also have the possibility of applying settings to the cores individually; Because overclocking without restraint, if done in general, can make your system unstable. However, if you gradually overclock the seats individually, you will achieve a better balance.
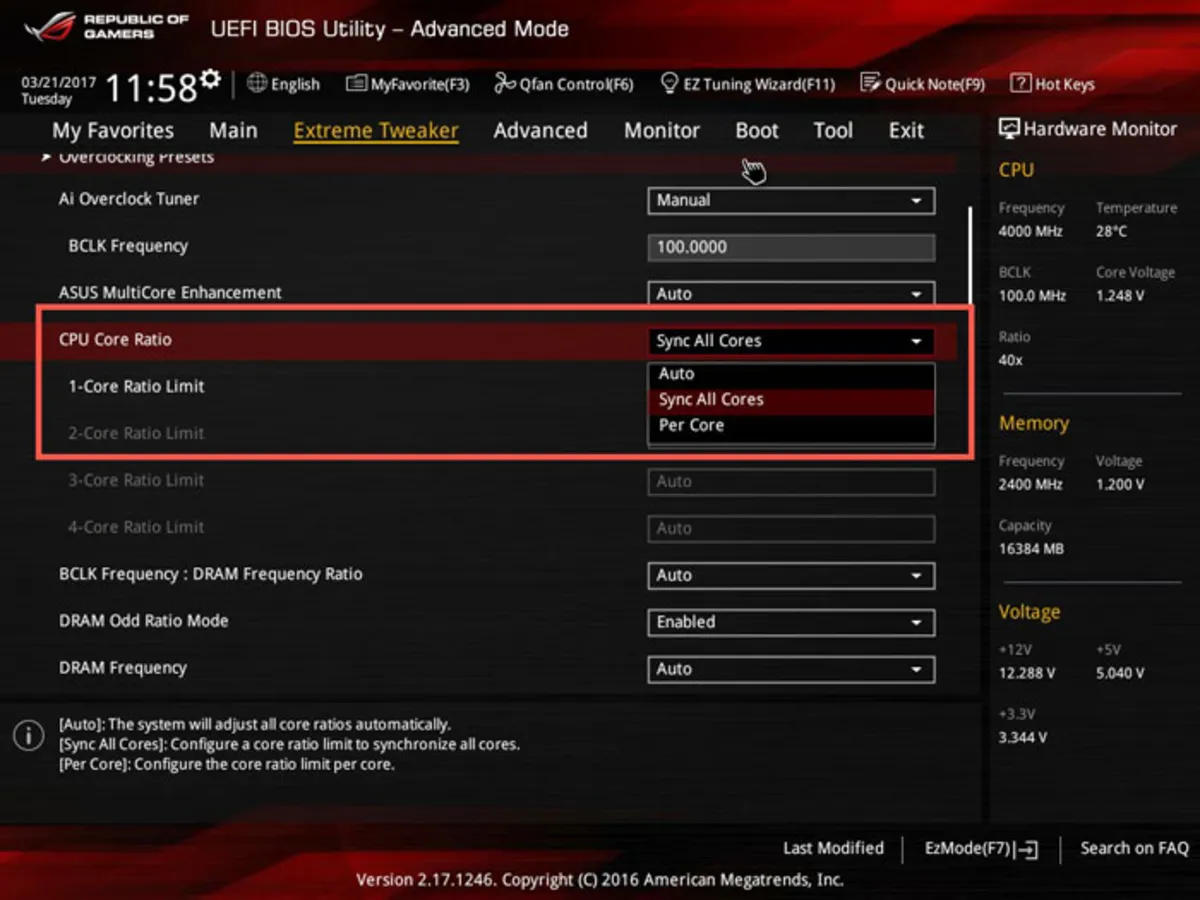
Changing the CPU Core Ratio settings from Auto to any other mode makes the part related to changing the ratio editable. The Sync All Cores option allows applying collective settings of cores, and the Set Per Core option allows using individual cores settings.
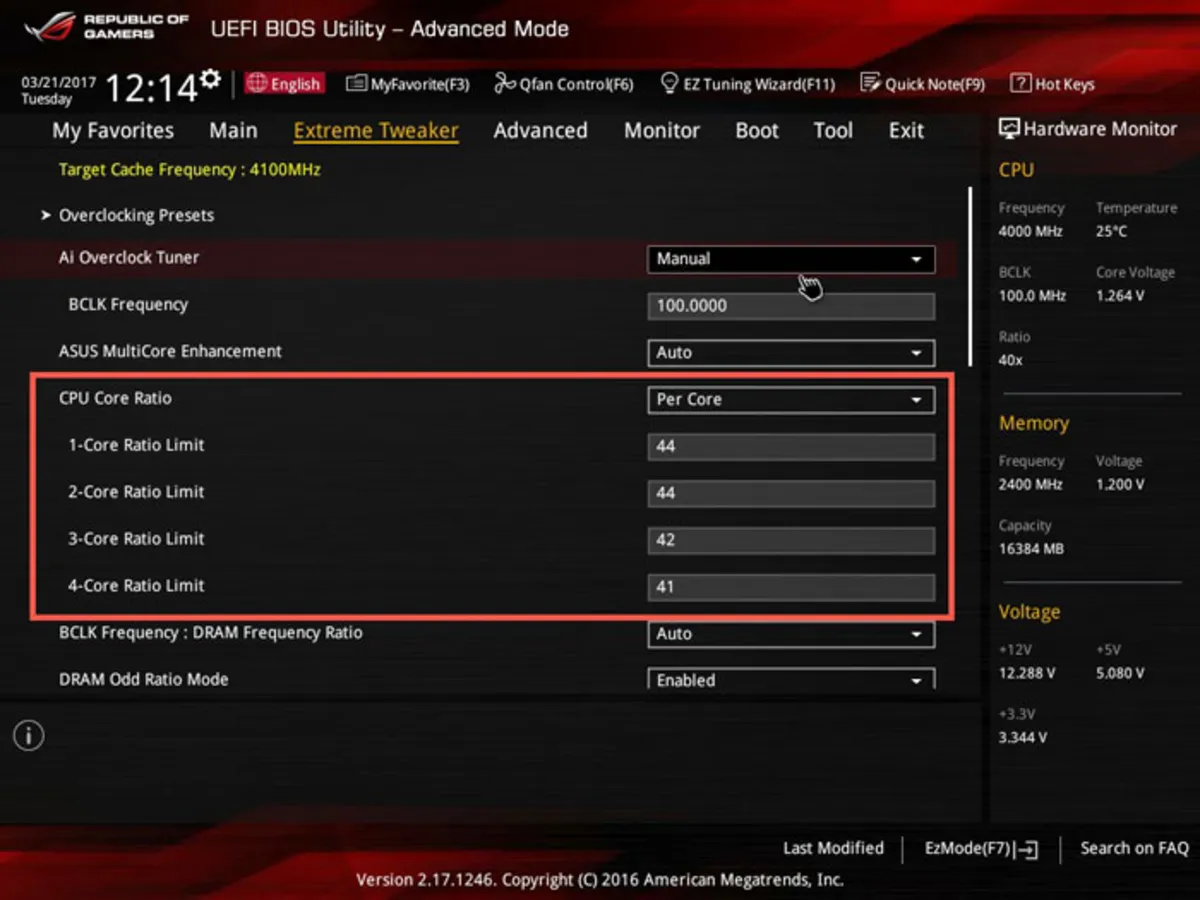
In this tutorial, we apply general settings; But you can set any of the cores to your desired frequency. Before we use a change in the primary processing frequency or coefficient, we must consider another factor called voltage. The voltage delivered to your CPU is constantly changing.
Higher speeds require more voltage for stable operation. Your device’s motherboard manages this without you realizing it, But you can also manipulate and adjust the voltage level received by the CPU based on the overclocking you do.
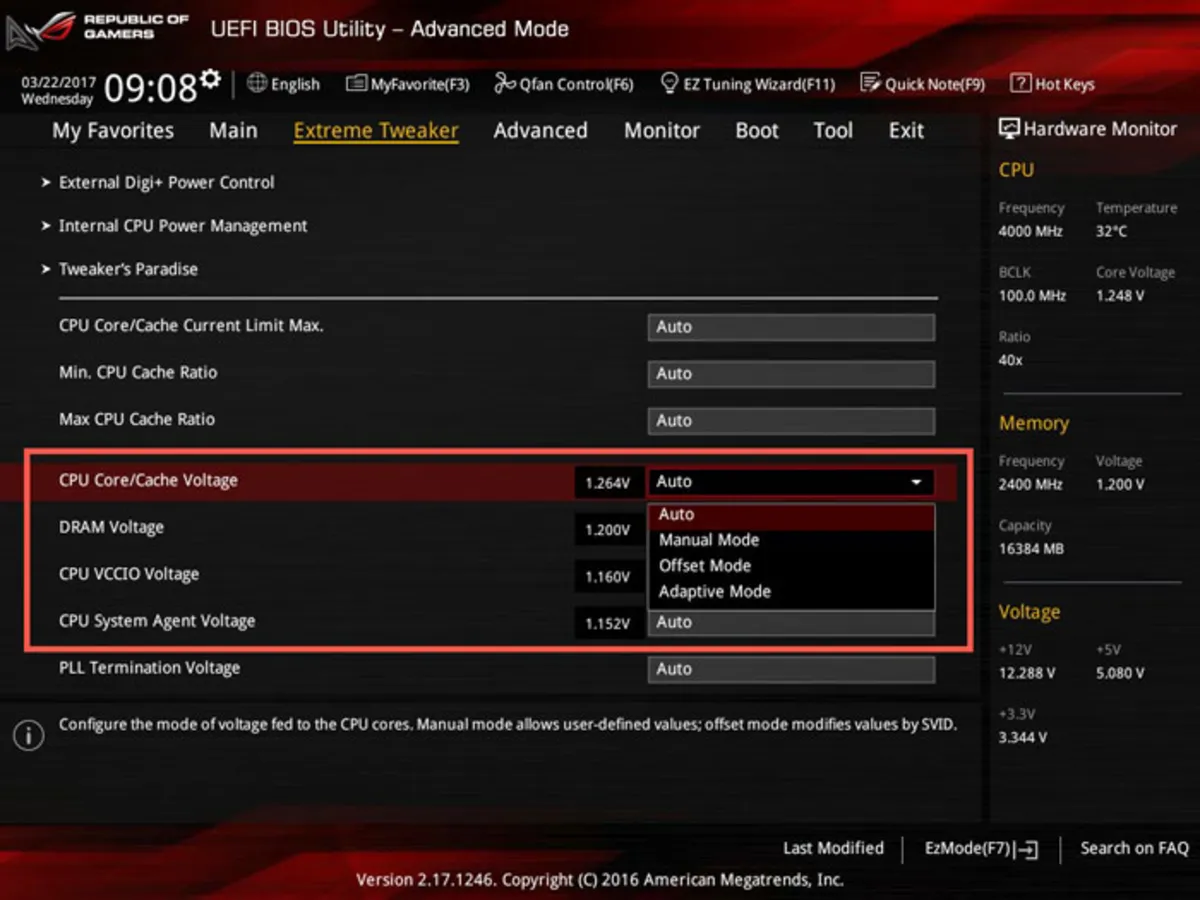
Scroll down and click on CPU Core/Cache Voltage. You will be presented with a menu that offers three alternative settings. Manual Mode assumes a static voltage value for all processing modes. In this case, the processor will receive a constant voltage in standard or heavy consumption mode. If you consider the electricity consumption, this Mode is not economical at all; But it gives you the most control.
In Offset Mode, you can increase the voltage value or decrease the voltage if you intend to underclock.
In this section, any value you enter will be added to the initial value. For example, if you enter a value of 0.1, the processor will receive 1.35 when it was previously receiving 1.25.
In Adaptive Mode, the CPU will receive higher voltage only if it is in Turbo mode. Note that on some motherboards in Adaptive Mode, you can also set an Offset value, in which case the processor receives more voltage without activating Turbo mode.
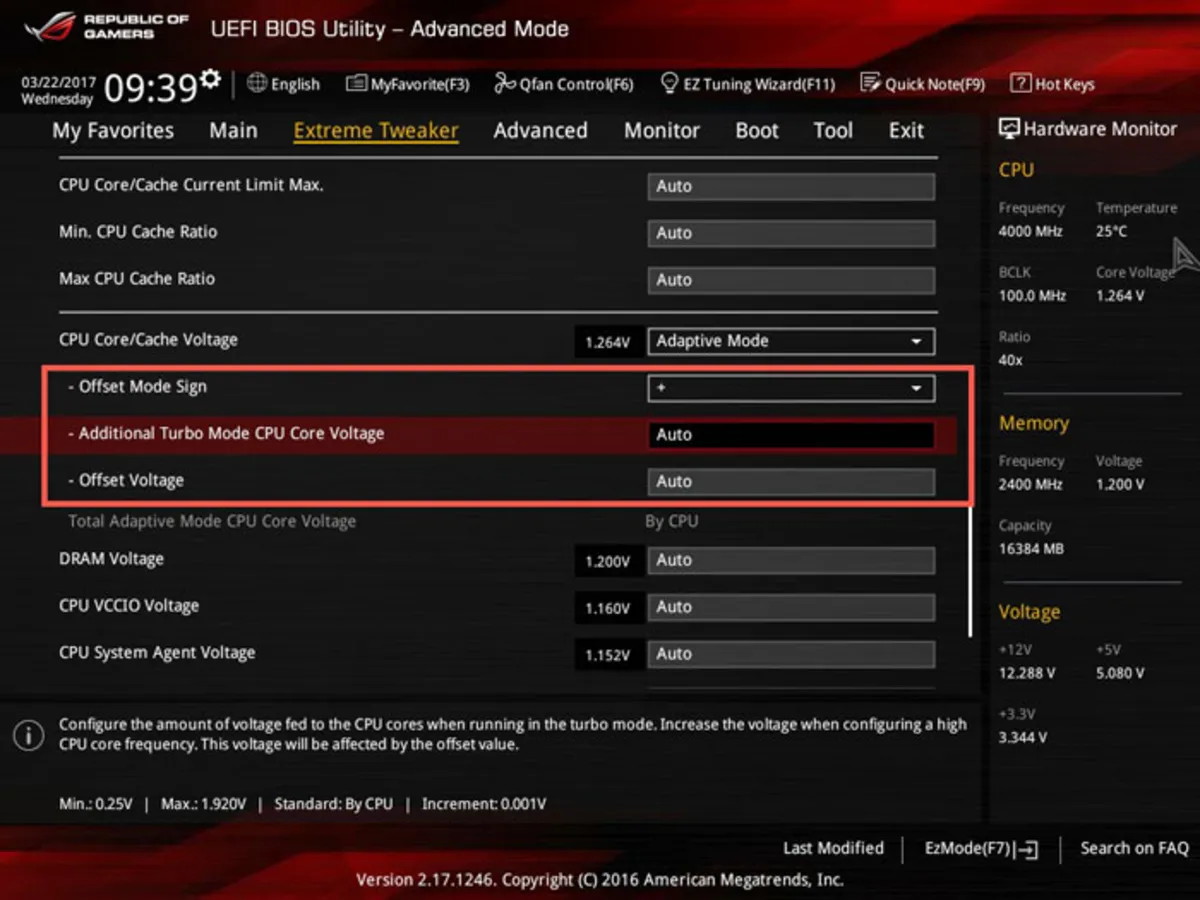
If it’s your first time overclocking and you don’t have much experience in this field, it’s better to let the motherboard manage the voltage automatically; At least until you become more professional. If you experience any instability, increase the values entered in the Adaptive and Offset modes to feed the processor with more voltage.
Do not forget that benchmarking the system in manual Mode puts a lot of pressure on the processor and may damage it. Be sure to follow the instructions on the BIOS settings page of your motherboard. The image above shows instructions at the bottom of the page about the minimum and maximum voltage settings.
Benchmark, then overclock
Now that we’ve discussed overclocking, you probably want to know what settings are correct for your computer. Since each processor has unique characteristics, no standard overclocking settings are guaranteed to work on all computers. So, it’s time to get to business and start trial and error.
The goal of overclocking is to increase performance while maintaining stability.
Let’s review our goal again: we want to have a calm and stable system while achieving the maximum speed of our processor. Such a system is easily powered and powered up and successfully passes the high-pressure benchmark tests. All you have to do is benchmark, overclock, measure again, overclock again, and so on.
If you haven’t overclocked yet, benchmark your system to know the base voltage, heat, and core speed. Then, increase the base frequency or multiplier slightly to achieve a speed increase of 0.2 GHz. Restart the computer and rerun the benchmark to see if the performance is stable. If stable, go back and test the frequency further and again. If not regular, either lower the frequency, increase the voltage, and try again.
Geekbench is the best option for benchmarking.
There are many programs for benchmarking CPUs. Geekbench is a popular option. PCMark and Cinebench are also popular among users. Most of this software is paid, But they offer a free trial. The overclocking process may be complex, But this safe method will help you properly understand your processor’s capabilities.
We use Geekbench 4. Along with Geekbench, we use the CPU-Z program to check speeds and voltages. To control the temperature, we also use the CAM program owned by NZXT. You can use the SpeedFan program or any program with your motherboard.
Below you can see an image of CPU-Z program information before overclocking. The graphs are fixed in the photo, but they constantly change depending on the incoming processing load. Pay attention to the Core Voltage and Clocks sections. In the Clocks section, the overall speed of your system processor is displayed along with the coefficient. Regarding heat, our device shows a temperature of 32 degrees Celsius in everyday use.
Open Geekbench 4 or whatever program you have chosen and run the CPU benchmark. For more accurate results, do not operate the system while benchmarking; But keep an eye on the CPU-Z program and temperature control to check the changes in speed, voltage, and temperature.
You can view the results in your web browser when the benchmark is complete.
Geekbench calculates separate scores for single-core and multi-core performance, which you should consider for further adjustments. The temperature of our system increased to 54 degrees during benchmarking.
Reboot the system and go to UEFI BIOS. Since our processor runs at 4.2 GHz in turbo mode, we enter a factor of 44 to increase the processor speed to 4.4 GHz. At this point, we don’t touch the voltage; But if instability appears, we can also go to the voltage.
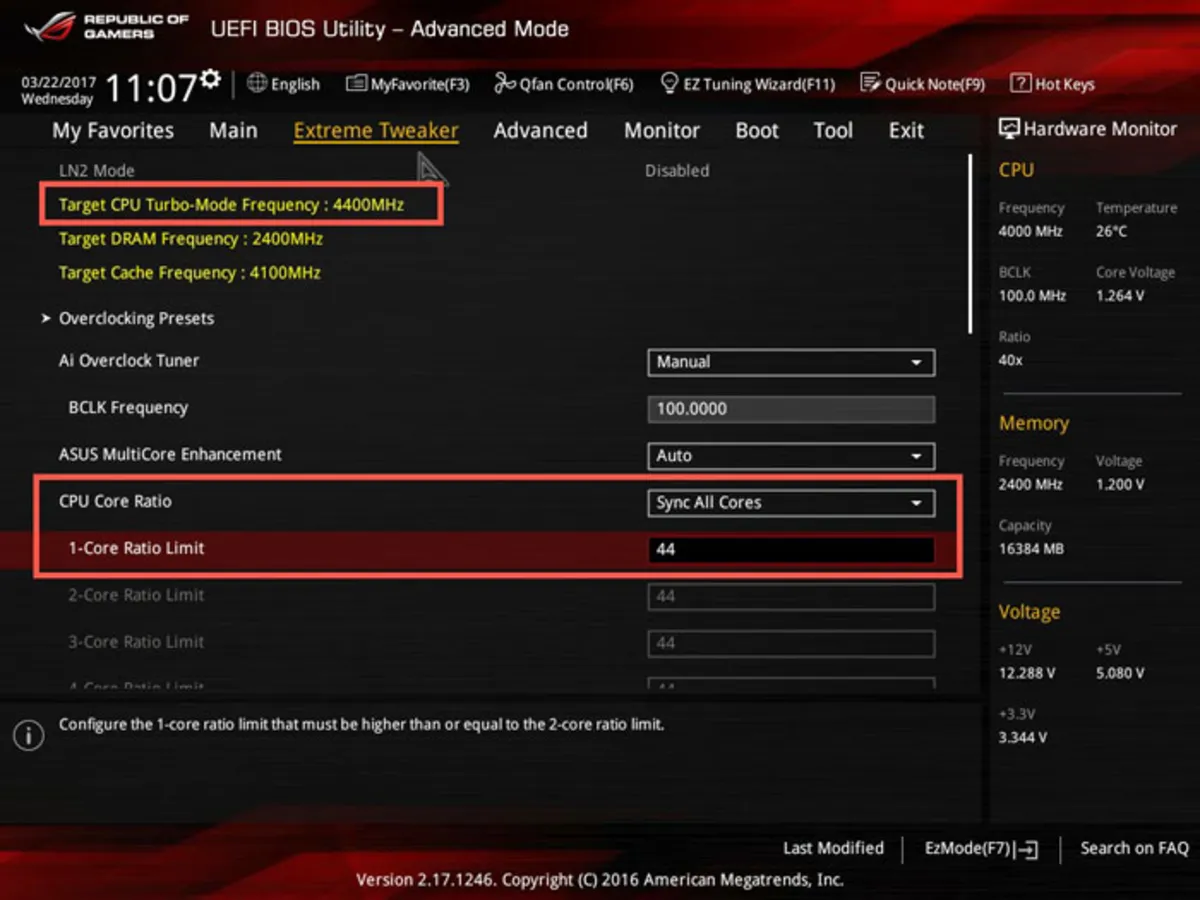
Reboot the system and recheck the core speed and voltage. As you can see, by applying the new settings, the rate of our processor has increased to 4.4 GHz, and the voltage has increased to 1.44 V.
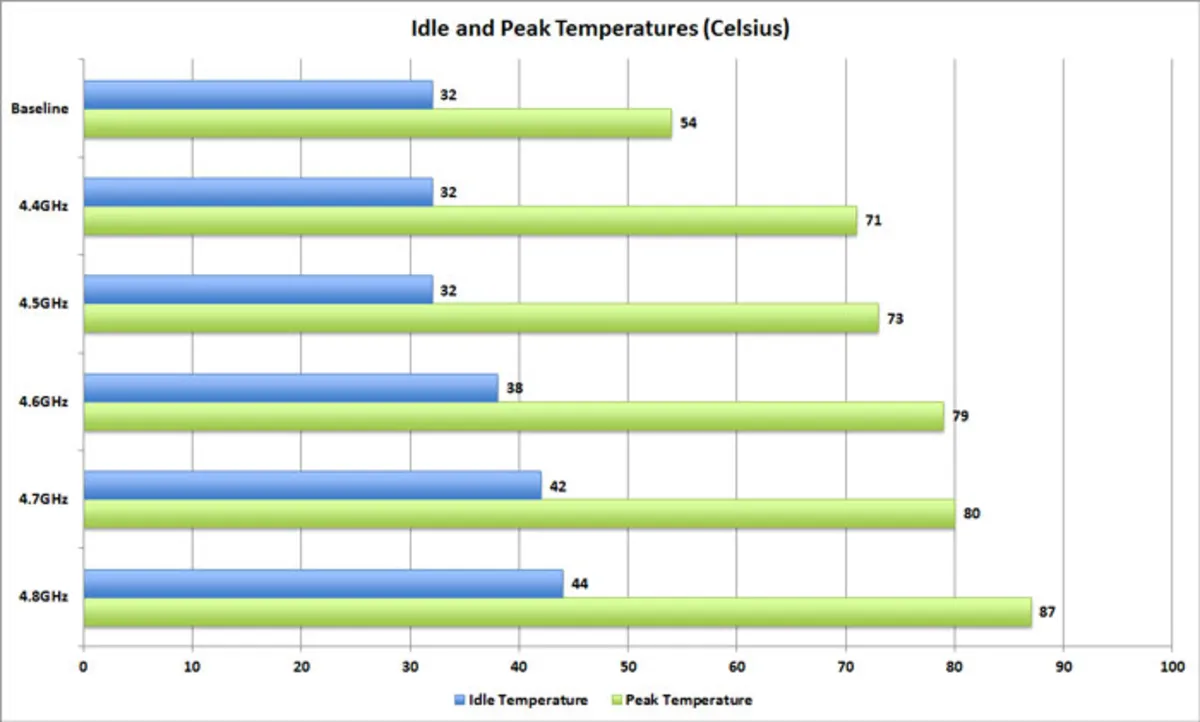
For safe overclocking, the CPU temperature should not exceed 70 degrees. Increasing the temperature to 80 degrees or more puts your hardware at risk, But just for curiosity’s sake, we continued the above process and quickly added another 0.1 GHz each time.
Repeat the benchmark test to see how the CPU performs under pressure with the new settings. This time you can see that the temperature of our processor increased to 71 degrees Celsius. As a result, fans and coolers made more noise; But the performance of the system remained stable.
Faster performance is not better performance.
The system hangs at 4.9 GHz when running Windows. At this speed, the maximum temperature reached 87 degrees Celsius, which is dangerous. We may decide to slow down a bit to create a margin of safety; However, the obtained results showed us the processor’s capacity. We managed to keep overclocking up to 4.8GHz without the PC performance becoming unstable.
The final point is that faster processor speed does not always guarantee better system performance. The extra heat from overclocking can sometimes cause the CPU to automatically slow down to control the temperature and reduce system performance. To prove this claim, you can look at our benchmarks:
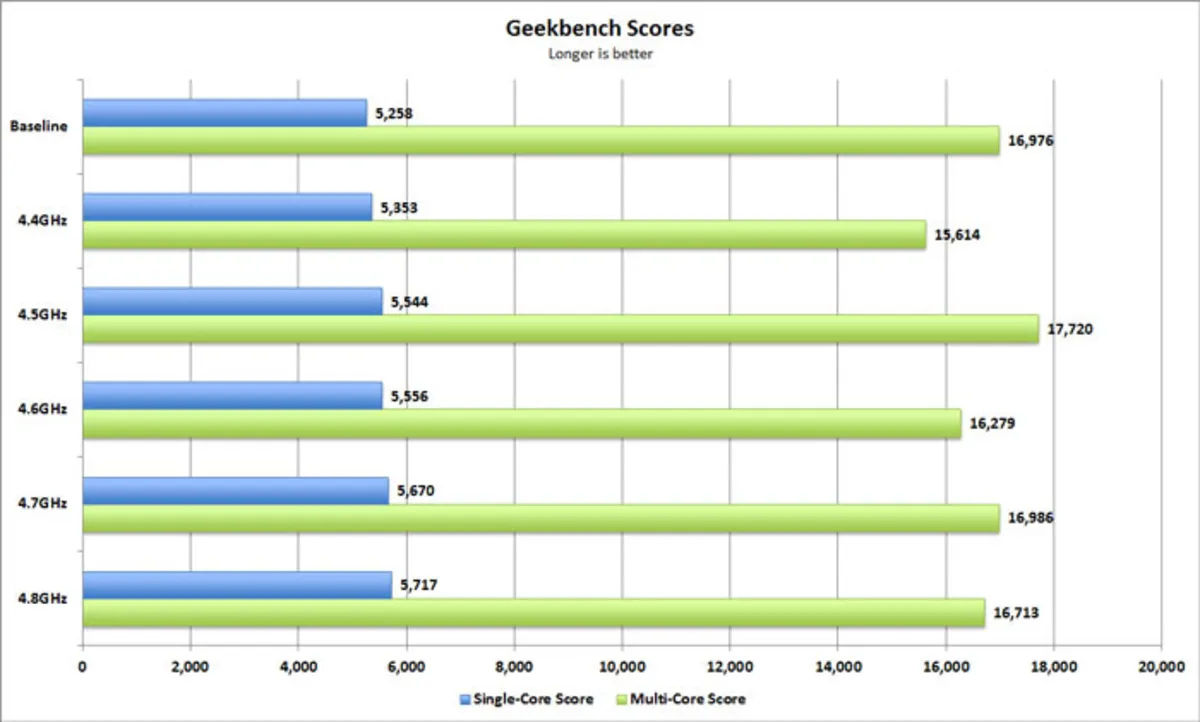
As you can see, the single-core performance benchmark score has increased monotonically as the maximum processor speed has increased. However, the benchmark multi-core performance shows erratic statistics; it reached 4.5 GHz and then stayed the same while the top rate and heat increased.
There is a sweet spot that you have to find; A point where there is a balance between speed and heat and performance. To reach this point, you need to increase the pace at each step, take a benchmark, and apply a little rate increase again.
Do not forget that the results will differ for different systems due to the silicon chance phenomenon we said at the beginning.
Now that you’ve learned the basics take your time and find that sweet spot for your system. 10-15% performance improvement without additional cost will result.
In this section, all Intel CPUs, including Core i3, Core i5, Core i7 series, and AMD Ryzen central processors, are available for comparison and purchase. See the full technical specifications and price of the processor in online stores and a complete comparison of CPU types in the products section. Please share your opinions and experiences in this field with me.