


What is a sitemap ?and How to Create a Site Map?
What is a sitemap ? and How to Create a Site Map?
A sitemap is a file in XML format that helps search engines to index your content. How to Create A sitemap is one of the necessary items for technical SEO, which we have discussed if you have read our article on what SEO is.
A sitemap is a site map that helps search engines identify and index your site pages.
You can greatly improve your site’s SEO if you create your Sitemap and introduce it to Google.
If you don’t know how to create a sitemap, don’t worry; we will teach you how to create a sitemap both on WordPress sites and on sites created with PHP and ASP languages. Be with us.
What is a sitemap?
We said that the Sitemap is an XML file that introduces your pages to search engines like Google. Search engines index your pages by crawling them. The purpose of indexing is to identify your page and show it in their search results.
The importance of the Sitemap increases when your site has many pages; In this case, the possibility that Google’s crawlers will place a page is high, and indexing your site’s pages may take a long time. Still, if you use a sitemap, you can index your site’s pages. Accelerate through search engines.
Why is a sitemap important for your site?
Google search engine uses Sitemap to find pages of your site. You may say that if the site’s pages are linked correctly, there is no need for a sitemap. But creating a sitemap has a positive effect on your site’s SEO, and in some cases, it is necessary to use a sitemap. For example, if your site is newly launched and has few backlinks, Google can find your pages and crawl them with the help of Sitemap.
Or you may have a site with a large number of pages. If you don’t do internal linking well and have a lot of backlinks, Google can hardly find your site’s pages. This is where the Sitemap comes to your aid.
We say we don’t use ready-made packages and plugins; You ask why?!
Whether you use ready-made frameworks such as Laravel or Symphony or content management systems such as WordPress, in any case, some packages and plugins will automatically do this for you, but t. Still, if you want to use packages for small facilities such as Sitemap, etc., the speed of your site will be greatly reduced, and p. Professionalmmers do not evaluate packages with standard features as desirable.
For static sites, creating a sitemap is a simple task, and it is enough to create a file called sitemap.xml in the ROOT path of their site and put the codes in it, and then based on the construction data, Change their content by themselves, from the address of the pages and the update time.
Types of sitemaps
Sitemap has a general function, but it is not the only type! The site map is in two types, HTML and XML, which we want to introduce in this section.
HTML Sitemaps
This type of Sitemap should be considered a traditional form of Sitemap designed on a separate page, and users can use it to visit websites.
HTML Sitemaps do not have a complex structure, and you can easily create them. Of course, in creating HTML Sitemaps, there is a point that you should keep in mind when using the Sitemap, and t: aftertaste a page or delete a page, you also update the map. Do. If your site does not support the creation of dynamic maps, then you need to apply the settings manually.
XML sitemaps
We should mention XML sitemaps if we want to introduce the opposite point of HTML sitemaps. The advantage of this type of Sitemap is that most search engines use it to process search engines. It is better to use XML format if you want to provide your Sitemap to search engines because most search engines can understand this language to read your Sitemap.
Create a sitemap for WordPress
There are different methods for creating a sitemap, which we will mention here. Remember that the methods we describe here to create a sitemap are suitable for WordPress, and if your site is written in PHP or ASP.NET, you should ask your site developer to create the Sitemap. .
Cre. an XML sitemap using the Yost plugin
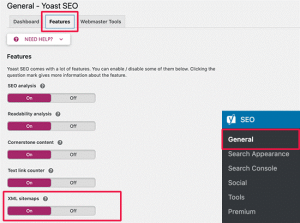
One of the easiest ways to create a sitemap is to use a sitemap plugin. In this method, you must first install the Yoast plugin on your site, and after activating it on your site, go to the General – Yoast SEO page and click on the Features option, and among the options, select the XML sitemap. Leave it on, and finally, click on the save change option.
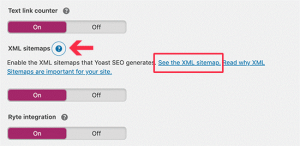
Finally, to confirm whether Yost has created a sitemap based on the image below, click on the question mark icon and the blue link, and view the created Sitemap.
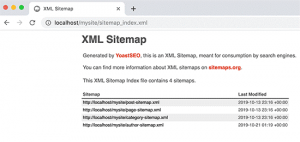
How to view Sitemap?
Viewing the Sitemap is not difficult. To work, add sitemap_index.xml to your site’s domain and view it. For example:
Enter https://www.example.com/sitemap_index.xml and view it.
The advantage of the Yoast plugin is that it creates different maps for different types of content by default. For example, blogs, author pages, and categories are among the things Yost creates when creating a sitemap. If you have a store site and create it with the help of WooCommerce, a map of your store products will be created.
Creating a sitemap using the Google XML Sitemaps plugin
If you don’t use the Yoast plugin, this method is more suitable for you. In this method, you need to download the Google XML Sitemaps plugin (you can do this from the WordPress repository). After you activate this plugin, your Sitemap will be created automatically, which can be accessed through the following address. You can see it.
https://www.example.com/sitemap_index.xml
The point that we should mention is that this plugin is mostly used for blogs and sites that are stores; If you use it, you can check the plugin settings to make sure that all your important pages are included. Of course, you can do the configuration from the address below.
Settings » XML-Sitemap
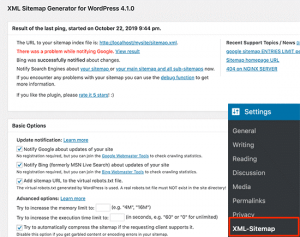
As you can see, this plugin provides you with a series of information related to the status of your site. You will be notified if the XML-Sitemap plugin fails to notify search engines that new content has been added and indexed.
There is a section called basic options where you can activate the tick of search engines such as Google and Bing to notify your site of updates.
In the next part, you can activate the Add sitemap URL to the virtual robots.txt file option to put the Sitemap URL by WordPress in the robots.txt file.
There is the Try to increase the memory limit option, which is to specify the size of the file, and you can avoid the large size of the sitemap. We recommend that you do not enter anything in this field.
There is also the Try to increase the execution time limit to option, which is the maximum time the sitemap file can be loaded (this number is calculated in seconds).
Another option is to Try to automatically compress the Sitemap if the requesting client supports it, which greatly compresses the Sitemap to reduce the occupied space. If you encounter an error, uncheck this section.
If you enable the Allow anonymous statistics option, you can send statistics to the developer to improve and develop the plugin. This option is optional, and you can disable it.
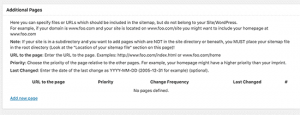
In the next step, you will be shown more details through which you can manually add pages to your Sitemap. Of course, the most use of this section is when you want to add HTML pages to your Sitemap apart from WordPress.
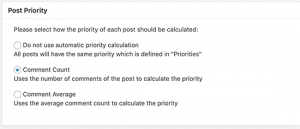
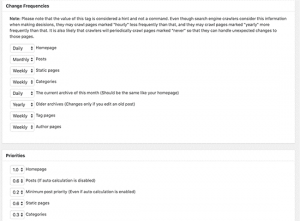
After that, you can determine how the plugin prioritizes the posts. Of course, this plugin uses the number of comments to prioritize posts by default.
In the Post priority section, selecting the Do not use automatic priority calculation option is better.
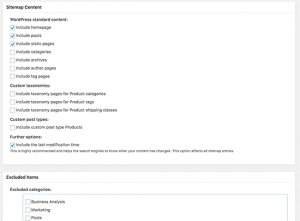
The next section that opens allows you to remove content from your Sitemap. Suppose you have a store site. You can activate the include categories option and add product categories to your Sitemap. Of course, there are also Excluded items that enable you to remove categories from the map. In general, this work can greatly impact the SEO of your store site.
After this, you can set the frequency and priority of your sitemap content. If you change these values, search engines will take it as a hint that they can follow or ignore based on their criteria.
After you apply the changes, you can click on Update Options.
How to introduce our Sitemap to Google?
Search engines can easily find the sitemap. Whenever you publish new content on the site, a ping is sent to the search engines so that the search engines are informed of the changes in the sitemap.
We recommend that you enter your Sitemap manually to ensure that search engines can find it.
Register the Sitemap in the search console
You probably have a question, what is Google Search Console? Google Search Console is one of Google’s free tools that it has provided so that site owners can improve or maintain the position of their pages. When you register your Sitemap in the search console, you help Google to index your content faster.
So it is better first to connect your site to the search console and, after activating it, select the Sitemap option from the INDEX section (you can find these options on the left side of the page).
After that, you have to enter the address of your Sitemap in the box we specified and select the SUBMIT option.
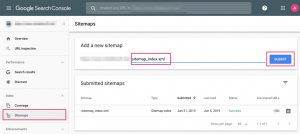
After this step, your Sitemap will be added to the search console, and you can see the details below.
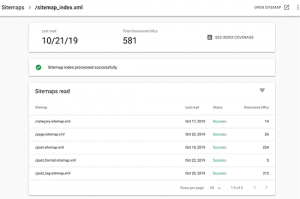
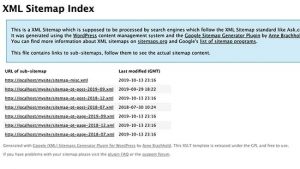
Sitemap index file
When the number of pages of a site is large and covers many topics, the map index file is very useful. When we talk about many pages, we mean a site with 5000 pages and a map size of over 100 maps. In this case, you will need your sitemap index file. In short, the file related to each Sitemap should be listed in the index file and then used.
Conclusion
In this article, we talked about the Sitemap and described the methods of creating a sitemap. Don’t forget that you need to create a sitemap if you want your site to get good rankings in search results. A sitemap is a part of technical SEO, and technical SEO is also a part of white hat SEO methods.
For example, site speed is one of the things that is important in technical SEO; This means that the faster your site is, the better your site’s SEO will be. One of the ways you can increase the speed of your site is to use a virtual server or a dedicated server, which you can choose depending on your needs and the input and traffic of your site. To get a VPS and a dedicated server, you can visit our site’s virtual server purchase and dedicated server purchase page.