Training to install Joomla 3.4.5 using LAMP on RHEL, CentOS and Fedora
In this article, we are with you, dear users, with a step-by-step comprehensive tutorial on installing the content management system (CRM: Content Management System) Joomla on the Linux operating system. There are many ways to install Joomla on the Internet, but we intend to teach you a method that can be used by new users. In this tutorial, we are going to install and configure the Joomla site builder on the Linux platform. Installation steps can be done on Fedora, CentOS and RHEL (Red Hat Enterprise Linux) Linux operating systems. We will install Joomla content management system using LAMP method and using Linux operating system, Apache web server, MySQL database and PHP programming language. Stay with us.
First, we want to know briefly what is Joomla?
Joomla is an open source content management system that is very popular among other website builders. This content management system allows users to build and design dynamic websites and manage web applications. Through Joomla, you can manage your website content, such as videos, images, and articles, and publish them on the web.
Joomla content management system is placed on the web for free and you can download and use it from different sites. Joomla supports all kinds of plugins and templates, and you can use this system to design and launch your site as desired without having specialized knowledge about site design and web programming.
Prerequisites for installing Joomla:
- Apache web server
- PHP programming language
- MySQL database
What is LAMP (Linux, Apache, MySQL, PHP)?
LAMP is an open source web development software package in which Linux is used as an operating system, Apache as a web server, MySQL as a relational database management system, and PHP as an object-oriented programming language. be
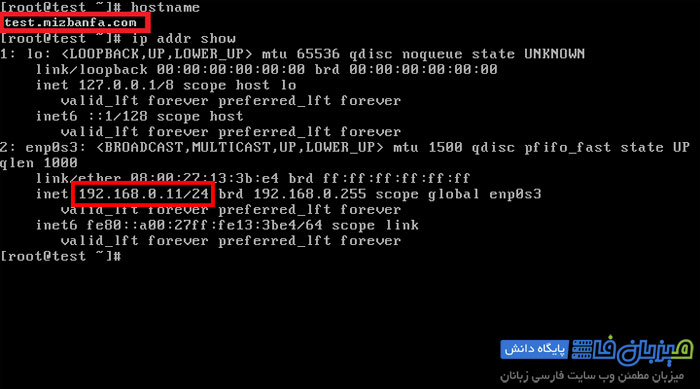
In this tutorial, we will use test.mizbanfa.com and ip address 192.168.0.11 as an example for hostname. Be careful, this information is for example and you should use the correct information according to your system.
In this tutorial, all steps will be executed with root access. Therefore, make sure you are logged in with root access.
hostname #
ip addr show #
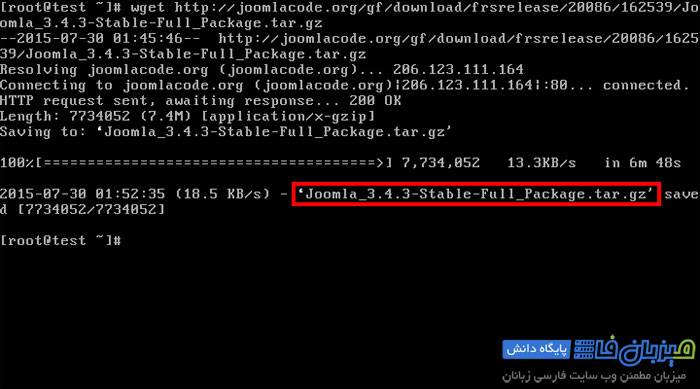
First step: Download Joomla 3.4.3
In this step, we will use a method to install Joomla that will help you install the latest version of Joomla 3.4.3 using LAMP on RHEL, CentOS and Fedora.
wget http://joomlacode.org/gf/download/frsrelease/20086/162539/Joomla_3.4.3-Stable-Full_Package.tar.gz #
You can download the latest version of Joomla in tar format using the “wget” command.
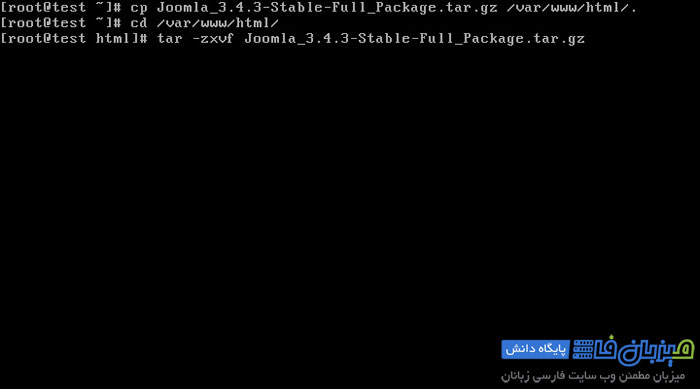
Copy and extract the downloaded installation package to the Apache Root path (for example /var/www/html/) using the following command.
cp Joomla_3.4.3-Stable-Full_Package.tar.gz /var/www/html/.
cd /var/www/html
tar -zxvf Joomla_3.4.3-Stable-Full_Package.tar.gz
Note: If you extract the files in a sub-path such as the joomla folder, your site will also be visible in YourSite.com/joomla path.
Second step: Change Ownership or ownership of the directory
Now you have to delete the main file and set the Ownership of the directory with the apache user and user group.
rm -rf Joomla_3.4.3-Stable-Full_Package.tar.gz
chown -R apache:apache /var/www/html/
ls -l
total 13808
drwxr-xr-x. 10 apache apache    4096 Jul  2 10:34 administrator
drwxr-xr-x.  2 apache apache      42 Jul  2 10:34 bin
drwxr-xr-x.  2 apache apache      23 Jul  2 10:34 cache
drwxr-xr-x.  2 apache apache    4096 Jul  2 10:34 cli
drwxr-xr-x. 16 apache apache    4096 Jul  2 10:34 components
-rw-r--r--.  1 apache apache    2915 Jul  2 10:34 htaccess.txt
drwxr-xr-x.  5 apache apache    4096 Jul  2 10:34 images
drwxr-xr-x.  2 apache apache      61 Jul  2 10:34 includes
-rw-r--r--.  1 apache apache    1212 Jul  2 10:34 index.php
drwxr-xr-x. 12 apache apache    4096 Jul  2 10:34 installation
-rw-r--r--.  1 apache apache    1869 Jul  2 10:35 joomla.xml
drwxr-xr-x.  4 apache apache      51 Jul  2 10:34 language
-rw-r--r--.  1 apache apache 6307937 May  6 21:45 latest.tar.gz
drwxr-xr-x.  5 apache apache      66 Jul  2 10:34 layouts
drwxr-xr-x. 11 apache apache    4096 Jul  2 10:34 libraries
-rw-r--r--.  1 apache apache   18092 Jul  2 10:34 LICENSE.txt
drwxr-xr-x.  2 apache apache      23 Jul  2 10:34 logs
drwxr-xr-x. 18 apache apache    4096 Jul  2 10:34 media
drwxr-xr-x. 27 apache apache    4096 Jul  2 10:34 modules
drwxr-xr-x. 14 apache apache    4096 Jul  2 10:34 plugins
-rw-r--r--.  1 apache apache    4213 Jul  2 10:34 README.txt
-rw-r--r--.  1 apache apache     842 Jul  2 10:34 robots.txt.dist
drwxr-xr-x.  5 apache apache      64 Jul  2 10:34 templates
drwxr-xr-x.  2 apache apache      23 Jul  2 10:34 tmp
-rw-r--r--.  1 apache apache    1690 Jul  2 10:34 web.config.txt
Third step: Apache server configuration
At this stage, it is necessary to open the Apache configuration file in the VI editor or the editor of your choice.
vi /etc/httpd/conf/httpd.conf
Change and run the following commands according to the system you are using.
ServerAdmin  admin@mizbanfa.com
ServerName test.mizbanfa.com:80
Note: The user and user group must be apache.
Step 4: Restart the Apache httpd service
At this stage, you must restart the Apache web service.
systemctl restart httpd.service
service httpd restart
In order for the httpd service to be included in the system startup, use the following command
systemctl enable httpd.service
chkconfig --level 35 httpd on
Now check httpd service and requests on port 80.
[ root@mizbanfa  ~]# netstat -antp | grep httpd
tcp     0      0 :::80            :::*          LISTEN 1705/httpd
Step 5: Configure Iptables or firewall
At this point, you need to open port 80 on the firewall, otherwise disable Iptables.
---------------- On CentOS/RHEL 7 and Fedora 20 Onwards ----------------
firewall-cmd --zone=public --add-port=80/tcp --permanent
firewall-cmd --reload

 ---------------- On CentOS/RHEL 6 and Fedora 12-19 ----------------
# iptables -A INPUT -p tcp --dport 80 -j ACCEPT
# service iptables save
# service iptables restart
Step 6: Create the Joomla database
If you have not set the root password of the MySQL service, you can define the desired password using the following commands. If you have already defined the password, skip this step.
mysqladmin -u root password 'redhat'
Login to the MySQL service with root access.
mysql -u root -p
Then create a database named Joomla.
mysql> create database joomla;
Set Joomla database user permissions in MySQL.
mysql> grant all on joomla.* to  joomla@ 'localhost' identified by 'redhat';
Query OK, 0 rows affected (0.01 sec)
mysql> flush privileges;
Query OK, 0 rows affected (0.00 sec)
Now you have to restart the MySQL service in the system startup.
---------------- On CentOS/RHEL 6 and Fedora 12-19 ----------------
systemctl restart mariadb.service
systemctl enable mariadb.service

 ---------------- On CentOS/RHEL 6 and Fedora 12-19 ----------------
service mysqld restart
chkconfig --level 35 mysqld on
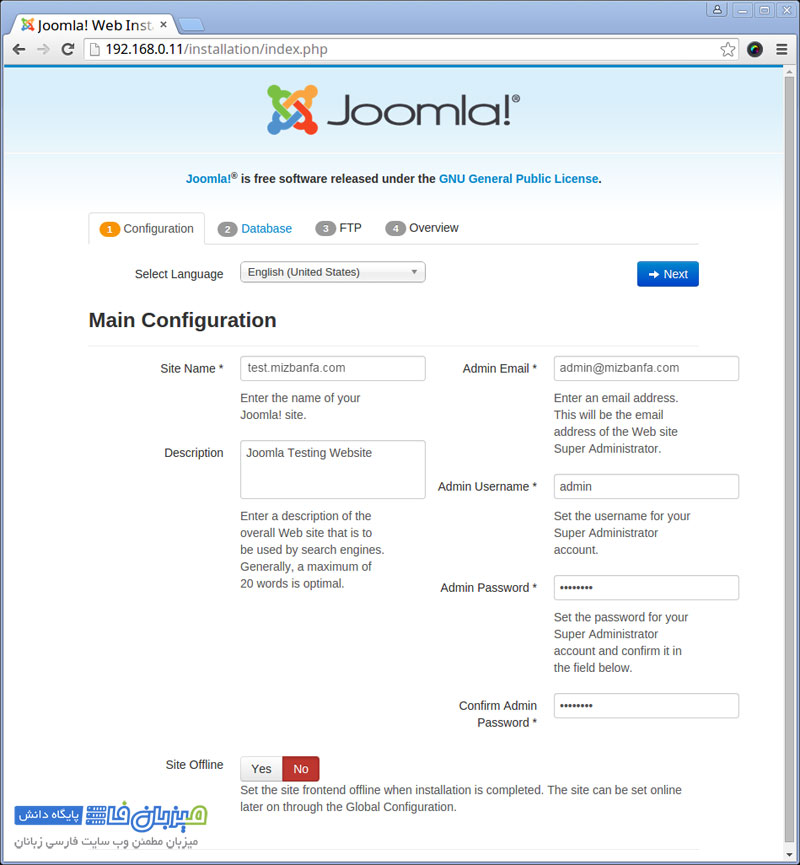
Step 7: Installing and configuring Joomla
In this step, we want to start the process of installing and configuring Joomla. Now open your browser and type the address http://192.168.0.11 and press the enter key to enter the Joomla installation page as shown in the image below.