


Training on installing plugins in WordPress
Installing a plugin in WordPress is considered one of the first steps in setting up and building a site; after purchasing a host, Iran hosts FaOr uninstall and install WordPress, in the next step is time to use WordPress plugins and plugins to make your site more professional by using millions of WordPress plugins, each of which is designed with a specific purpose and features and registered in the WordPress repository. And add more features to it. The WordPress plugin will allow us to use features not present in our site’s shell, and their coding has not been done to implement on the site.
The WordPress plugin includes various items, each of which has its use, and for one task, you can test several plugins and see which one provides you with more features and capabilities to use. In this article, I will use the Fa host knowledge base to teach WordPress plugin management and installation. Using this tutorial, you will learn all the steps you need to install and use WordPress plugins and use them. We will also review how to prepare a plugin from GitHub, similar to what we saw in the WordPress theme installation and management tutorial.
Training on installing plugins and working with plugins.’
plugins path. You will see a list of plugins available on your site by referring to this page.
There are two ways to install a WordPress plugin. You can use these two ways to install and activate any plugin with any function on your site, including establishing the plugin from the WordPress repository, which is done by the WordPress counter, and the second way is to install a custom plugin. You can install and activate the plugin by uploading the plugin through the WordPress counter or the host.
- Please search for the plugin in the environment and install it
- Download the plugin and install it (through the counter, host, and GitHub)
1- How to install the plugin from the repository
To install a WordPress plugin downloaded from the WordPress repository, a custom plugin you coded and designed yourself or purchased from an authorized WordPress plugin store, you must proceed by uploading the plugin.
If you are facing a connection problem installing the plugin directly through the WordPress repository or have prepared a commercial plugin, proceed with the following method to establish and launch the desired plugin.
Sometimes you may have purchased or downloaded the plugin; if you plan to upload the plugin through the WordPress counter, follow the steps below:
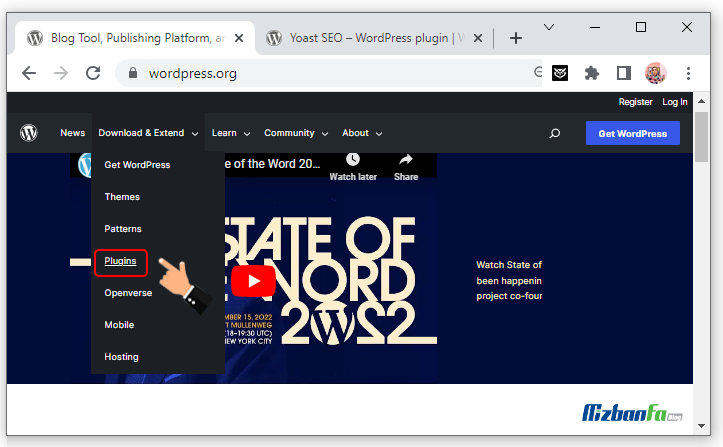
- First, download the desired plugin from the WordPress repository at wordpress.org and then go to the Download & Extend menu under the Plugins menu or from the desired address.
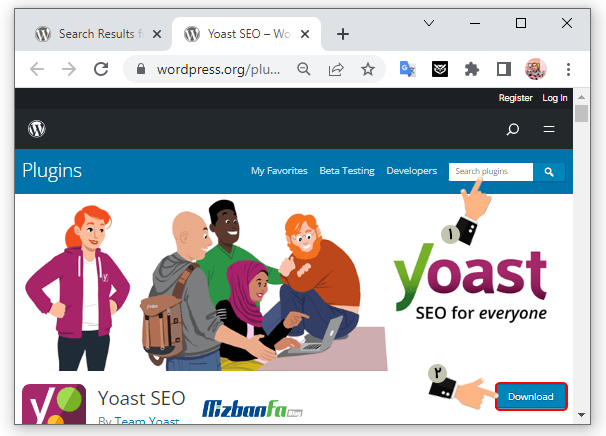
- For this purpose, you can search for the desired extension name, download it, and save it on your system.
 In the WordPress dashboard, go to Plugins > Add and then click on the plugin upload button, as shown in the image below, so that the contents of the file upload section will be displayed to you.
- Then select the plugin you bought or downloaded from your system and finally upload it by clicking the Install Now button.
- After you click on the Install Now button, wait until the installation is done, depending on the add-on size, and you will be directed to the next page you see in the image below.
- On this page, as you can see in the picture, the details of the plugin installation will be shown to you. If the plugin installation is successful, you will be shown the button to activate the plugin, and you can finally start the installed plugin on the site by clicking this button. Do.
Or, click the Return to Plugins Installer text to return to the Plugins page in the WordPress dashboard.
2- Installing the plugin directly from the counter
To date, the WordPress repository has registered more than 50,000 WordPress plugins, and you can install and activate any of the WordPress plugins on your site to use the features these plugins provide. Follow the steps below to install the plugin from the WordPress repository:
- First, log in to the dashboard with the help of the tutorial on entering the WordPress administration and entering the username and password.
- Go to the “Plugins” path in the WordPress dashboard and then click the Add button, or go directly to the “Plugins > Add” way to be directed to the Add Plugin page.
- You will see a list of popular plugins you can use by visiting this page.
- To install the plugin, as you can see in the picture, enter the name of the plugin you want in the search field of plugins… which is located at the top of the page on the left side, and search for the plugin you are looking for.
- After entering the name of the plugin, wait for a short time until the search results are displayed to you, and then after seeing the desired plugin in the plugin search results, click on the Install Now button to start the plugin installation process.
- After installing the plugin, this button will be changed to the name of activation; by clicking on it, the plugin is activated, and you can configure and customize the plugin by referring to the plugin page that is added to the WordPress counter or the main submenus.
3- How to install the plugin on the cpanel host
But sometimes, you want to install the WordPress plugin through FTP or hosting due to errors or lack of access to the WordPress counter. For this purpose, whether you use FTP or install the plugin directly through the host’s File Manager, you must first go to the directory or the same folder /public_html/wp-content/plugins/.
Here I am using a cPanel host to upload the plugin.
-
After entering the cPanel host or direct admin host, click on the File Manager option to enter the file manager and then refer to the above path.
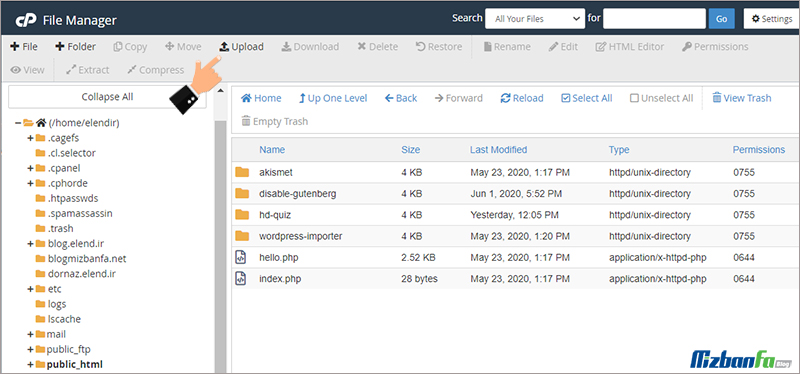
- By referring to this path, similar to the image above, you will see a list of folders in which the plugins used by you are located on the site, and each of these folders is related to one of your plugins. Now, to add a new plugin in this section, you have to put the plugin folder here, so from the main folder of your plugin, a compressed file in zip format. And then, click the Upload button to be redirected to the plugin upload page.
- After going to the cPanel host upload page, choose your plugin zip file and upload it to the host.
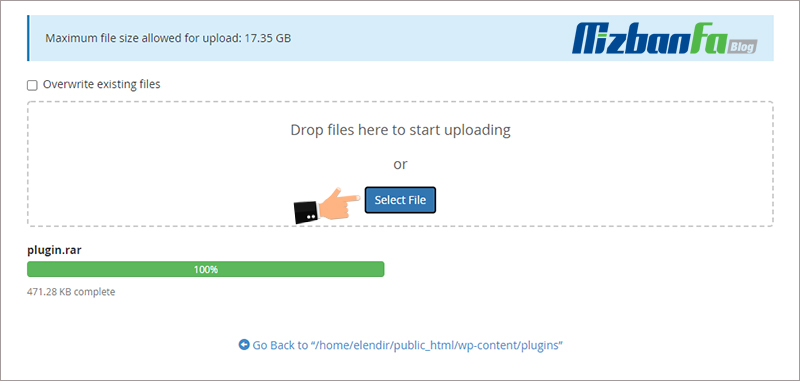
- After the upload is complete, click on the blue link at the bottom of the page that you can see in the image above to be directed to the plugins folder. As you can see in the picture, the plugin you want has been added to the host, and now you need to unzip it to continue installing it.
- Like the image, right-click the plugin zip file and select Extract.
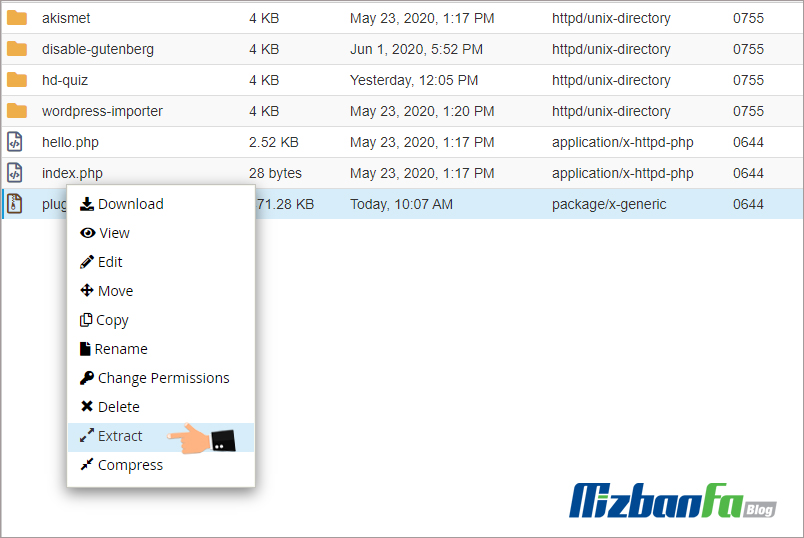
- Then, in the opened window, click on the Extract Files button so that, depending on the size of the plugin file, it will be decompressed, and its folder will be added to the plugin’s directory.