If you are a server administrator, you should check the status of your disks. For example, by listing the disks, you can find out whether their space is full or empty.
Basically, whenever your disk space is completely full, it means that from that moment on, your server does not have the necessary performance. And you have to turn it off and prevent users from accessing it.
In this tutorial, we want to see how you can easily list the disks in your Linux server.
prerequisites
For some of the commands that we will use in this tutorial, you must have access to the system as an administrator. to get the desired output.
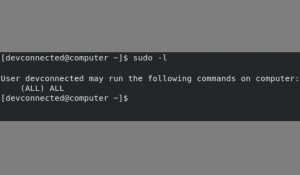
To check if you have sudo access, you can run the sudo command with the -l option:
sudo -l

If you see a result according to the image above, it means that you have the necessary permissions and there is no problem to list the disks.
List disks in Linux using lsblk
The easiest way to list disks in Linux is to use the “lsblk” command without any additional options. The “type” column refers to the disk as well as the optional and LVM partitions on it.
lsblk
Optionally, you can use the “-f” option for “filesystems”. This way, your disks will be listed as well as the partitions and file systems formatted on them.
lsblk -f
By executing the lsblk command, such columns will be displayed for you:
Name: The name of the device is very important for you to know that Linux devices have a special prefix depending on the nature of the device. “sd” in this case refers to SCSI devices, but is also short for SATA connections since most drives today use SATA.
Filesystem type: If your partition contains a filesystem, it should be listed in this column (xfs, swap or …).
Label: In some cases, you can have a label for your device to avoid using the UUID.
UUID: A universally unique identifier. This ID must be unique worldwide and uniquely identify your device.
Mountpoint: If your filesystem is mounted, you should be able to see the actual mountpoint.
You just listed your disks using “lsblk” in Linux.
However, you may want to list your disks with more actual hardware information. So stay with us.
List disk information using lshw
To list disk information on Linux, you need to use “lshw” with the “class” option specifying “disk”. By combining “lshw” with the “grep” command, you can find specific information about a disk in your system.
sudo lshw -class disk
sudo lshw -class disk | grep <disk_name> -A 5 -B
As you can see, running lshw without the grep filter will show you all the disks on the system.
If you want to target a specific disk on your computer, you can run the command with “grep” to list only the disks you want.
As you can see, using this command, you have more information about your disks: description, product and vendor, as well as motherboard information.
Disk listing using graphical interface
To list disks in Linux using the GUI, you need to go to Activities and look for a program called Disks.
By clicking on “Disks”, you will see a list of disks available on your Linux machine.
As you can see, in the Disks window, you have hard disk options as well as block devices, which are LVM devices that you may have created during the installation of the distribution.
When you click on a particular disk, you can see the disk size, serial number, as well as the partitions and contents that may be stored on it.
Conclusion
In this tutorial, you learned how to easily list your disks in Linux using the lsblk and lshw commands as well as using the graphical interface.