


If You Want To Share Your Computer With Someone Securely, You Must Create A Guest Account With Limited Access. This article will teach you how to create a guest account on Windows 11.
The guest account in older versions of Windows allowed users to create a minimal environment so that different people could use it safely to run programs or access the Internet. Still, an account called Guest, created with one click on older Windows, is no longer directly available on Windows 10 and 11.
However, creating a limited user account with guest account features in Windows 11 is still possible using settings, Computer Management, the command line, and even PowerShell commands. In this tutorial, you will learn how to create a temporary guest account on PCs running Windows 11.
Create a guest account using the settings
To create a guest account in Windows 11, you must do the following steps:
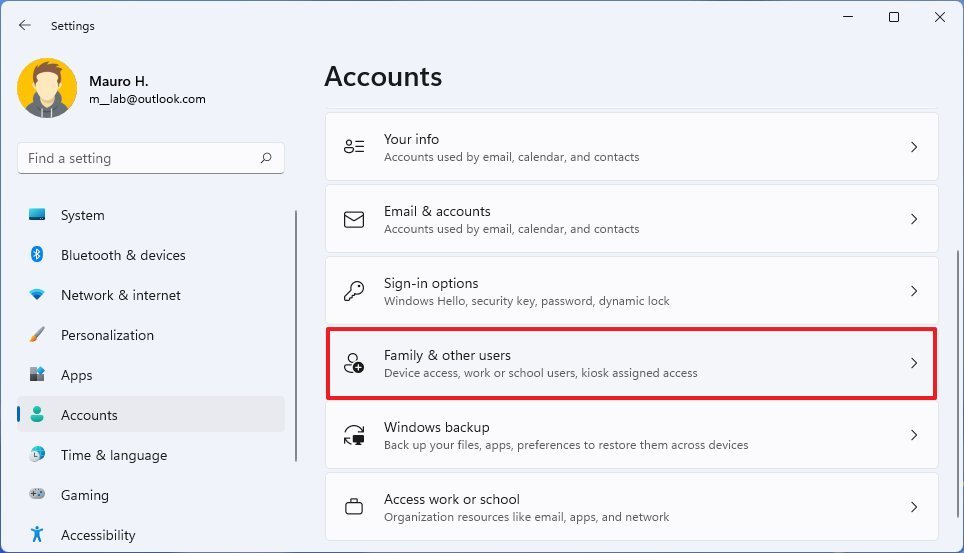
- Enter the Windows settings section.
- Click on Accounts.
- Right-click on the Family & Other Users page.

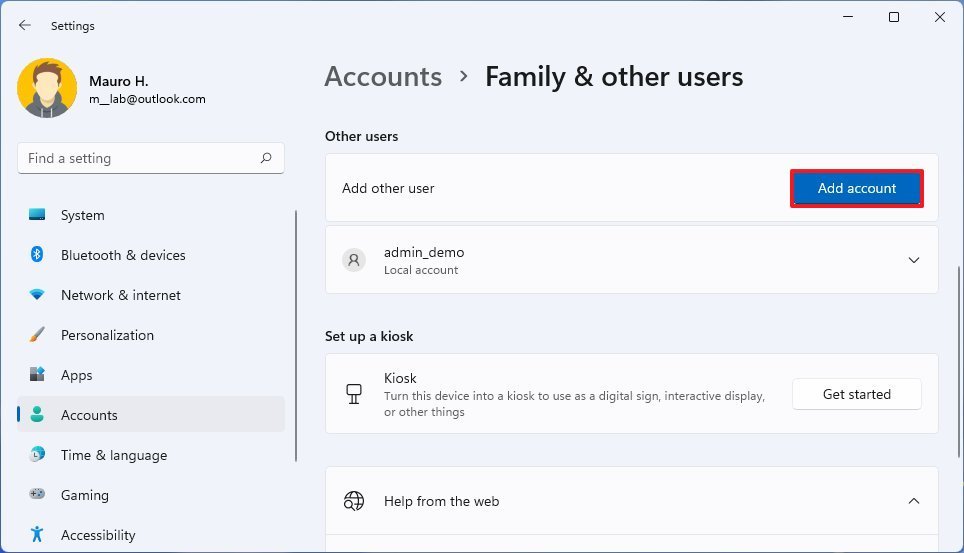
- In the Other User’s selection, click the Add Account button.
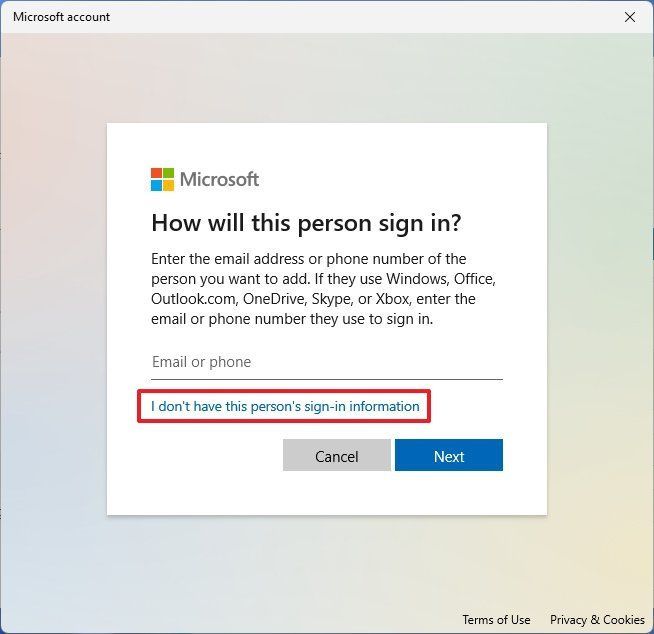
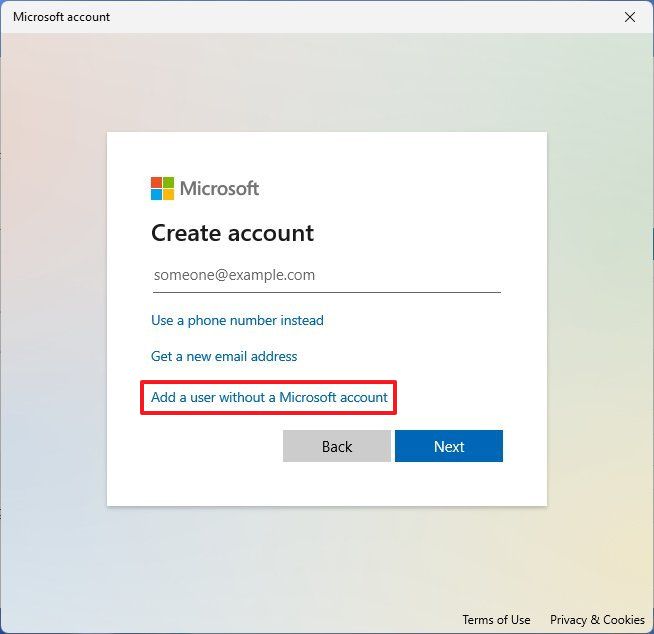
- Click Add a user without a Microsoft account. In the new window that opens, click I do not have this person’s sign-in information.

- You must now enter the name you want for the guest account, Visitor. Although the Guest account is no longer available in Windows 11, the Guest name is still reserved and cannot be used as a guest account.
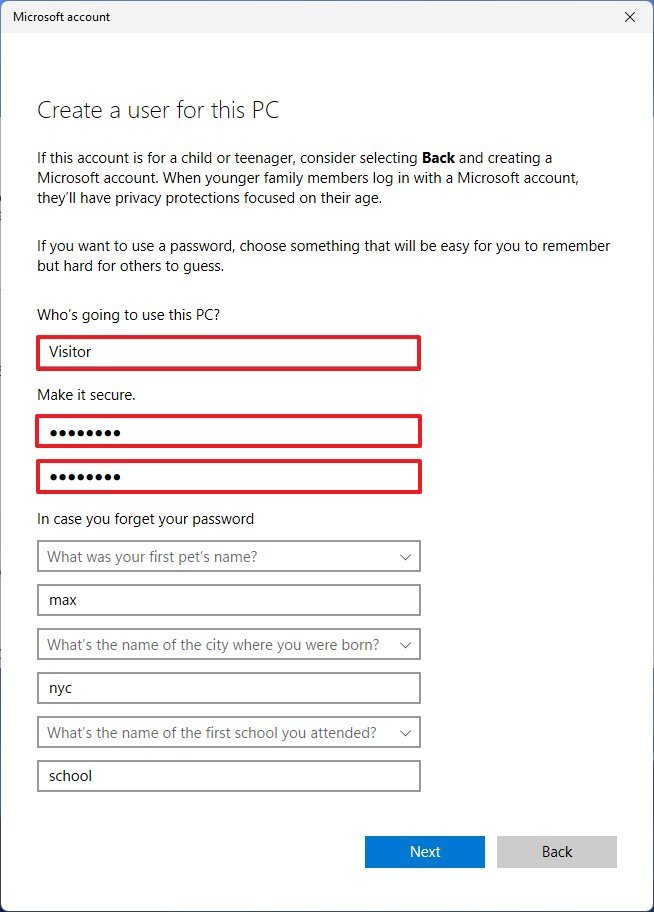

- Please enter a password for the account in the Make it Secure field.
- In case you forget your password, specify three security questions and answer them to enable password recovery.
- Click the Next button.
After completing the above steps, a restricted account will be created. The last thing you must do is log out and log in to your guest account.
Although creating a standard account (instead of an administrator account) with more limited authority is always possible, the computer can still be made available to the guest user. Still, to apply precisely the conditions of a guest account in the created account, you can go one step further and set the Guest account group or Guest to have more restrictions.
However, since changing user groups in the settings is not possible, you must use the Computer Management program or the command line.
Add an account to the guest user group.
To add an account to the guest group via Computer Management, the following steps must be performed:
- Open the Start menu.
- Search for Computer Management and click on the first result to open the program.
- Go to System Tools> Local Users and Groups> Users from the navigation menu on the left.
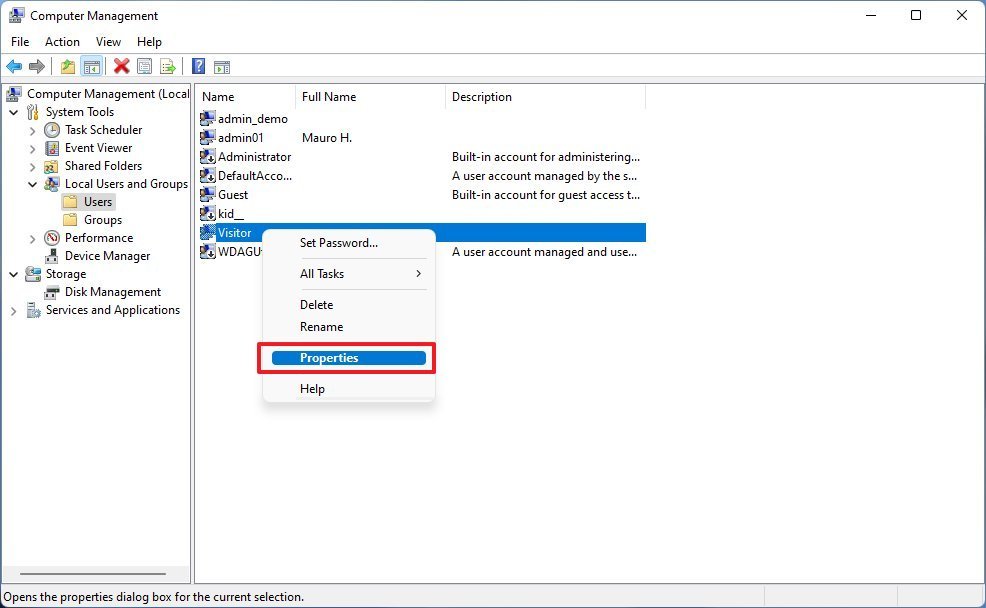
- Right-click on the account you created in the pre-made section and select Properties.


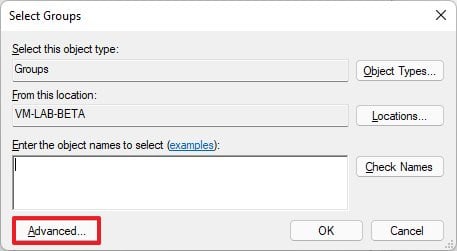
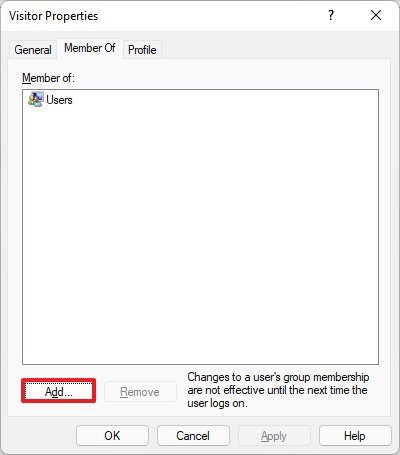
- Click the Member Of tab and then the Add button.
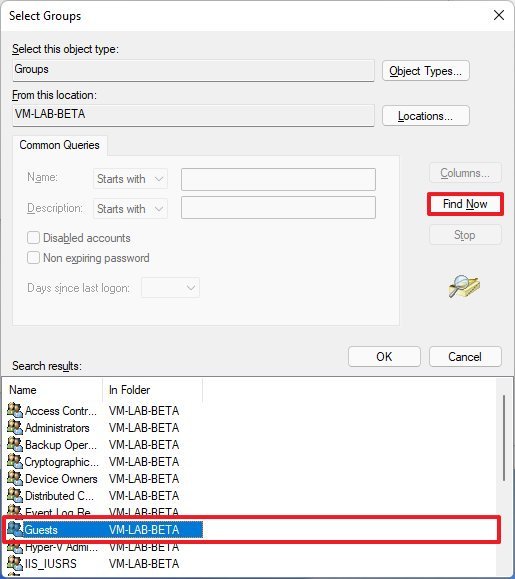
- Click the Advanced button.

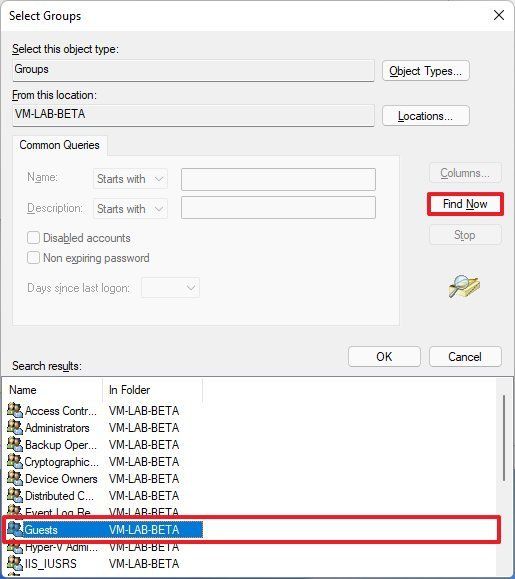
- Click the Find Now button.
- Select the Guest group.

- Click the OK button and the OK button again.
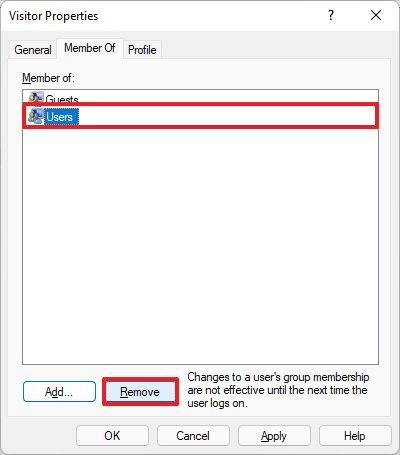
- In the Visitor Properties window, select the Users group.
- Click the Remove button.


- Click the Apply button and then OK.
After completing the steps, we will place the newly created account in the guest accounts group.
Create a guest account using Computer Management
To set up a guest account through Computer Management:
- Open the Start menu.
- Search for Computer Management and click on the first result to open the program.
- Go to System Tools> Local Users and Groups> Users from the navigation menu on the left.
- From the toolbar above, click the Action menu and select New User.
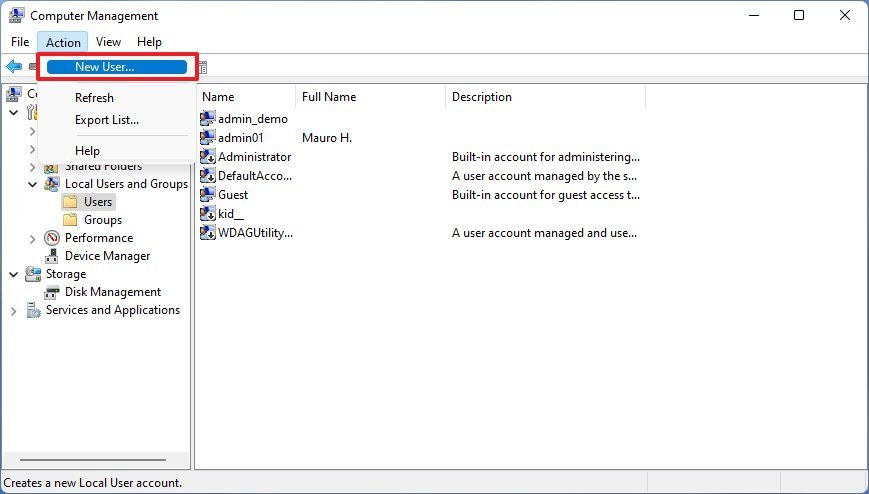

- Enter the account name (for example, Visitor) in the User name field and set a password.
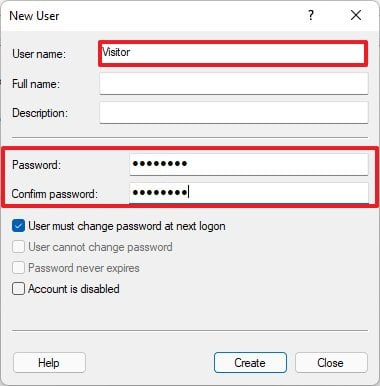

- Disable the User must change the password using the next login option.
- Click the Create button.
- Right-click on the created account and select Properties.
- Go to the Member Of tab and then click the Add button.
- Click the Advanced button.

- Click the Find Now button and select the Guests group.
- Click the OK button, then click it again.
- In the Visitor Properties window, select the Users group.
- Click the Remove button.
- Click the Apply button and then OK.
After completing these steps, you create an account with special user permissions.
Create a guest account using the command line
To set up and create a guest account in Windows 11, use the command line:
- Open the Start menu.
- Type cmd or Command Prompt, right-click on the first result, and then select Run as administrator.
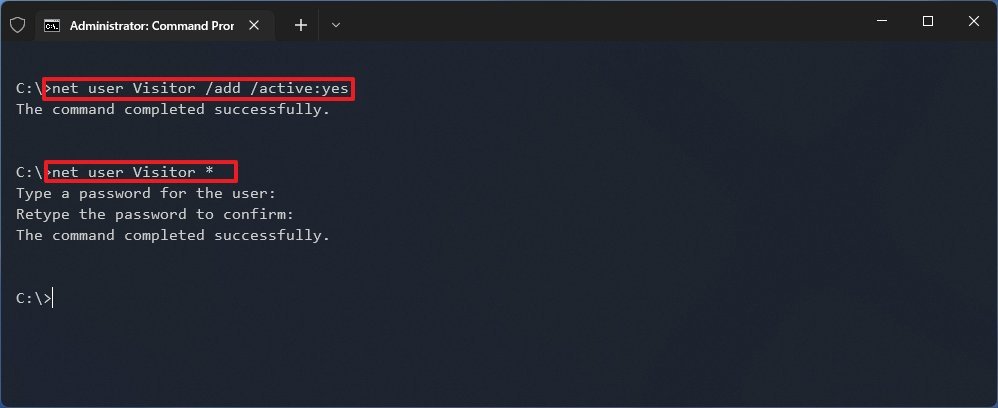
- Enter the following command and then press Enter on the keyboard. Note that the phrase Visitor mentioned in the commands is the name of the account, and you can replace it with another name of your choice:
Net user Visitor /add /active: yes
- To set a password for this account, type the following command and press Enter. If this is a temporary account, you do not need to set a password; you can skip this step by pressing Enter twice.
net user Visitor *

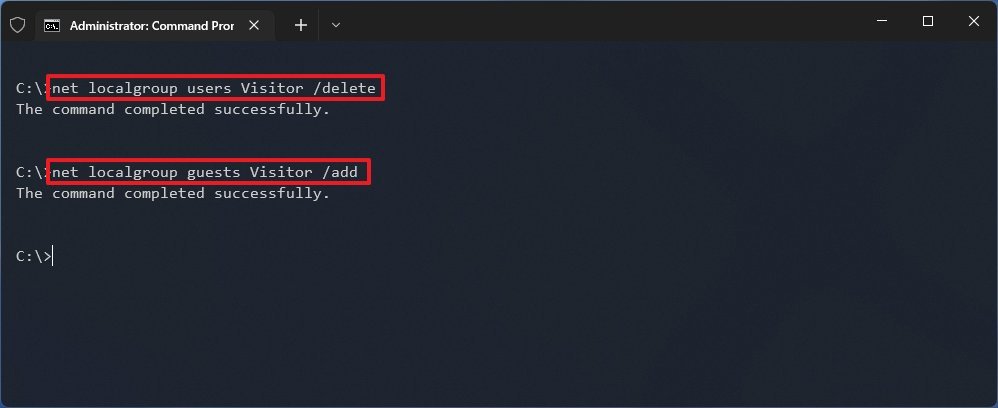
- Enter the following command to remove the new account from the Users group, then press Enter:
Net localgroup users Visitor/delete
- Enter the following command to add a new account to the guest user group and press Enter:
Netlocalgroup guests Visitor /add
After completing the steps, the account will appear on the login page.
Create a guest account using PowerShell.
Use these steps to create a guest account with PowerShell commands in Windows 11:
- Open the Start menu.
- Search for PowerShell, right-click on the result, and select Run as administrator.
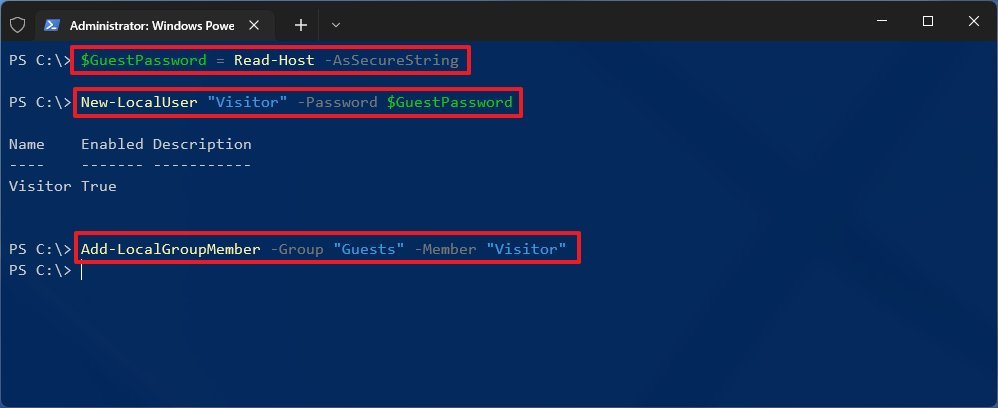
- To create a guest account, you must first specify the account password using the following command:
$GuestPassword = Read-Host -AsSecureString
- Enter the desired password in the area where the cursor flashes.
- Now, to create an account, type the following command and then press Enter. Note that the phrase Visitor mentioned in the commands is the name of the account, and you can replace it with another name of your choice:
New-LocalUser “Visitor” -Password $GuestPassword
- To add a created account to the Guest group, use this command:
Add-LocalGroupMember -Group “Guests” -Member “Visitor”
After completing the steps, PowerShell will make a guest account to share with a Windows 11 PC.
These steps temporarily set up an account to share the device with a guest user. If someone wants to use your machine regularly, you recommend creating a standard charge for each User using a Microsoft or offline version.
FAQ
How can I create a guest account in Windows 11?
Open Settings → Accounts → Family & other users → Add account, then choose “I don’t have this person’s sign-in information,” create a local user with limited permissions.
Can a guest account access my personal files?
No — a guest account has limited permissions and cannot access other users’ files or make system-wide changes.
Is a guest account good for temporary users or visitors?
Yes — it offers a safe way to let someone use the PC without risking your personal data or system settings.