


Teaching how to define dns records in Direct Admin
DNS server settings in the host are one of the most important issues most users have faced. DNS setting and DNS record definition in Direct Admin are important for site communication. You must be asking what a is DNS record? In this article from the knowledge base, we will teach DNS records and create a record so you can finally set DNS in the direct admin.
The topics we discuss in this tutorial:
- DNS setting in direct admin
- What is a DNS record?
- Types of DNS records
- Defining DNS records in Direct Admin
- Create a record
- txt record in DNS management
- What is a txt record?
- How to define a txt record?
- Delete record from direct admin
DNS setting in direct admin
Half server or DNS is an abbreviation of Domain Name System host. If the host introduces the domain, the information is uploaded, but the half servers are not set up and published. Your site will not be displayed to users. The half server set on the domain is responsible for processing requests from the server-side depending on the domain. Finally, access to the server and displaying the site is possible.
Sometimes, it is possible to identify the site’s host group, server location, and the like by looking at the domain and checking the half-server. The use of dedicated DNS is exactly for the same reason, that is, not displaying the server of the host company, and as a result, the site’s branding is done. Direct Admin has a section called DNS Management to manage the half server and all related records.
What is a DNS record?
There are different types of records in the DNS Zone section of the host, each of which is intended for a specific use. In the following, we will describe some of the most common ones.
Types of DNS records
 A Record
 - NS Record
- MX Record
- CNAME Record
- PTR Record
- TXT Record
- AAAA Record
- SRV Record
Defining DNS records in Direct Admin
with the help of the direct admin login tutorial to your host’s control panels, On the page that opens in the Your Account section, click on the DNS Management option to be directed to the defined records page and its common settings.
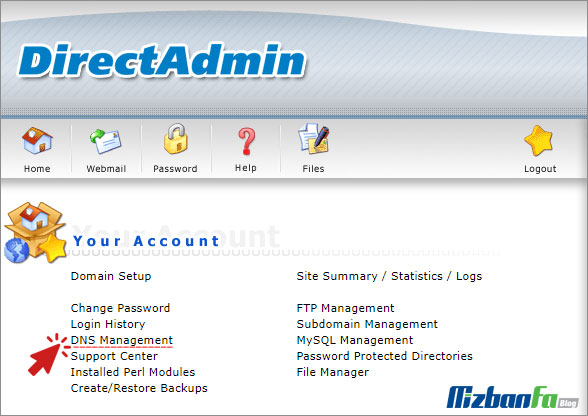
You will see a page similar to the image below. This page consists of two sections.
As you can see in the image above, the DNS Management page includes two general sections as follows:
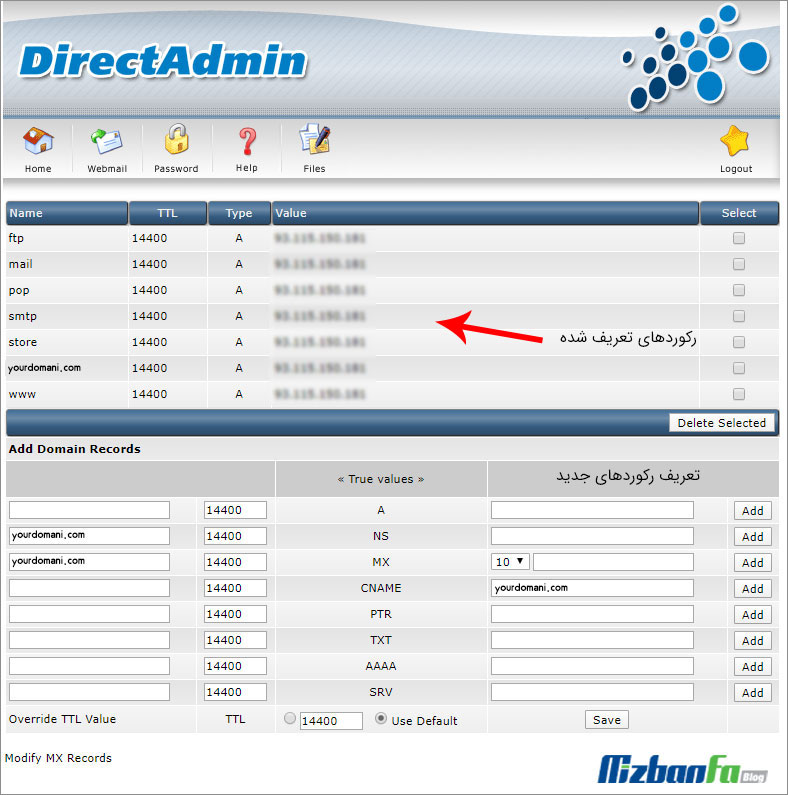
- The defined records are displayed in the first part, along with their types and values. New records are added to this list after they are defined.
- A little lower in the second section is a section called Add Domain Records, which can be used to register the desired record.
Create a record
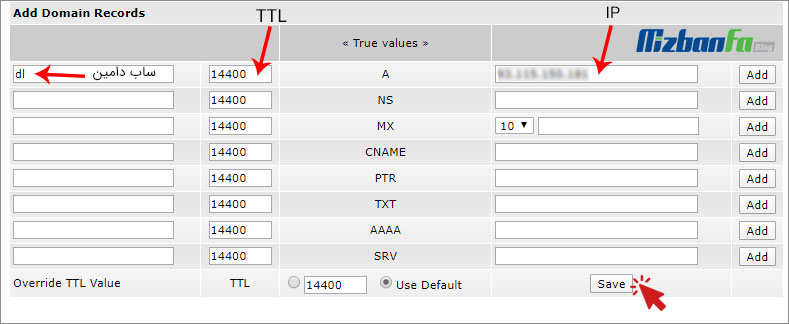
This record is used to connect to another IP. For example, suppose a download host is prepared, and a subdomain called dl. yoursite.com for it. Now you intend to connect this subdomain with the download host with a record. For this purpose, you need an A record.
- First, define the subdomain you want (in the download host or…).
How to create a subdomain in Direct Admin - To define an A record on your website host, Add Domain Records refer
- All records are displayed in the “True values” column. Find the line opposite to A.
- Enter a name for this record in the field on the left side of the page. (Enter the defined subdomain.)
- Do not change the second field. This field is the same as TTL and, by default, has a value of 14400, meaning the duration of the record’s cache in the system memory.
- Enter the IP of your host in the field on the right side of the page.
- Click the ADD button in front of the line to create the record.
- Click the save button to save your changes.
How to connect the subdomains of the cPanel host to the download host
txt record in DNS management
Sometimes, in completing and developing the website, we come across a phrase like ” Create a txt type record with the following value in your DNS zone. “ This statement urges you to refer to your DNS Management section and define a TXT type record. You must be wondering what a TXT record is and its use?
What is a txt record?
As its name suggests, it is considered a text type record or TEXT. In other words, it is recorded on the host to add a brief description in the form of a record. It is used for times such as confirmation and verification. One of the methods of verification and authentication when introducing a site to the Google search console is to define a TXT record. Next, we will define the types of records.
How to define a txt record?
The steps of defining a txt record are the same as defining an A record, with the difference that we select the TXT line from the “True values” section. Also, in this process, we do not need IP, but we enter the text value or TEXT related to authentication in the corresponding field.
- To define the TXT record, refer to your host’s direct admin.
- Click on DNS Management and go to Add Domain Records.
- Find the line opposite TXT.
- In the first field on the left, enter your domain name with . enter.
- Set the second field, which is TTL, to 14400. (By default, it is on this value.)
- In the right field, enter the provided text for verification. (This value is provided to you by the requesting confirmation system.)
- Click the ADD button in front of the line and then the SAVE button.
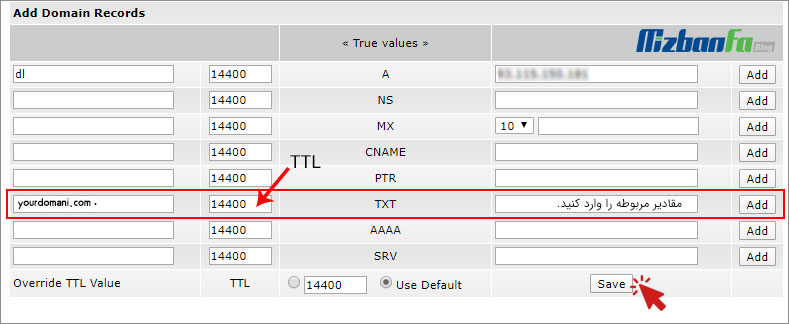
This record will be added to the list of available records after being defined.
Delete record from direct admin
If you want to delete one of the records defined in this section, you can select the check box next to the desired record and click on the Delete Selected button next to the page.