


Learn how to set domain dns records in C Panel
Setting DNS records is one of the most important topics that website owners should be familiar with because the solution to many problems can be found in their records. By setting DNS, you are linking your domain name to an IP address that consists of numbers. In this article from the Fa-host knowledge base, we want to introduce you to the definition of DNS and a tutorial on setting up DNS domain records in the C panel.
In this article, the following topics will be examined:
- What is DNS?
- Types of DNS records
- Use Zone Editor to set DNS records in Cpanel
- Edit DNS records using Zone Editor
- Delete DNS records in C Panel
Domain DNS records in C Panel

DNS stands for Domain Name System, which provides important and accurate details about your domain name. The information stored in this section is known as the DNS record or domain name records. Imagine you have a phone book with the names and phone numbers of the people you care about. In a phone book, people’s information is placed according to their names and in alphabetical order. Whenever you need one of these numbers, go to your phonebook and find the number based on the name you gave it. Of course, if you do not choose a standard format for writing numbers, you will have trouble trying to find the numbers you want.
Your computer, the servers on which your domain information is stored, and the DNS records do the same. Servers are responsible for storing information, just like a phonebook. Information such as names, phone numbers, or addresses is the same as DNS records.
Familiarity with different types of DNS records
Records can be recorded in several different ways, some of the most important of which are as follows:

- A record: A record or history that associates a domain name, yourdoamin.com, with a specific IP of 000.000.00.000 is known as a record.
- CNAME Record: CNAME records are obtained by joining two domain names together. For example, combining two domain names could create a mail.yourdomain.com record. This allows you to define multiple domains without specifying an IP for each domain name.
- TXT record: The TXT record can contain any text you want. They are often used to define SPF and DKIM settings.
- MX Record: Another type of DNS record stands for M ail E x changer Record. This record is used to identify email servers for a specific domain name. This record determines which email server receives incoming emails and where incoming emails should be routed.
Use Zone Editor to set DNS records in Cpanel.
To set DNS records for the domain, the Cpanel user panel has introduced an area called the Zone Editor. You can quickly and easily change your domain or domain DNS records through this area. As mentioned, you can create different records, and we will teach you how to create, edit or delete different types of records.
In order to get more familiar with the Zone Editor section, you can read the Zone Editor C article training .
To add a record, you must follow the steps below in order:
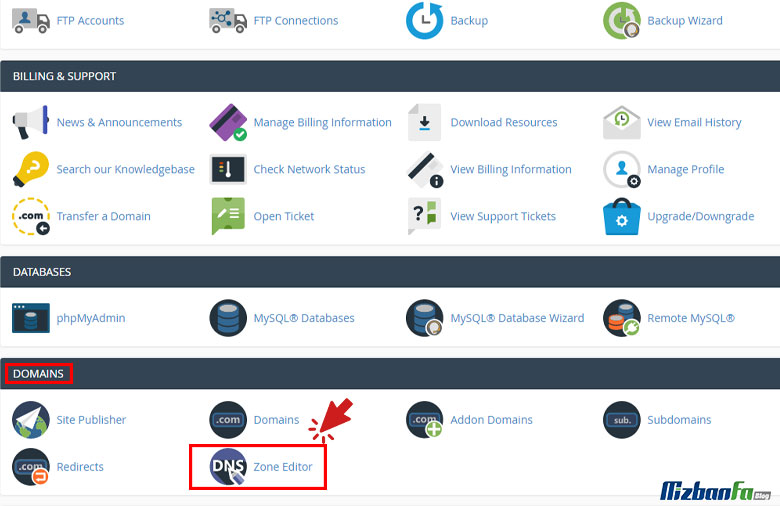
1. Enter your user panel and select the Zone Editor option in the Domains section.
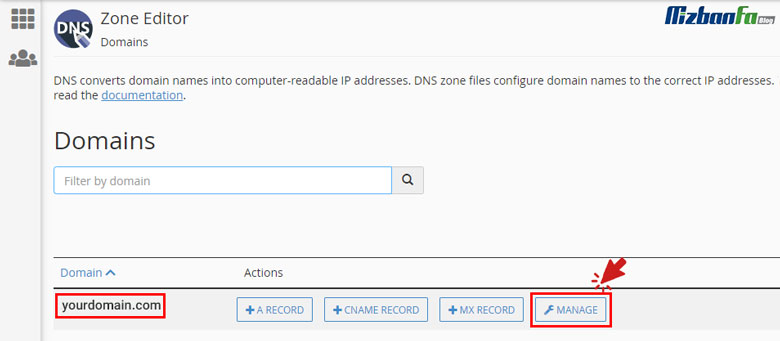
2. You will see your domains at the bottom of the Domains box. Specify the domain for which you want to define a record and click Manage.
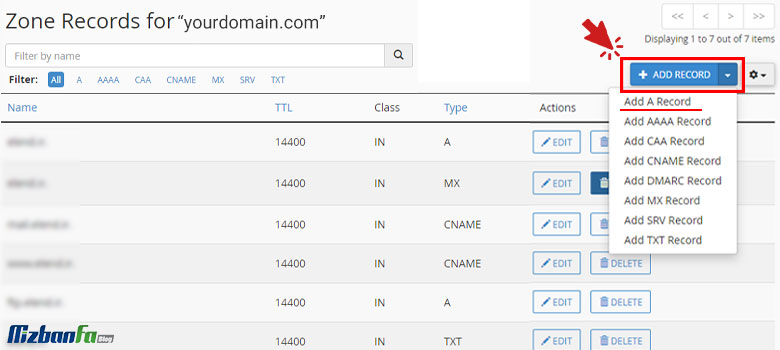
3. Click on the arrow next to Add Record. Then specify the type of record you want to record.
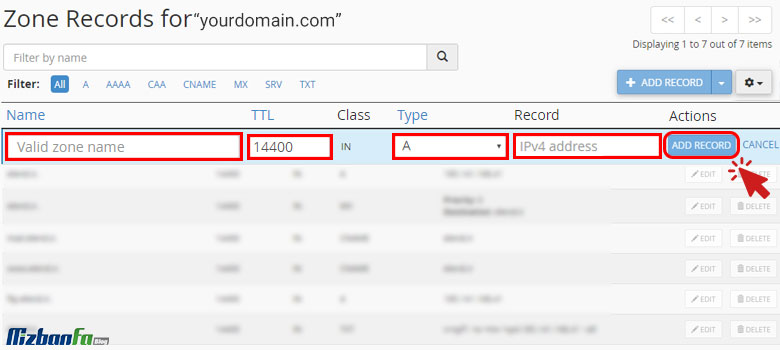
4. Next, enter the domain name for the record you want in the Name text box. You must add time-to-live in the TTL text box.
In the Type column, find the type of record you want to record. Then you have to enter the corresponding values in the Record field in front of it, which we will describe in detail below.
- To register a record, you must enter the IP of your desired domain.
- To register a CMAME record, you must enter a domain name.
- TXT record registration will be possible by entering a text link.
- To record the MX record in the box, you must specify a number to indicate the email priority (a number between 0 and 65535) and a domain name.
8. Finally, by clicking Add Record in the C panel, it will add the record you want.
The record you just defined will be added to your list.
Edit DNS records using Zone Editor
To edit a record in Zone Editor, you must proceed as follows:
- Enter your user panel and select the Zone Editor option in the Domains section.
- At the bottom of the Domains box, find the corresponding domain name.
- Click the Manage button in front of the domain name.
- Select the record you want to edit and click Edit in the Actions column.
- Make the changes you want to apply, and then click Save Record.
In this way, C Panel will update the desired record.

Delete DNS records in C Panel
- As before, enter your user panel and select the Zone Editor option in the Domains section.
- Click on Manage in front of the desired domain.
- Select the Delete option below the Actions column. To delete the relevant record.
- In this step, the C panel will delete the specified record by clicking on Confirm Deletion and then selecting the Continue option.

In this DNS tutorial series, we discussed how to set up DNS in Cpanel and hosting settings. In Cpanel settings, you must be very careful about defining DNS records because this connection will not be established with the slightest mistake. Setting up domain DNS records is one of the most important tasks that can affect the performance of your website. In this article from the Fa-host knowledge base, we have tried to teach you how to set DNS records by providing a step-by-step guide