Batteries are very important for electronic devices such as cell phones, computers, and laptops. You can set your computer to show the remaining battery time to know exactly how long you can use it in real-time. However, battery life decreases over time. To find out the current status of the battery, you should check its health.
Do you need to check the battery’s health?
Batteries are important for electrical power devices such as laptops and cell phones. Battery capacity determines how long you can use your device after a full charge. However, the battery does not last forever and is discharged in a few hours (if the device is used continuously), and over time, the battery charging capabilities are reduced. Checking the battery’s health is important because you can determine if you need to charge the battery or if you need to replace it with a new one.
How to check battery health in Windows? In this tutorial, we will fully explain its steps.
Tip: Be careful when performing these steps on your system, as a small mistake can lead to the loss and corruption of your information. In this case, you should use data recovery software to restore your important files.
Battery life versus battery health
Most people confuse battery life and battery health and think they are different but the same.
Battery life: Battery life, also known as battery life, refers to the amount of time a device can work before being recharged. This determines how long your battery lasts on a single charge.
Battery health: Battery health is also called battery life, i.e., the current state of the battery. Indicates for how long the battery will need to be replaced. Determines how much battery life decreases over time.
The easiest way to test the health of a laptop battery on any Windows
To do this, download the BATExpert software (from here or any other site). This software is the most accurate laptop battery health testing software. After installation, it has an image like the following:
If the battery health percentage indicates more than 70%, the battery is in good condition. Between 50 and 70 is average, and below that means the battery is not in good condition and needs to be replaced.
Other methods without the need to install the software:
How to check the battery health of Windows 10
Do you want to check the battery life of Windows 10? Do you know how to test a laptop battery? Follow these two simple ways to understand it.
Report on battery power
1. Press the Windows + S keys on the keyboard to open the Windows search box.
2. Type cmd to display the Command Prompt option, then click on it.
3. In the window that opens, press Ctrl + Shift + Enter to run it as an admin.
4. Click Yes in the User Account Control window.
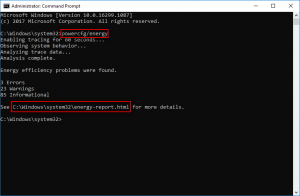
5. Type powercfg / energy and press Enter.
6. Wait a while (about 1 minute) for a report of battery power to be displayed.
7- An HTML report file is created and saved in Windows.

How to access the energy report file
- Press the Windows + R keys and enter the address C: \ Windows \ system32 \ energy-report.html in its text box, and then click OK or press Enter. Then select the browser you want to view the HTML file.
- Press Windows + E to open File Explorer, then copy C: \ Windows \ system32 \ energy-report.html to the address bar, select a web browser. Also, you can not manually go to drive C and then find the HTML report file in the system32 folder in the Windows folder.
Build reports from the battery
Laptop battery test steps:
1. Run the Command Prompt tool as admin.
2. Type powercfg / battery report and press Enter.
3- Wait for the process to finish.
4. Open the HTML file related to the battery report and view its information.
The default location for the file is C: \ Windows \ system32 \ battery-report.html.
You can also type and run the powercfg / battery report/output “C: \ battery-report.html” command in the Command Prompt window using Windows PowerShell in admin mode.
Display battery remaining time in Windows 10
Some users ask how much battery life their system has left. For more information, you can activate the remaining battery life by following the steps below:
1. Open the Registry Editor: To do this, press the Windows + R keys, type Regedit in the box, and click OK.
2. Copy and paste Computer \ HKEY_LOCAL_MACHINE \ SYSTEM \ CurrentControlSet \ Control \ Power into the address bar, then press Enter.
3. Go to Power and right-click on EnergyEstimation. Now select New and then DWORD (32-bit) Value.
4. Give it a new name: EnergyEstimationEnabled.
Double-click EnergyEstimationEnabled and change the Value data to 1.
6. Click OK and reset your Windows 10.