


Increase the size of the C drive With 2 simple methods
Increase the size of the C drive With three simple methods
If you have a shortage of storage space on your computer, you may want to increase the disk space. In the case of Windows PCs, if you are mainly using the C drive, you will encounter a warning message that the disk space is low. This message indicates that you need to increase disk space or delete some stored data.
If you do not want to delete anything, you should look for ways to expand the C drive space in Windows 10. You should check the disk size using the built-in disk management tool in Windows.
Before we start increasing the space, we suggest that you make a backup of your data on the hard drive. Before making any changes to disk space, Make sure your data is secure.
We must first create an unallocated space and ensure it is right behind the system drive. Then increase drive C space with unallocated space. We can create empty or unallocated space by shrinking or removing some existing drives. However, this space must be created behind the C drive. So the only choice is to remove the space behind drive C and empty it.
Increase drive C space from other drives
Here, for example, we will show how to increase the space of drive C from drive D (drive behind C).
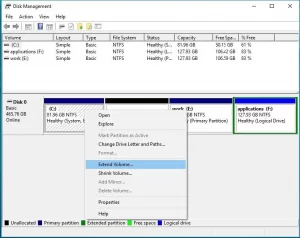
Step 1. Open Disk Management and right-click on drive D, then select Delete Volume
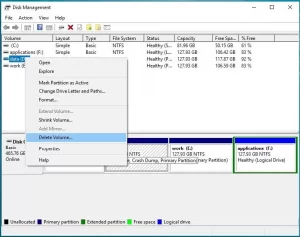
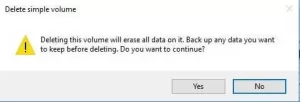
Or deleting drive D will delete its data. So be sure to back up important data or move it to another safe place.
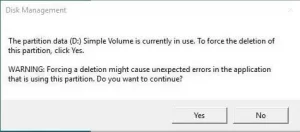
If the drive’s contents are used when deleting, it will notify you in a message. We can force the drive to delete. However, forced removal may cause unexpected errors in programs that use this drive. So be careful.
Step 2: The deletion process is completed in a few seconds. When done, we see that the space that originally belonged to drive D has become an unallocated space and is located behind drive C.

Note: If the space created is not enough, we can delete the next drive to create more space.
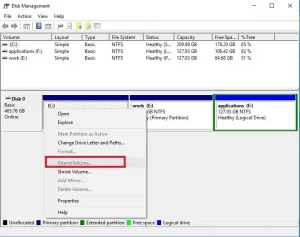
Step 3: Right-click on drive C and select Extend Volume.
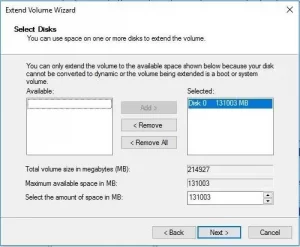
Step 4: The Extend Volume Wizard window opens. Click Next to continue.

Step 5: Select the desired disk (s) to capture free space in this window. Here, both drive C and drive D have been removed from Disk 0, and this is the only disk from which we can get free space. So Disk 0 is selected automatically. Specify the amount of free space to add to drive C (sets all unallocated space by default). Finally, click Next.
Note: Even if there is another hard disk with a lot of free space on it, we can not add this unallocated space to drive C because Basic Disks can not have space on more than one hard disk, Be. Dynamic disk space can be placed on different hard disks. So if the base disk we want to expand is on a hard disk containing data, we first convert the entire disk to a dynamic disk and then increase the space with unallocated space on another hard disk.
It is not recommended to convert a hard disk to a dynamic disk on which the system is installed. Converting Basic System Disk to Dynamic may make it an unbootable system. Dosage To increase the size of a basic disk drive, the system must have unallocated space on that disk right after the drive.
Step 6: Click Finish.
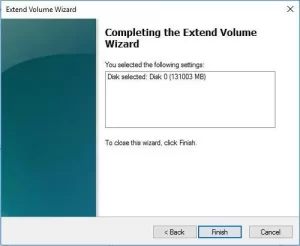
In just a few seconds, we were able to increase the size of the system C drive.

The second method, with the help of EaseUS Partition Master
There are two main methods to increase C drive space in Windows 10. Let’s start with the first method, which uses a unique feature to allocate unallocated space to another partition. Alternatively, you can use the partition resize feature to increase the space on drive C.
- 1: Download EaseUS Partition Master.
- 2: Complete the installation process and then launch the program.
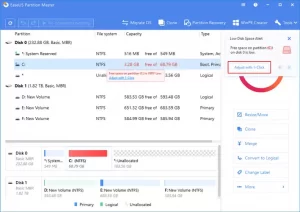
- 3: On the Windows you will probably see a message displaying the disk space warning with the corresponding solution with the phrase Adjust with 1 Click (make settings with just one click). Clicking this button is the easiest way to increase the size of the C drive on your computer.
Conversely, if you did not see this message, you can select Disk Partition from the list and click the feature.
Step 4: This will open the Smart Space Adjustment window below, and the disk layers will be displayed for you. This way, you can see which space can be allocated to drive . If you are satisfied with the automatic settings displayed in this window, click the Proceed button.
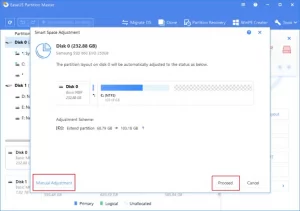
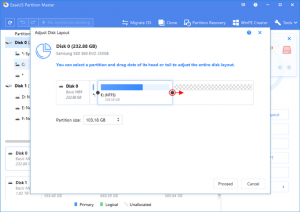
Instead, click the Manual Adjustment button and allocate space manually.
Step 5: After confirming the action you have selected, you will see the Execute Operation button on the window’s top bar. Click on it and then click Apply when the Pending Operation window appears.
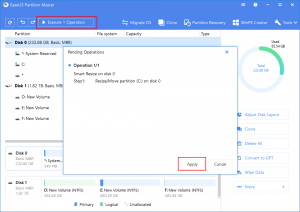
This process is done after several minutes.
This will add unallocated space to drive on your computer.