


How to Send SMS and MMS Messages in Python
This tutorial will show you how to use Twilio’s Programmable SMS to send SMS and MMS using your Python application.
The code samples in this tutorial use the Python Twilio helper libraries. Let’s get started!
Sign up for Twilio or sign in to your account.
You’re all set if you have a Twilio account and a text-enabled Twilio phone number! Go to the code easily.
Before receiving phone calls and sending messages, you must sign up for a Twilio account and purchase a Twilio phone number.
You can sign up for a free trial account if you’re new to Twilio. After signing up, go to your console and get your account SID and verification password. It would help if you had these values for the code example below.
Get a phone number with SMS (and MMS) capabilities
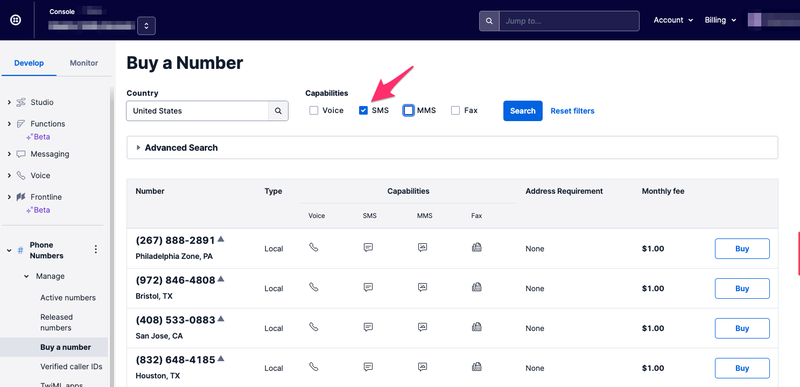
You need a Twilio phone number with texting capabilities to send messages. You’ll need to purchase one if you don’t already have a Twilio phone number with texting capabilities. After going to the number purchase page, check the SMS box and click on search:
You can check the MMS box if you live in the US or Canada and also want to send MMS messages. When viewing search results, you can see feature icons in the list of available numbers:
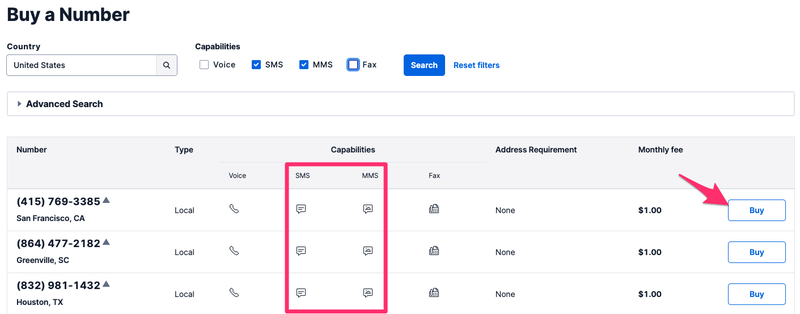
Find the number you like and click buy to add it to your account.
If you’re using a demo account, verify your phone number through the console before you can test sending SMS to yourself.
Now that you have a Twilio phone number, you can send messages to mobile devices.
Sending SMS in Python via REST API
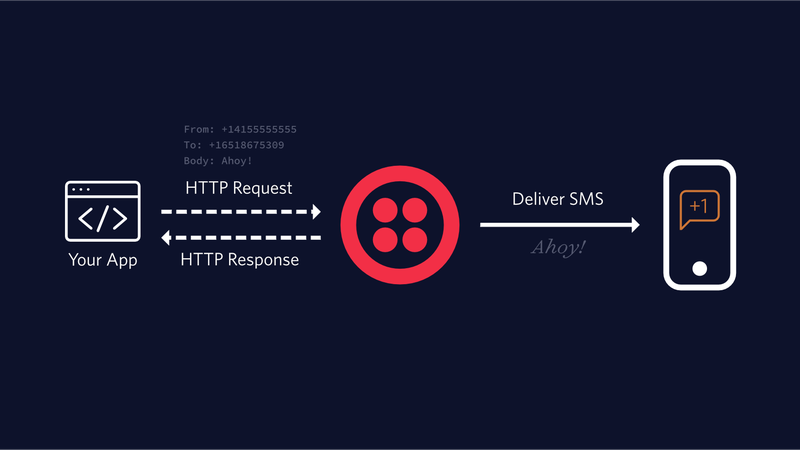
To send outgoing SMS from your Twilio account, you must send an HTTP POST to the message source.
The Twilio Python library helps you create a new instance of the message resource and specify your message’s To, From, and Body parameters.
If you don’t already have the Python helper library installed, you can install it using pip:
pip install twilio
If you are not using pip, you can find manual installation instructions here.
Now create a file named send_sms.py and enter the following code:
Replace the placeholder values for account_sid and auth_token with your unique values. You can find these in your Twilio console.
By replacing the from_ number with the Twilio phone number you already purchased, you tell Twilio which phone number to use to send this message.
Next, identify yourself as the message recipient by replacing the destination with your mobile phone number. Both parameters must use E.164 formatting (+ and a country code, for example, +16175551212).
twilio also includes a body parameter that contains the content of the SMS we want to send.
Once you’ve updated the sample code, you can test it by running it from the command line:
python send_sms.py
You will receive the SMS in just a few moments.
Let’s take a moment to understand what happens behind the scenes when you send this request to Twilio.
Twilio’s answer
When Twilio receives your request to send an SMS via the REST API, it checks that you’ve entered a valid Twilio phone number in the from_ field. Twilio will then queue the SMS or return this HTTP error in response to your request.
Assuming your request did not result in any errors, Twilio’s HTTP response will contain the SID of the new message. This unique ID helps us refer to this message later: We printed that SID to the terminal in the code above.
Twilio’s JSON response contains a lot of data about your message. A sample answer might be:
{“sid”: “SMxxxxxxxxxxxxxxx”, “date_created”: “Thu, 09 Aug 2018 17:26:08 +0000”, “date_updated”: “Thu, 09 Aug 2018 17:26:08 +0000”, “date_sent” : null, “account_sid”: “ACxxxxxxxxxxxxxxx”, “to”: “+15558675310”, “from”: “+15017122661”, “messaging_service_sid”: null, “body”: “This is the ship that made the Kessel Run in fourteen parsecs?”, “status”: “queued”, “num_segments”: “1”, “num_media”: “0”, “direction”: “outbound-api”, “api_version”: “2010-04-01” , “price”: null, “price_unit”: “USD”, “error_code”: null, “error_message”: null, “uri”: “/2010-04-01/Accounts/ACxxxxxxxxx/Messages/SMxxxxxxxxxxxx.json”, “subresource_uris”: { “media”: null } }
You can access any of these properties from your Python code, just like when we printed message.sid.
Try adding a print statement like print(message.status). Save the file, then run the code with python send_sms.py again. You should see the status of your message, “Queued”, printed on your terminal.
Send SMS to multiple recipients in Python
If you want to send sms to multiple recipients in Python, you can create an array of recipients and iterate through each phone number in the array:
numbers_to_message = [‘+15558675310’, ‘+14158141829’, ‘+15017122661′] for number in numbers_to_message: client.messages.create( body=’Hello from my Twilio number!’, from_=’+15017122662′, to=number )
This creates a new message instance for each phone number in the list.
A note about the SMS rate limit in Python
As you send more messages through the API, Twilio queues them up for delivery at your specified rate limit. API requests for messages that exceed specified rates are queued and processed as capacity is available.
If your application tries to queue more than 4 hours of outgoing traffic (for example, queue more than 14,400 messages to Canada on a long code phone number), the API will start returning a 429 error.
How to (MMS) a message containing media in Python
You’ll need to add the code we wrote above to include media in your text message using Twilio. This time we need to add the media_url parameter.
Create a file called send_mms.py and enter the following code:
Again, update the from_ and to parameters to use your Twilio and mobile phone numbers.
The new media_url parameter in this code tells Twilio where to go to get the media we want to insert. This must be a publicly accessible URL: Twilio cannot access hidden URLs that require authentication.
Like when you send a simple text message, Twilio sends information about the message in response to your request. The JSON response will contain the unique SID and URI for your media source:
“subresource_uris”: {“media”: “/2010-04 01/Accounts/ACxxxxxxxxx/Messages/SMxxxxxxxxxxxxxxx/Media.json”}
When the Twilio REST API creates your new message resource, it stores the image at the specified media_url as the media resource. Once created, you can access this resource at any time via the API.
Print this value from your Python code to see where the image is stored. Add the following line to the end of your send_mms.py file to see your newly rendered media URI:
print(message.media._uri)
Save the file and run it from the command line:
python send_mms.py
In less than a few moments you should receive a text message with a picture!
You have now successfully sent some messages with the Twilio Programmable SMS API and Python helper library.