


How to Remove Write Protection from USB in Windows
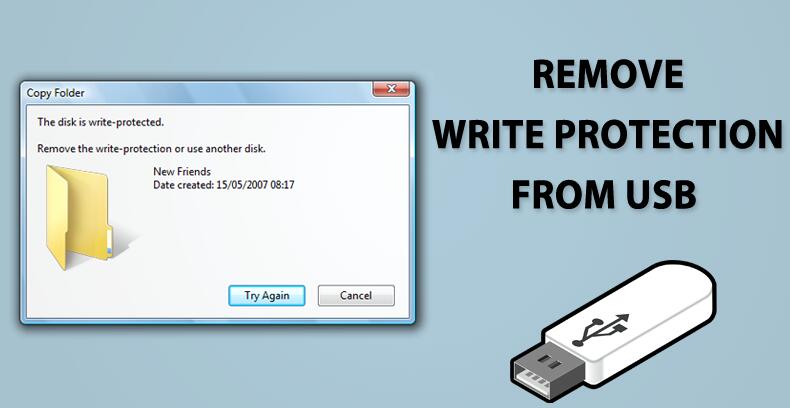
When copying files to the pen drive, you may encounter an error message with the content “The disk is write-protected.” When a USB drive is in write-protected mode, it restricts users from making changes to files and folders. Although we can configure the drive to remove write-protected settings, some computers do not allow the user to format the flash drive itself.
Let’s see the fastest solution to cancel saved mode on a USB drive. Below is a list of things you can try to disable write protection on your USB drive.
How to disable the write protection mode from the USB drive?
Below are some simple ways to remove Write Protection on USB drives.
1-USB flash with the lock switch
Most SD cards and USB drives have physical switches to lock them. These switches are usually placed on one side of the drive. Also, the word “Lock” may be written on the front of the SD card.
When a USB drive is locked, users cannot change the data on the drive. In addition, this switch prevents users from accidentally deleting data inside the USB drive. To disable this feature, we can physically disable the switch.
If the USB drive or SD card does not have a physical switch, move on to the next solution.
2- Format the USB drive
Formatting a removable drive permanently erases all data and resets all settings to defaults. The write protection settings are also reset to default. Since formatting, the drive will delete all existing data; ensure you have backed up all your essential files and folders on the drive before starting the format process.
When you want to reconfigure the drive, an error message with the content “You do not have sufficient rights to perform this operation” may appear. This means that the user does not have permission to format this drive. To fix this problem, see Solutions for Windows.
Note: This step may not work for all Windows users.
3-Format the drive in Windows
1- Insert the USB drive.
2- Right click on the external drive you want to format.
3- Click on Format. Another dialog box will open.
4- Select FAT32 (File Allocation Table 32) or NTFS (New Technology File System) format in the File System section.
Note: FAT32 format is compatible with all operating systems and is the default for all USB drives. However, only Windows, macOS, and Linux operating systems support the NTFS format.
5- Then, in the Allocation size section, select Default allocation.
6- In the Format Options section, check or uncheck Quick Format. Quick Format does not delete data, and we can recover deleted files. Meanwhile, unchecking Quick Format clears everything and is usually more time-consuming.
7- Click on Start.
Drive format in macOS operating system
1- In MacOS, when you insert the USB drive, it will be displayed on the desktop.
2- Now click on the search icon in the upper right corner.
3- Search for “Disk Utility” without quotation marks and click on Disk Utilities.
4- Select your USB drive from the list displayed on the left.
5- Click on the Erase option above.
6- Now, type a name for the drive, and select the Format as MS-DOS (FAT) option.
7- Then click on Erase option.
8- After completing the process, click on Done.
Drive format in Chromebook OS
1- Click on Apps and go to Files. You can also press the keyboard’s Alt + Shift + M keys.
2- Right click on the drive you want to format and select Format Device.
3- Click OK and wait for the process to complete.
How to disable USB write protection mode in Windows?
Below, we’ve listed some Windows-specific solutions that you can try to disable write-protect mode.
1- Disable Deny Write Access mode
The Local Group Policy feature in Windows Pro and Enterprise Editions provides access to many partitions, including removable disks. Using the Local Group Policy Editor application, an administrator can change the access properties for multiple users and computers in a network environment.
Unfortunately, the Local Group Policy Editor is not available in the Home version of Windows. However, we can get Policy Editor for Home Windows by running a Group Editor batch file that enables Group Policy.
To activate Group Policy in the Home edition, follow the steps below.
Note: If you are using the Professional or Enterprise version of Windows, you do not need to do these steps.
1- Download the batch file.
2- If your web browser gives you warnings, ignore them. Since batch files (.bat) are system files, the browser warns that this file may damage the operating system.
3- Double click on the downloaded file and let the command run.
4- Your computer can access the Local Group Policy Editor program when everything is complete.
How to disable Deny Write Access?
Follow these steps to disable Deny Write Access.
1- Press the Windows key + R to open the Run window
2- Type “gpedit. MSC” without punctuation and press Enter.
3- The dialogue box of the Local Group Policy Editor program opens. Here, on the left side, under Computer Configuration, click Administrative Template and then Removable Storage Access
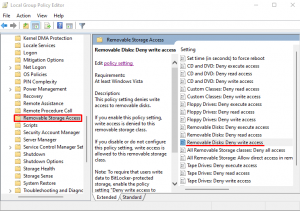
4- Double click on Removable Disk: Deny Write Access in the right part of the dialog box.
5- Another dialogue box under Removable Disks: Deny write opens.
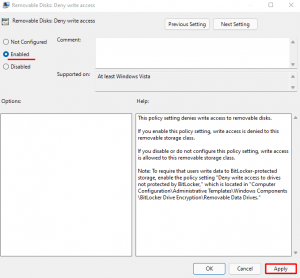
6- Make sure the checkbox is set to Not Configured or Disabled.
7- After making changes, click Apply, then OK.
Pro tip: You can fix most permissions issues using the Group Policy Editor.
Use the Diskpart Command
The Diskpart Command manages all the storage space that the computer can use. We can use this command to manage the partitions of all storage devices connected to the computer. Also, this command can manage write protection settings and create, delete or merge partitions.
Follow these steps to disable write protection for your drive using the Diskpart command.
1- Press the Windows + R key.
2- Type cmd without quotes and press Ctrl + Shift + Enter to run Command Prompt as admin.
3- Now type diskpart and press enter.
4- To list all the storage devices connected to the computer, type “list disk” and press enter.
5- You will see all the storage spaces named Disk 0, Disk 1, Disk 2, etc., along with their specifications.
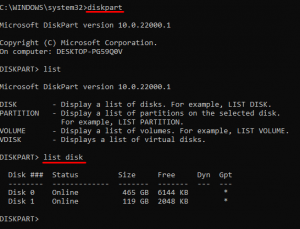
6- Here, find your removable drive from the list that shows the amount of storage space (Size) of each drive. The size of your USB drive must match one of the disks in the list.
7- Type select disk X; X is the removable disk number.
8- Type “attributes disk clear readonly” without quotation marks and press Enter.
9- Wait for the command to remove write protection. After the process is finished, type exit and press Enter.
10- Restart your computer to save the changes.
Try copying some files to USB. If this solution doesn’t work for you, continue to the next step.
Edit the registry settings (Registry Configuration).
Registry Editor allows users to change database values stored in Windows. Since the write protection values are also stored in the registry, we can manipulate these values for the write protection feature.
However, wrong changes to the registry may damage the operating system itself. Although changing the values below will not affect your computer, read all steps carefully before making any changes.
Before starting, it is recommended to back up your registry settings in case you make any mistakes.
1- Insert/connect your USB drive to your computer
2- Press Windows key + R and type Regedit.

3- Now, go to the following location from the left panel of the registry editor.
Computer\SYSTEM\CurrentControlSet\Control\StorageDevicePolicies
4- Double click on StorageDevicePolicies. There should be an item in the list called WriteProtect in the right panel.
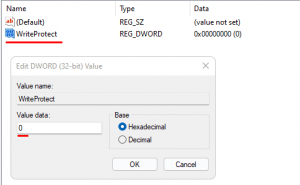
5- Double click “WriteProtect” and set Value Data to “0”.
6- Click OK to save the changes.
7- Restart your computer for these changes to take effect.
If StorageDevicePolicies does not exist, we need to add this folder and WriteProtect along with its value. If StorageDevicePolicies does not exist, follow the steps below.
1- Right click on Control from Computer\SYSTEM\CurrentControlSet\Control in the registry editor.
2- Click on New > Key.
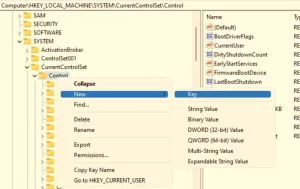
3- Change the name of the created folder to StorageDevicePolicies.
4.- Now right-click on StorageDevicePolicies and click on New > DWORD (32-bit) Value.

5- Name the entry as WriteProtect.
6- Double click on WriteProtect and set Value Data to “0”.
7- Click OK to save the changes.
8- Restart your computer to apply the changes.
After restarting the computer, all writing capabilities are available.
Turn off Windows Bitlocker
The Bitlocker feature in Windows encrypts your data so unauthorized users cannot access it. If the USB drive is encrypted with BitLocker, we need a password to access this data or turn off the feature. If a removable drive is encrypted with BitLocker, it is indicated by a lock icon.
Although we cannot access the drive unless we have a password, we can configure the drive to remove this feature. However, formatting the drive permanently deletes all files and folders inside it.
Follow these steps to turn off BitLocker.
1- Insert the USB drive and right-click on the removable drive in the File Explorer window.
2- If you are using Windows 11, click on Show more options. If you are using Windows 10, skip this step and go to step 3.
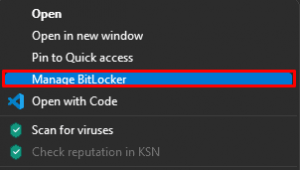
3- Click on Manage Bitlocker.
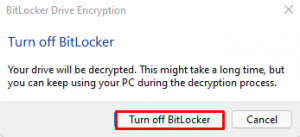
4- Click on the Turn off Bitlocker option under Removable data drives.
5- Another dialog box will open. Click here to Turn off BitLocker.
Depending on the size of the USB drive, this may take several minutes.
How to disable the USB write protection feature in macOS?
Here are some solutions we can use to disable write protection in macOS.
Use the Repair Disk Permissions method.
Permission settings in macOS can sometimes prevent you from copying a file to a USB drive. Although formatting the USB drive is a viable option for macOS, you can use the Disk Utility feature to reset the permissions on your removable disk.
Follow these steps to reset permission settings.
1- Insert the USB device.
2- Click the search icon, and search for “disk utility” without the quotation marks in the upper right corner.
3- Click on the first search result named Disk Utilities.
4- Select the removable drive you want to repair and click on the First-aid tab.
5- Click on Repair Disk Permissions.
In the latest version of macOS, Apple has removed the Disk Utility feature for Repair Disk Permission. However, we can use the terminal. Follow these steps to Repair Disk Permission.
1- Click on File on the desktop’s top left side.
2- Click on Applications in the Finders window.
3- Scroll down the page and open the Utility folder.
4- Open the Terminal. App window.
5- Now, type the following command.
diskutil resetUserPermissions / id -u
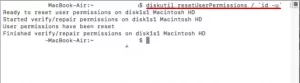
The above command will reset all your storage devices’ read or write permissions.
If the above command does not work, run the following command.
sudo diskutil resetUserPermissions /id -u
The sudo command executes any command with superuser privileges and stands for Super Do.
Restart your computer to save the changes.
I can use the repair volume command to fix any problem. If both commands don’t work, Follow these steps to reset your USB drive settings.
First, we need to know the disk number the computer has assigned to your removable drive (disk2l1). To do this, type diskutil list. Now find your removable drive by size.
If you can’t find the disk number, type diskutil info “USB’s name” |grep Node (replace USB’s name with your drive name). Now pay attention to the Node that is given with this command. Example /dev/disk2l1
After knowing the disk number, type the following command.
sudo diskutil verifyVolume /dev/disk2l1
sudo diskutil repairVolume /dev/disk2l1
When typing the above command, replace /dev/disk2l1 with the output of the previous command
Common questions
How to disable or enable write protection in a file?
If you cannot change the contents of a file, your file may be in read-only mode. To enable/disable write protection or read-only mode on a file, we need to change the property value of a file. Follow these steps to change the properties of a file.
1- Click on the file you want to enable/disable write protection.
2- Click on Properties.
3- In the Attributes section, check or uncheck the Read-only option depending on what you want to do. If you want to hide a file, you can also check Hidden.
How to add a write protection feature to the USB drive?
Follow this process to add Write Protection to the USB drive.
- Use a physical USB switch
- Use the diskpart command.
- Change specific registry values in the registry editor.
- Enable Deny Write Access from the Group Policy Editor.
.