

If You Want To Get Rid Of The Watermark Displayed On The Unsupported Desktop Page Of Your Windows 11, Follow This Article.
After the unveiling of Windows 11, many users wanted to install it on their systems but were disappointed to see the required hardware specifications.
However, these people installed it on their System by bypassing the restrictions and without the minimum hardware necessary to run Windows 11.
Everything was going well until Microsoft decided to add a “System requirements not met” watermark to inform users.
Suppose you are one of those people who have installed Windows 11 on a device that does not meet the minimum hardware requirements of this operating System. After installing the latest update, you may have encountered a surprising watermark on the desktop.
Although most users know their hardware specifications, Windows 11 build 22000.588 displays the message.”
The “System requirements not met” message on the desktop reminds the user that the System does not meet the minimum hardware requirements for the operating System.
Installing Windows 11 on unsupported devices is not easy. Therefore, it is unlikely that the user will quickly forget that his device does not meet the minimum hardware requirements of the latest Microsoft operating system.
If you are unhappy with this reminder message on your desktop, you can easily hide it in the registry. To do this, continue reading this educational article.
Remove the “System requirements, not the ‘t’ watermark, from the Windows 11 desktop.


Follow these steps to remove the annoying Windows 11 watermark that reminds you that your System does not have the minimum hardware requirements to run the new Windows:
1. Press Win + R on the keyboard and type Regedit in the Run box to open the Windows registry.
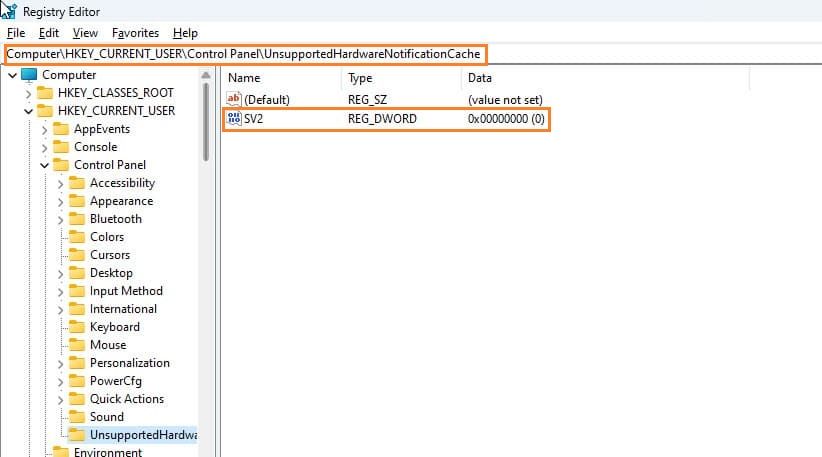
2. Scroll down or copy and paste it into the address bar.
Computer\HKEY_CURRENT_USER\Control Panel\UnsupportedHardwareNotificationCache

3. Double-click SV1 DWORD in the box on the right and change its value from the Value data section 1 0.
If the UnsupportedHardwareNotificationCache and SV1 DWORD keys are not in this path, you should create them. Right-click on the Control Panel folder in the left pane and select New> Key.
Name the key UnsupportedHardwareNotificationCache.
Then right-click inside the created folder and select New> DWORD value (32-bit). Then, rename the created DWORD to SV1 and set its value to 0.
4. Restart Windows so that the annoying watermark on the desktop disappears.
Note: SV1 value is used in stable, beta, and preview builds with build number 22000.588. If Dev builds with build number 22557 and above are installed on your device, replace SV1 with SV2 in the steps above.
A quick way to remove the Windows 11 watermark from the desktop
If you do not want to follow the steps above and are looking for a shortcut, you can use the following shortcut that does what was said above.
- If you are running Windows 11 build 22557 or higher, use the following command in the Run box (Win + R):
reg add “HKEY_CURRENT_USER\Control Panel\UnsupportedHardwareNotificationCache” /v SV2 /t REG_DWORD /d 0 /f
- If you are using Windows 11 build 22500.88 or higher, use the following command in the Run box (Win + R):
reg add “HKEY_CURRENT_USER\Control Panel\UnsupportedHardwareNotificationCache” /v SV1 /t REG_DWORD /d 0 /f
After completing the above steps, Windows 11 will no longer display annoying notifications, and the System requirements not met watermark will disappear from the desktop screen and the settings program.
The” system requirements not met “watermark is a notification displayed on Windows 11 devices that don’t meet the minimum hardware requirements. It appears in the lower right corner of the screen, reminding users that the system lacks Systemcessary components for optimal performance.
This message signifies that your device doesn’t comply with the following Windows 11 minimum specifications:
- Processor: 1 GHz or faster with at least two cores on a compatible 64-bit processor system on a Chip (SoC)
- Memory: 4 GB RAM
- Storage: 64 GB or larger storage device
- System Firmware: UEFI, Secure Boot capable
- TPM: Trusted Platform Module (TPM) version 2.0
- Graphics Card: DirectX 12 compatible graphics with WDDM 2.x
- Display: 9 inches or more extensive with HD resolution (720p or higher)
- Internet Connection: Required for setting up Windows 11 Home with a Microsoft account
This feature warns or prompts users to ensure their hardware is fully compatible with Windows 111’11’11’s requirements. Let me know if you need more details or assistance!
FAQ
Why does the watermark appear?
Because Windows 11 detects unsupported CPU or hardware and adds a watermark warning.
How can I remove the watermark?
By editing the Registry or adjusting certain system settings that control watermark display.
Is removing the watermark safe?
It can help remove the visual warning, but unsupported hardware may still suffer from stability or compatibility issues.