


How to Install Google Play and Android Apps on Windows 11
It is currently possible to install the special Android subsystem (WSA) in Windows 11 to run Android applications. The problem is that officially, you can only install apps from the custom version of the Amazon App Store, which currently only has about 50 apps.
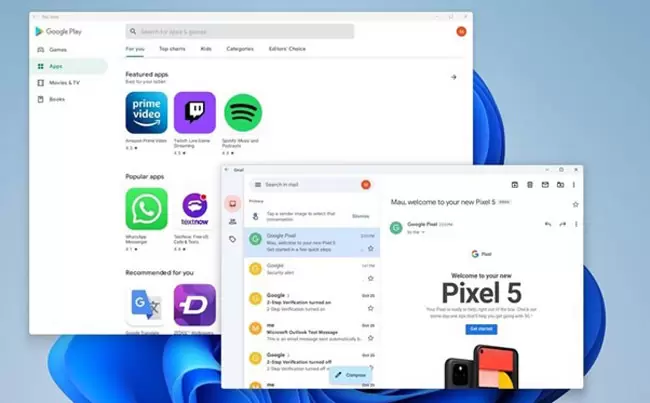
You can install or sideload Android apps in Windows 11, but it is impossible to use apps like Gmail and Google Maps that require Google Play services. However, an Italian UX design student (who goes by the name ADeltaX on Twitter) has found a way to install the Google Play Store app so that almost any Android app can get into Windows 11.
It’s a tedious process and may not work the first time, but once you get going, you’ll be able to install all your favorite Android apps.
In this article, we will introduce you to the steps of creating a custom version of the Windows subsystem for Android to install and run Android apps from the Google Play store.
Note: Attempting to install Google Play Services may violate the Play Services Agreement. Also, these instructions include downloading third-party tools and using unsupported methods. Use this guide at your own risk.
How to install Google Play Store and run Android apps
Installing the Google Play Store in Windows 11 requires launching various tools that run a series of Linux commands, Command Prompt and PowerShell. The instructions below include everything you need to complete this task. If something isn’t working properly, you probably did something wrong. If so, follow the instructions to fix it.
Setting up the environment
The preparation process includes uninstalling any Windows Subsystem for Android (WSA) and installing the Windows Subsystem for Android and Ubuntu; It is also necessary to activate Developer mode in Windows 11 and install a tool such as 7-zip to extract files, and in addition, you must also download a version of the main Windows subsystem for Android, OpenGApps, WSAGAScript scripts, and ADBKit tools.
Remove WSA
Since you cannot run both the original and custom WSA versions, you must remove the original version if installed on your computer. Otherwise, you will install WSL2.
To uninstall the original WSA, perform the following steps:
1-Open Settings.
2- Click on Apps.
3- Click on the Apps & features page from the right side.
4- Select Amazon Appstore.
5- Click on the menu (three dots button) on the right side.
6- Click on the Uninstall button.
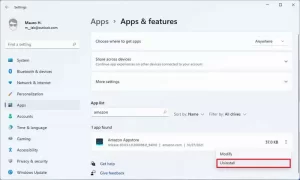
7- Click the Uninstall button again.
After completing the steps, you can continue to install the Linux subsystem.
Install WSL2
To complete these settings, you need a Linux distribution. If you have not already installed the Windows subsystem for Linux on your computer, continue with the following steps. Otherwise, continue with the steps to enable Developer mode in Windows 11.
To install WSL alongside the Ubuntu distribution, follow these steps:
1- Open Start.
2- Search for Command Prompt, right-click on the above result, and select Run as administrator.
3- Enter the following command to install the Windows subsystem for Linux and Ubuntu and press Enter:
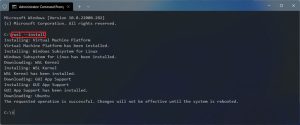
4- Restart the computer to apply the changes.
5- Continue following the on-screen instructions to install the Ubuntu distribution.
After completing the steps, the Linux subsystem will be installed with the Ubuntu distribution.
Enable Developer mode
The next step is to make sure Developer mode is enabled in Windows 11:
1-Open Settings.
2- Click on Privacy & Security.
3- On the right side, click on the For developers page.
4- Turn on the Developer mode switch

After completing the steps, you can install or sideload programs on Windows 11.
Install 7zip
Since you need to recover files from different containers, you need a program like 7-zip. If you already have it, you can skip these steps.
To install 7-zip from the Microsoft store, use these steps:
1- Open the Microsoft Store 7-zip page.
2- Click the Get button.
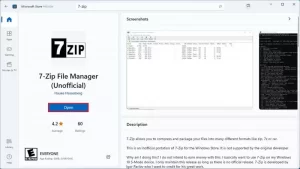
After completing the steps, the file manager program will be installed on Windows 11.
Download the WSA
The process of running Android apps from the Google Play Store requires creating a custom version of the Windows subsystem for Android, which means you need to download the package to modify it.
To download the Windows Subsystem for Android package, follow these steps:
1- Open the rg. adguard website.
2- Select the Productid option.
3- Copy and paste this ID 9P3395VX91NR.
4- Select the Slow option.
5- Click on the Check button.
6- Scroll down and click on the MicrosoftCorporationII.WindowsSubsystemForAndroid_1.7.32815.0_neu tral_~_8wekyb3d8bbwe.msixbundle link to download the Windows Subsystem for Android package.
Note: If the browser refuses to download the file, select the Keep option from the download menu.
After completing the steps, there are other components such as OpenGApps tools and custom WSAScript scripts that you need to download to continue the process.
Download OpenGapps
To download the OpenGAapps tool, follow these steps:
1- Open the OpenGapps website.
2- Select the x86_64 option for this platform.
3- Select option 11 for the Android section.
4- For Variant, choose pico.
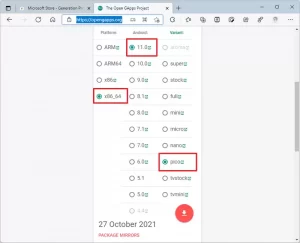
5- Click the Download button to save the file on your device.
After completing the steps, you need to download the WSAGAScript package.
Download WSAGAScript
To download WSAGAScript scripts, follow these steps:
1-Open the WSAGAScript GitHub page.
2- Click on the Code menu and select the Download ZIP option.

3- Save the file on your computer.
After completing the steps, the script package will be downloaded to the computer.
Download ADB Toolbox
At the end of the process, you need to use the Android Debugging Bridge (ADB) tools to enable the Google Play Store.
Use these steps to download the ADB toolbox:
1-Open the MediaFire download page.
2- Click on the Download button.
3- Save the file on the computer.
After completing the steps, the compressed file will be downloaded to your device.