


How to Host Multiple Websites on a Single Web Hosting Account
How to Host Multiple Websites on a Single Web Hosting Account
If you have ever googled how it is possible to host multiple websites on the same host, but the related content was confusing, you are not alone.
The information related to this issue is complicated for most people and full of complicated issues and steps. Surely only a programmer can understand what is being said.
But hosting multiple websites on one server is not as difficult. It can be done even by ordinary people like you and me.
In this simple five-step tutorial, you’ll learn how to host multiple websites on one server:
Step 1: Buy a domain name and a shared hosting plan
Step 2: Add a domain to the server/cPanel
Step 3: Update Name server
Step 4: Install WordPress on the server
Step 5: Set up the basics on your WordPress sites
If you need a WordPress host, go to the Ded9.com site and see the great plans at great prices.
But before we get into the discussion, let’s answer a basic but vital question: Why bother hosting multiple websites on the same server in the first place?
Two major advantages of hosting multiple websites on one server
1. Control all your websites from one place
Having more than one site is great – as long as you have to log in and out of them frequently while performing your WordPress admin tasks.
Yes, some tools keep all passwords and login details to make the process smoother, but it’s still a time-consuming and tedious task.
But with an integrated setup, you sign in once and manage all your web features from one dashboard.
2. You save on hosting costs
Hosting costs may seem small, but they add up over time. Let’s say you own ten websites for $6 a month. That’s $60 a month for all of them. In five years, your hosting bill will reach $3,600.
You save a significant amount of money by hosting all your domains on one server.
Now let’s see how to do it:
Step 1: Buy a domain name and a shared hosting plan
The initial step you take to add multiple sites to a server has two parts:
- Buy a shared hosting plan
- Buy the domain names you want to add
Let’s take a closer look at each:
Buy a shared hosting plan.
Not all shared hosting plans allow you to host and manage many websites on one server. If you are using a host that cannot own multiple sites, upgrade it to a host that does.
Technically, you get unlimited storage if you’re on a shared host. This means you can host as many websites as you like.
In practice, there is a limit to the amount of data and files in your bandwidth resources. So, the more resources you consume, the more likely it is that some of your sites will be straining for available resources at their peak performance.
That said, hosting multiple sites on one server is a great idea if you do it right.
Buy the domain names you want to add.
To add domains to the server, you must first own them. So, another basic step is to buy all the domain names you want to add to the server.
With a shared hosting plan and your domain names, you’re ready for the next step.
Step 2: Add a domain to the server/cPanel
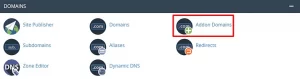
The second step is to enter the cPanel of hosting services.
Go to the Domains section and click on the Addon Domains icon:
On the Addon Domains page that appears, add your new domain in two places:
- New domain name
- Subdomains
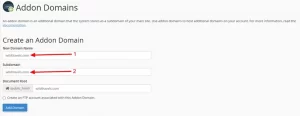
Once done, click on Add Domain.
You will see a success message similar to the following:
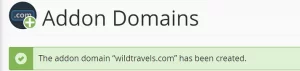
Depending on your hosting provider, you may need to wait a few moments for the new domain to be added. It may take a minute or two for the domain to fill. So, don’t panic if you don’t see the success message immediately.
Please press the back button to confirm that you did it right. Sure enough, you’ll see your new domain (wildtravels.com here) in the Addon Domains section:
![]()
Follow the same steps to add as many domains as you like:
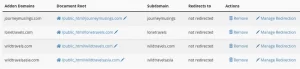
You can delete a domain at any time in the Actions column.
Step 3: Update the NameServer
Next, update the NameServer.
The NameServer update tells your domain registrar which server to redirect the domain to. Here’s how to do it on Ded9.com
The important thing is that you need to update the NameServer for each domain you want to set up with your new host.
For example, if you have domains registered with different registrars, you need to go through the NameServer settings with each one and point them to your new server – the one you want to host all those domains on.
If you have registered your domain with Ded9.com, here is an example of how to do the process.
Go to the Domains menu on the left and select the DNS tab:
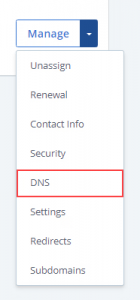
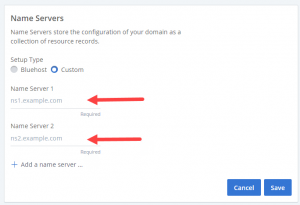
Then go to the Name Servers section and click on Edit:
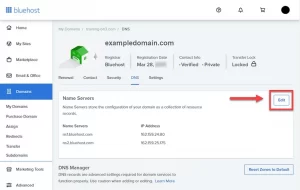
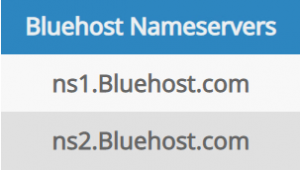
In the Setup Type section, select Custom Nameservers and then enter the NameServer for your account:
And finally, click the Save button to save the changes and update the NameServer:
In this, you have redirected the domain name part to the server that will host your sites from now on.
Step 4: Install WordPress on the server
Installing WordPress used to be difficult. Ordinary people do not dare to install WordPress. It belongs to WordPress developers. Not anymore. Modern technology has made it so simple that you can do it with one click without paying a dime to expensive developers.
There are many ways to install WordPress.
For our purposes, we will focus on installing WordPress using cPanel’s automatic installer.
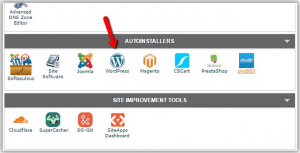
To do this, log into your cPanel dashboard. Look for the AutoInstallers section. Click on the WordPress icon:
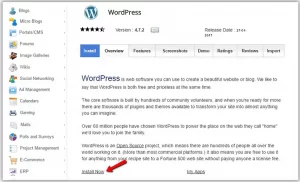
Next, click on Install Now:
Then, click Choose Protocol and select the SSL certificate for a secure HTTPS website:
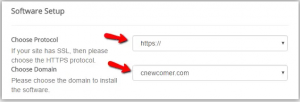
If your site does not have an SSL certificate, choose the default HTTP instead. Then click Choose Domain to select the domain name of your site.
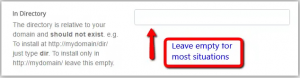
Then the In Directory section will appear. Leave it blank:
Go to Site Settings and enter your site name and description. Write down the essentials. You can polish these details later:
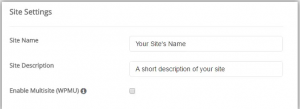
Even though the topic of this post is how to host multiple websites on the same server, you should not check the Enable Multisite (WPMU) option you see above. WordPress Multisite is a special version of WordPress that is not required for the purposes we are doing here.
Finally, assign a user to your site and create a password manually or use an automatic password:
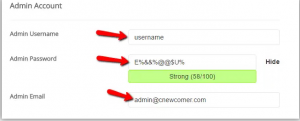
Don’t forget to write down your password and keep it safe.
Congratulations! 🤩
You have successfully installed WordPress on your own.
Step 5: Setting up the basics on WordPress sites
Have you installed WordPress on your site? It’s time to do some basic home cleaning.
You need to configure all the necessary WordPress settings according to your preferences:
- These settings include the following:
- General settings: site title, cover, tag, website address, admin email address, language, and more.
- I am writing Settings: Covers categories and blog post formats, default editor for users, and the ability to send posts via email.
- Reading Settings: Covers homepage views, number of blog posts to display per page, and search engine visibility.
- Discussion Settings: This covers most of the post and comment settings that control how people interact with your content and interact with you.
- Media Settings: Covers how to add media files to your media and content library.
- Permalink Settings: Covers how to create a custom URL structure for your permalinks and archives.
- Privacy Settings: Covers how to create a privacy policy for your site.
Conclusion
This article summarizes how to host multiple websites on one host. It’s not as hard as it seems at first, right?
It’s pretty simple, as long as you know exactly what to do and when.
Remember that you can find the best hosting with the lowest price and quality from Ded9.com.