


How to Flush DNS on Windows 7, 10 and 11?
How to Flush DNS on Windows 7, 10, and 11?
A problem in your computer’s DNS memory causes problems connecting to the Internet. If you’ve tried the usual solutions to Flush your browser’s cache and cookies and you’re still having trouble, resetting your DNS can fix your problem. Read this article to the end to learn how to solve this problem.
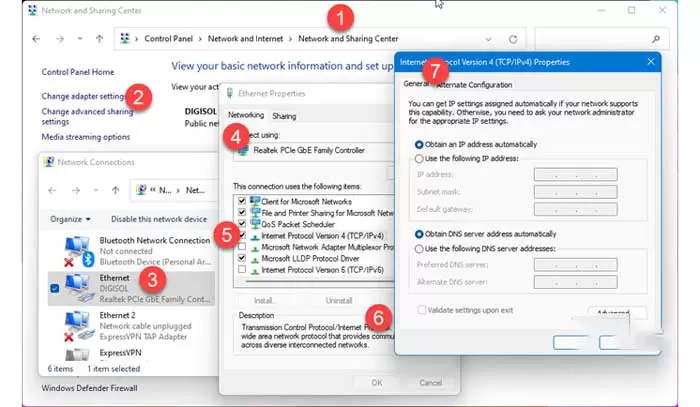
What does the DNS cache do?
Domain Name System or Domain Network System, abbreviated as DNS, is a service that converts familiar howtogeek.com domain names into IP addresses that computers use to connect. When a program tries to connect to a domain like google.com or facebook.com, your computer asks a DNS server to give it the corresponding numeric IP address. To save time, Windows 10 stores a copy of the information it receives from DNS servers on your computer by default. This resource is called a DNS cache.
While the DNS cache can make your work faster, if it encounters a problem, it will also cause your Internet connection to fail. Sometimes the DNS cache, where the information about the IP addresses of the domains is located, can be lost and corrupted due to a technical fault. Additionally, sometimes this cache is outdated, meaning that the domain name or IP address of the site you are trying to access has changed and is no longer in the DNS cache.
Click the start button to launch the Command Prompt. Next, type cmd in the search bar and then press Enter.

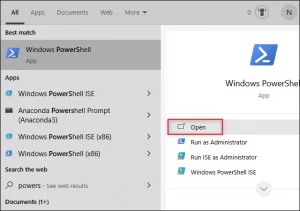
You can also use Windows PowerShell. Click the Start button, type “PowerShell” in the Start menu search bar, and press Enter.
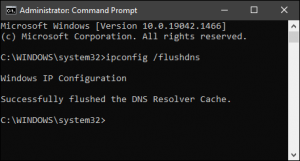
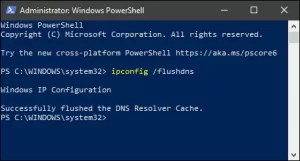
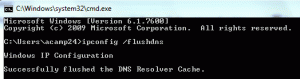
When Command Prompt or Windows PowerShell opens, type ipconfig /flushdns and press Enter. If the DNS cache is cleared successfully, the message “Successfully flushed the DNS Resolver Cache” will be displayed.
If you have used Windows PowerShell, the same message will be displayed to you eventually.
Now you can try the programs and sites that were having problems again and see if they work. If you are still having problems, we recommend that you troubleshoot your internet connection.
In Windows 7
Clearing the DNS cache removes all the information stored in the cache, making all malicious and damaged data disappear.
Follow the steps below to clear the DNS cache in Windows 7:
1- Press the Start button. In the search bar of the start menu, type cmd and press Enter.

2- In Command Prompt, type ‘ipconfig /flush DNS and press Enter.
3- This way, the DNS cache will be cleared, and you will receive a message that the process is successful.
4- Type exit in the Command Prompt or select the red X in the upper right corner of the window to exit the Command Prompt.