


How To Flush DNS Cache on Linux and Windows?
The DNS cache may fail for various reasons, including network attacks or various types of viruses. When this happens, the IP address becomes problematic for certain popular websites.
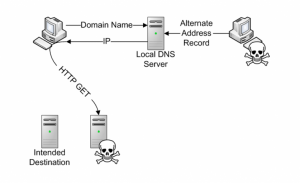
For example, instead of going to www.google.com, your browser might redirect you to the IP address of a malicious website that the attacker inserted into your system’s DNS records. Or you might even get a lot of 404 errors.
Clearing the DNS cache will delete all stored DNS lookup information. Your system will then receive the new information from the DNS servers the next time it sends a lookup request.
This article will teach you how to reset the them in Linux and Windows operating systems.
What is a DNS cache?
Linux, Windows, and other operating systems store name information in the DNS cache format. This increases the loading time of the project. Because the cache contains the IP addresses for the requested domains. Instead of requiring rerouting to DNS servers, the system responds to requests from it.
The DNS cache contains the following information:
- Resource data
- Record type
- Record name
- TTL (time to live)
- Class
- Resource data length
How to reset DNS cache in Windows
Clearing the DNS cache is an easy and quick process. This method is almost the same for all versions of Windows. In the following example, we will use Windows 10.
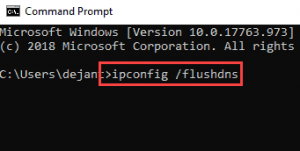
1. Open the Run window by pressing the Win+R buttons. Then type cdm and hit enter to run Command Prompt.
2. When the Command Prompt window opens, type the following line in it:
ipconfig /flushdns
3. The process should only take a few seconds. Once done, you should see the “DNS Resolver Cache” confirmation message:
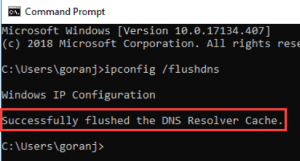
The DNS cache database on your computer is now cleared. The next time your device sends a DNS request, you should receive the correct and up-to-date IP map from the DNS servers.
How to reset DNS cache in Linux
Linux distributions are slightly different from Windows and Mac machines. Each Linux distribution may use a different DNS service. Some distributions, such as Ubuntu, have no default DNS service at all.
It depends on which service you have in your distribution and whether it is enabled by default. Some of them include NCSD, dnsmasq, and BIND.
From whatever Linux distribution you are using, you will need to open a terminal window to get started. Press Ctrl+Alt+T on your keyboard and use the corresponding command to clear the DNS cache for the service your Linux system is running.
DNS reset for NCSD service
Use this command to delete the DNS cache for the NCSD service on your Linux machine:
sudo /etc/init.d/nscd restart
Enter your password if necessary. Once the process is finished, the NCSD service will start within a few seconds.
DNS reset for dnsmasq service
If you are using the dnsmasq service, enter the following line in your terminal:
sudo /etc/init.d/dnsmasq restart
Here, if it asks you for a password, enter it. Then the service stops and starts again.
DNS reset for BIND service
If you are using BIND for your DNS service, you can use a few commands to flush its DNS cache. You may need to enter your password to complete the process.
sudo /etc/init.d/named restart
sudo rndc restart
sudo rndc exec
Note: BIND also allows you to target specific domains when performing a DNS reset. As in the following example:
sudo rndc flushname phoenixnap.com
Conclusion
This tutorial taught you how to delete DNS in Windows and Linux operating systems.
As users, we may not know the processes before viewing a web page or receiving an email. This is why clearing DNS is important.