


How to fix WordPress repair mode error
It must have happened to you that when you are updating WordPress or updating site plugins after you have completed the update operation correctly, you have encountered an error when visiting the site, that a message titled ” to carry out scheduled repairs for Not available for a short time. a minute “it will be displayed to you or in English mode with the error message ” Briefly unavailable for scheduled maintenance. “Check back in a minute ” will appear. In this article from Hostfa, I am going to teach you how to fix the WordPress repair mode error in WordPress, which usually occurs during the update of the WordPress plugin or the WordPress core on your site, and the reason for that is nothing but the incompleteness of the update operation. Various reasons cause such an error to be displayed to you for hours and not fixed, so you need to take action to fix it.
How to fix WordPress repair mode error
When you click on the button to update WordPress or update WordPress plugins, WordPress automatically executes a file in your host’s file manager. Title maintenance, now, sometimes it happens that when the update operation is in progress, for whatever reason, this file is not deleted, or the update fails, so this file remains in its place. Various other reasons can occur for this problem, such as server disconnection when downloading the updated version, interference with other plugins, which mostly occur with site cache plugins, timeout during updating, and other things that cause this error. They are in WordPress.
So by now, you must have realized that the way to fix this error is to delete this file manually. Because as I mentioned, this file is created during the update in WordPress, and after the update operation is completed, it hosts are automatically deleted. The file remains in its place, and to fix the problem, you have to manually delete the maintenance file, which we will discuss below on how to delete the file in the CPanel host and Direct Admin.
Delete the maintenance file in the cPanel host
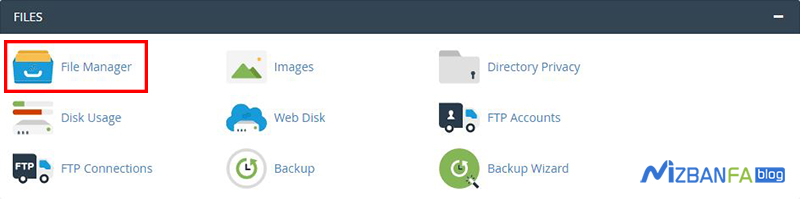
To delete the WordPress repair mode file in the CPanel host under the name maintenance, enter the CPanel host and then click on the File Manager option from the Files section.
After entering your file manager, go to the public_html and look for a file called maintenance. Look, this file is located right next to other WordPress files and folders that are in the main WordPress directory, after finding the desired file, just delete it, so that the error message on the main page of the site will be deleted immediately after deleting this file, and your site will be deleted. displayed without any problems.
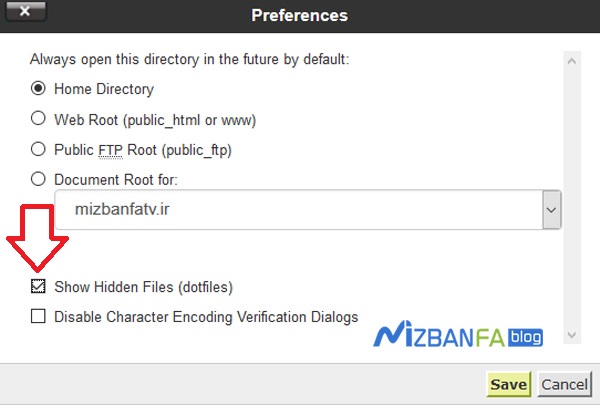
But if you don’t find this file, you should enable the display of hidden files from the settings section. Therefore, on the CPanel host file manager page, click on the Settings located at the top right to display the following window. Then show hidden files option and click on the Save button so that the hidden files are visible to you and finally view this file.
Delete the maintenance file in the direct admin host
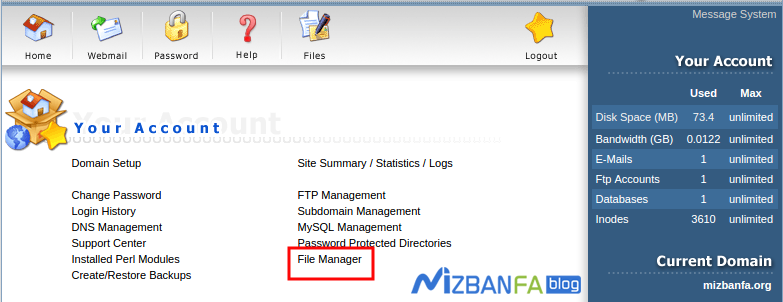
To delete the WordPress repair mode file in Host Direct Admin, which exists under the title of maintenance, first enter Host Direct Admin and then click on the File Manager option.
After entering your file manager, go to the public_html and look for a file called maintenance. Look, this file is located right next to other WordPress files and folders that are in the main WordPress directory, after finding the desired file, just delete it, so that the error message on the main page of the site will be deleted immediately after deleting this file, and your site will be deleted. displayed without any problems.
Customizing the WordPress repair mode message
But in order to customize the WordPress repair mode error message when updating, you can use the following method to display the default message “Unavailable for a short period of time to perform scheduled maintenance operations.” Come back in a minute” that I mentioned above, define a desired message to be shown to visitors, for this purpose, first create a file named maintenance.php in the /public_html/wp-content/ path, which is related to Create WordPress files, then put the following codes in this file.
<?php
 $protocol = $_SERVER["SERVER_PROTOCOL"];
 if ( 'HTTP/1.1' != $protocol && 'HTTP/1.0' != $protocol )
     $protocol = 'HTTP/1.0';
 header( "$protocol 503 Service Unavailable", true, 503 );
 header( 'Content-Type: text/html; charset=utf-8' );
 ?>
 <html xmlns="http://www.w3.org/1999/xhtml">
 <body>
     <h1>We are updating, please check back in a few minutes, thank you for your patience...</h1>
 </body>
 </html>
 <?php die();  ?>
When you update the site, the file maintenance is done. If it is created on your host, instead of displaying the default message, this page you created will be displayed, which you can make more user-friendly by designing and styling it using CSS