


How to Fix the SSD Not Recognized Error in Windows
Earlier, Computers were equipped with traditional magnetic hard drives, which had drawbacks and problems. But now, solid-state hard drives (SSD) are preferred over older options due to their many advantages. The reason is that they are made with newer technology, which makes them more durable and stable than traditional hard drives.
Since they have no moving parts, they are more compatible with temperature changes and completely resistant. The most notable difference is the speed boost you’ll experience by switching to an SSD from a regular hard drive. You will notice that your computer will start up or boot much faster than usual, and you will be able to do things faster.
Therefore, whether you want to save the images you have downloaded using the Spectrum mobile application or whether you want your important files to be stored more securely, SSD hard drive is the best option. However, when you change your hard drive to SSD in Windows 10 system, you may encounter SSD not recognized error. This problem may bother you; Because you need it to boot your computer.
The good news is that this problem is usually a trivial one with easy solutions. You need to do a little troubleshooting and make sure your SSD is connected properly. Usually, you can make everything go back to how it was before with just a few tricks and changing part of the settings. Usually, by trying the following solutions, your problem should be solved easily; But if these solutions do not work, you should consult a specialist.
Confirm diagnosis from BIOS
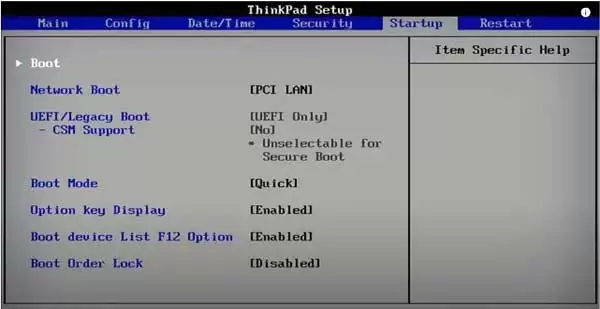
To fix SSD not detecting an error in Windows 10, you first need to check if your SSD is properly connected. If so, your computer’s BiOS will detect it. The BIOS controls the basic functions between your operating system and the various devices connected to it. Additionally, it boots your computer, so it should recognize your SSD.
To confirm this, you need to open the BIOS menu on your computer. The specific task key depends on your computer manufacturer, but it’s easy to access. Once you open the menu, look at the boot menu and see if your SSD is listed there.
If it doesn’t, your BIOS doesn’t recognize it correctly. This could be due to various reasons, such as faulty hardware or problems with the SATA settings in your BIOS menu. So you have to change the SSD or change the settings in the menu.
Configure SSD settings
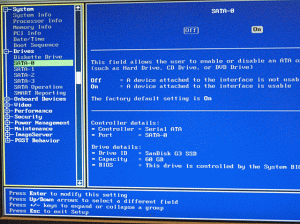
You need to check the settings if your BIOS still doesn’t recognize your SSD. SATA settings refer to the hardware interface that connects your hard drive to the motherboard.
Change the SATA controller mode to fix SSD’s not recognized error in Windows 10. To do this, you need to access the BIOS menu. Different manufacturers have different ways to access this menu, so do your research before starting.
Changing controller settings is very simple. You need to go to the BIOS menu and open Storage Options. Go to Serial ATA and then to SATA Configuration or similar settings. Select the IDE Compatibility mode, save the changes and restart your computer.
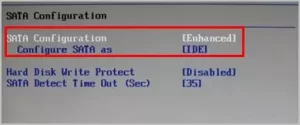
Now the BIOS should recognize your SSD. You can start working with Windows 10 after launching it.
Initialize to SSD
When you get a new SSD, you need to initialize it on your Windows 10 system. You won’t see it in the Disk Management or File Explorer menus if it’s not initialized. Setting up an SSD hard drive is a fairly simple process. The step-by-step guide to do this is as follows:
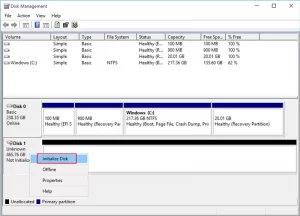
1- In the search bar of the start menu, search for Disk Management, right-click on the best match, and select Run As Administrator.
2- Next, select your SSD and right-click until the Initialize option appears.
3- When in the Initialize Disk dialog box, select the SSD and its partition style. Then click OK.
4- Afterward, go back to the Disk Management menu and right-click on the SSD Volume until New Simple Volume appears and select it.
5- Finally, follow the instructions given on the screen to assign a capacity and a letter to the drive. After finishing the work, be sure to restart the computer.
After completing all these steps and restarting the computer, you should be able to find your SSD in the File Explorer menu.
Solve memory problems
Sometimes, memory problems prevent your computer from recognizing the SSD. To identify such problems, run the Windows Memory Diagnostic. Search for the tool in the start menu, right-click on Best Match, and then run Run As Administrator.
This should help your computer detect your RAM or hard drive and fix any problems. When you’re done, save whatever you’ve done and restart your computer. When the computer reboots, it will start troubleshooting and restart automatically to show you the results.
Finally, you should check if your BIOS recognizes the SSD in the File Explorer or Disk Management menu and initialize it as described earlier.
Check Drive Letter
Usually, Windows 10 cannot detect an SSD when a drive letter is missing or inconsistent. You can easily solve this problem by assigning a new drive letter in the Disk Management menu. In the Disk Management dialog box, right-click on your SSD.
Then select the Change Drive Letter And Paths option. If the drive letter does not exist, select Add, and if you want to change the existing drive letter, select Change.
You can select the new drive letter from the drop-down menu and press OK to apply the changes. Then restart your computer. You should be able to find your SSD in File Explorer.
These methods are some basic solutions to fix SSD not detected errors in Windows 10. You can start with these to solve your problem. However, if even these solutions do not work, there are probably more serious problems with the SSD that should be fixed under the supervision of a professional.