


How to fix the Enable Keep Alive error in GTmetrix
Enable Keep-Alive is one of the most visible errors when testing site speed with GTmetrix. This feature is related to the number of requests from the server to load files and data from the site. This feature is known as keeping alive; in this section, I will explain what is alive and how we can activate keep alive on the site. This feature allows the browser to receive more than one file from the server simultaneously. In other words, when you open the address of a site page and the CSS, JavaScript, images, etc. files start to load, so that after the complete loading, the appearance of a site and its contents will be shown to you. The activation of keep alive makes it possible to All these files to start loading simultaneously. Not that it is necessary to load, for example, CSS files in turn at one stage, images at the next stage, and so on until a complete site is loaded.
In this tutorial, from Hostfa’s knowledge base, going to discuss how to enable keep alive on the site. By activating this feature, if you have encountered the problem of Enable Keep Alive in GTmetrix, you can easily solve your problem by adding a short piece of code. .
Training on how to fix the Enable Keep-Alive error
When you go to the waterfall tab, you will see data similar to the image below that specifies each file that is loaded on the site and how much time it takes to load each one.
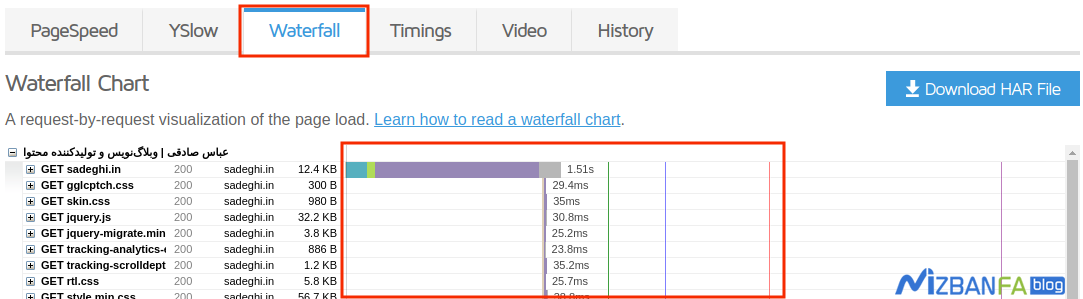
As you can see in the picture, a time line will be displayed for each file depending on its size. Depending on the server settings, these files can all start receiving from the server at the same time or can be done one by one. The best solution is to do this at the same time so that the loading time of the site does not take long, but some hosting companies may have disabled this feature due to their work policy.
What is Keep-Alive?
If the Keep-Alive feature is not active on the site, CSS, JavaScript, HTML, etc., files will be loaded separately. That is, when you enter a site, first that page starts to be downloaded in HTML mode in the background of the browser, and then the addresses inside this HTML page, which include css and js files, are checked one by one, and every time you go to the address One of these files will be sent to the server to load one request. In this case, if there are several files and on the other hand, due to the high simultaneous visits, these requests are constantly sent to the server by the users, the site will be slow. Because all these requests should be checked one by one and the appropriate answer should be given to them. The image below occurs when this feature is not activated.
But when the Keep-Alive feature is enabled, all css and js files will be requested from the server in two separate requests and they will start receiving at once in a timeline. So, in this case, the number of requests on the site will be reduced and it will increase the site’s speed and fix the site’s slowness. In the image below, you can see an example of keep alive being active.
Enable Keep-Alive from htaccess.
Now, to activate this feature in WordPress, just add the following code at the end of the htaccess file. host and save it so that the Keep Alive feature is activated on the site and all css, js, images, etc. files start to be received from the server in one request. For this purpose, log in to your host and click on the File Manager option.

Then look for the htaccess file in the path where WordPress is installed. Browse and right-click on the file and select Edit. Finally, copy the following codes and add them to the end of the file.
<IfModule mod_headers.c>
Header set Connection keep-alive
</IfModule>
After saving the file, the keep alive function is activated on the site, and it causes the files of your site to start receiving from the server at the same time, which will make the site load faster and increase the speed of the site.
Enable Keep-Alive on Apache Server
If you have access to the server and it is Apache, you can use the following code.
#
# KeepAlive: Whether or not to allow persistent connections (more than
# one request per connection). Set to "Off" to deactivate.
#
KeepAlive On

#
# MaxKeepAliveRequests: The maximum number of requests to allow
# during a persistent connection. Set to 0 to allow an unlimited amount.
# We recommend you leave this number high, for maximum performance.
#
MaxKeepAliveRequests 100

#
# KeepAliveTimeout: Number of seconds to wait for the next request from the
# same client on the same connection.
#
KeepAliveTimeout 100