


How to edit video for YouTube
YouTube is one of the most widely used video-sharing platforms. Content creators on YouTube need to learn a variety of other skills in addition to recording good videos. Editing videos allows content creators to create unique and engaging content. In this article, we will review nine simple steps on how to edit videos for YouTube.
What is the best YouTube video editing program?
Most video editing tools today are very flexible for converting files. MP4 and other common extensions will not stress you out.
Let’s not forget that YouTube Video Editor is a great resource for beginners who are just beginning to learn how to edit videos.
We use Adobe Premiere Pro. The process is similar to Final Cut, Windows Movie Maker, and iMovie. If you work with AVID, you probably know how to do all this.
Most video editing software offers titles, color correction, audio tools, and transitions, all of which can be used to improve the final product. Software like DaVinci Resolve is completely free and much more advanced than the principles offered by editing software like Premiere Pro.
If you want to make a name for yourself in the world of YouTube, these tips can help you produce quality content to engage your audience.
Two other software
Famous VDSC software
VDSC has always been one of the best free video editing software for YouTube. It supports all popular video and audio formats and has various editing tools for beginners and professionals.
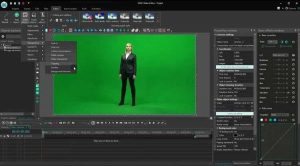
But the highlight is the key chroma tool used to make movies with a green background. If you are a YouTuber, there are times when you need to use the green screen. Fortunately, VDSC allows you to replace the green background with anything you want easily.
VDSC also has many effects and filters that users can work with. It also does not require a large system and is a good option for computers with low specifications.
CyberLink PowerDirector 365 software
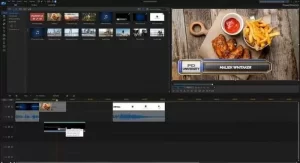
CyberLink PowerDirector has been used for a long time and has become a popular video editing program in Windows. An Android version was also included in the list of the best video editors for Android.
PowerDirector is more compatible with editing defaults on YouTube than any other software. It also has a familiar interface that appeals to PowerDirector fans and anyone who has used a video editor before.
Cyberlink PowerDirector 365 is available for Windows, Android, and iOS.
How to find a YouTube video editor?
We will explain how to access the YouTube video editor. Follow these steps:
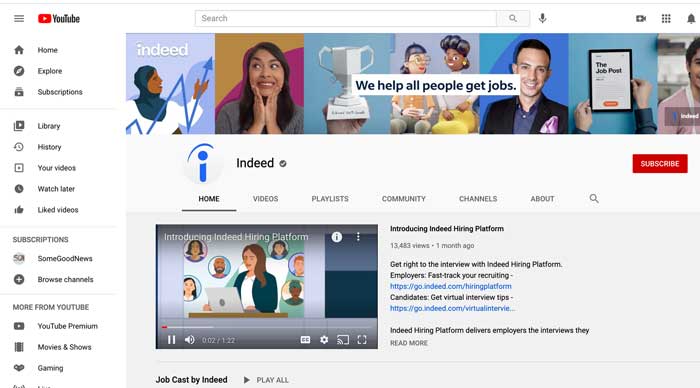
1. Go to YouTube Studio.
2. Click on Content in the left navigation menu.
3. Find the video you want to edit and hover the mouse over it. Click on the pencil icon to access the video details in the open menu.
4. Click Editor in the left navigation menu.
When you see such a page, it means you are in the right place:
You can also access the video editor from the watch page. To do this, click on one of your videos and watch it the usual way. You can see your comments, video descriptions, and other suggested videos.
If you log in as the channel owner, you will see two blue buttons below the video. Click the Edit button to access the video detail page, then select the video editor again.
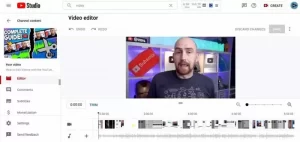
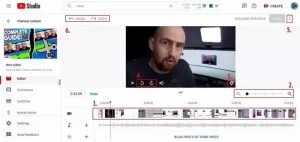
The main controls in the YouTube video editor
A good video editor has user-friendly controls. YouTube has six important controls you will need:
1- Video timeline: An area for browsing the entire video with a marker to click and drag on the timeline.
2- Zoom functions: A tool for zooming and zooming in on the table when you can make changes to the movie more accurately.
3- Video speed controls allow you to change the video speed.
4- Jump forward and backward: Using these controls, you can move the video forward or backward by 10 seconds.
5. Keyboard shortcuts for the Editor: List of commands for faster editing.
6- Functions related to a step back or forward: A tool to delete the last edit or re-apply some changes made.
Match the numbers above with the image below to find each number control quickly.
YouTube video cut
Video trimming is a common task that every creator must master. Follow these steps to cut scenes in YouTube videos:
1. Go to the YouTube video editor (go to YouTube Studio> Content> Hover over the video> Pencil Icon> Editor).
2- Click on the trim button to highlight the entire video in blue.
3. Use the gray video cursor to move around the timeline to get exactly where you want to cut—zoom in so you can see the sound waves and have a fine selection.
4. Go to the beginning of the video, click on the dark blue bar and drag to the gray cursor position. This part of the video will be grayed out and will not play in the video when the result is tested.
5- After cutting the desired area, click on Preview to preview and see the changes.
Do not worry about saving changes. In the following, we will show the most effective way to do this.
Share YouTube video
In this step, we separate and delete a part of the video. It is a combination of division and cutting. After applying these changes, we will explain the best way to save the movie.
Follow these steps:
1. In the video timeline, drag the gray cursor to the desired point to separate or split.
2. Click on Trim and then Split.
3- The gray indicator should now be highlighted in blue. Drag the marker from the split point to create a slit in the video. The gray area will be removed from the video. To cancel it, click on the X symbol above the gray areas.
4- After finishing the work, follow the steps of the previous part to cut the selected area in the video. Click Preview to see a preview of the results of these changes.
Save editing changes in YouTube Editor
1- To save, click on the blue button in the upper right corner instead of clicking on the three dots.
2. From the drop-down menu, click Save as New.
This option allows you to save the changes as a new video. If you click the Save button, YouTube will show the original video without editing while you have spent a few hours processing the changes.
So make the edits before the video goes public. If it’s released and you need to change something, set it to private to make changes to the video.
Add music to the YouTube editor.
Sorry, you can not add external audio or video to your YouTube editor. This means that the sound or other sound effects must be made using other video editors such as Final Cut Pro or Adobe Premiere Pro.
However, you can add free royalty-free music. YouTube has an audio library that is accessible from the video editor. His music is also very beautiful!
Add audio tracks to the video:
1- Click on the music icon (quarter note) on the left side of the video timeline.
2- By default, a panel containing free songs will appear. You can scroll through the list, listen to songs, and select one. Click Add to add the song to the video timeline. Click on the Audio Library for more information on all songs.
3. When the song is on the timeline, a blue bar with three dots is displayed at the end. A menu that you can click to delete a song or view its license, this license explains whether you should give credit to the artist in the description of your video.
4- Next to the three points are hybrid controls. Click on the levels icon and drag the slider to the appropriate position. By default, the song completely replaces the original sound in the video; for a good combination of the two, you have to set these settings.
5- To place a song, click and drag it to the desired location in the timeline
Tips for editing your videos on YouTube
These tips will help you learn how to edit your videos for YouTube.
- Record several impressions. The more content you have, the more unique cuts and effects you can create in your YouTube videos. Likewise, more content allows you to be creative and use more editing tools.
- Join the Academy of Manufacturers course. YouTube Academy of Producers provides videos and tips to help you develop your video editing skills as a content creator on YouTube.
Watch your completed video several times. Watch your video several times to make sure there are transitions and that the video conveys the message you want to the audience. You can also ask a trusted friend to watch the video and ask for feedback. - Take advantage of keyboard shortcuts. On YouTube, you can perform operations such as undo, rebuild, cut and split faster using keyboard shortcuts. You can use this tool to speed up the editing process.
- Be creative. With all this, you apply your editing style to the video. Try to play with different features and test your creative abilities.
So, in short, how to edit videos for YouTube?
Follow the steps below to edit videos using YouTube Studio’s Editor for YouTube.
1. Log in to your YouTube account
The first step in editing videos is to log in to your YouTube account. Then, select or upload the content you want to edit and go to the Editor. If you have not yet created a YouTube account, you can sign up for it for free using your email address.
2. Organize your content to prepare for editing
Organize your content in advance; It can help you make the editing process easier and faster. Upload and back up your content to your computer. Then put them in a specific folder so you can easily find them when editing.
3. Complete editing, assembly, and assembly
Editing Assembling and editing is sometimes referred to as “editor cutting” or “primary / careless cutting.” Take your best clips and organize them in the order in which they create your video scenes. At this point, please do not focus on cutting the clips together or transitioning them.
Make sure your videos are arranged so they can tell the story in a way that conveys the main purpose of your video to the audience.
4. Shorten the clips.
Start shortening clips by targeting long breaks or sections that do not fit the overall style of your video. Click the trim button and select the parts of the video that you want to delete. Depending on the style you want, you can select and cut long breaks or mistakes in the video. You are reviewing the video again after each edit is a good idea to make sure that you have shortened the sections. Using the split button, you can split your videos into several sections in the same way.
5. Edit transitions
Jump Cutting is a popular technique used to reduce the overall duration of the video. You can also use other creative transfer tools on YouTube, such as dissolve or fade. You can also adjust the colors and filters on your videos and transitions using color correction tools. Each time you create a transition, you can see what the changes look like. This way, you can undo the changes if they do not turn out to be what you were hoping for.
6. Add sound and music
Once you have completed your content design and placed them in your transitions, it is time to add sound or music. The type of audio you use in your video may depend on the type of video you produce. If your video is an instructional video, you can accompany your audio with it. If your content does not have sound, you can add appropriate music to it.
If you need free music, you can use the YouTube Audio Library, which gives you a long list of music you can use in your video; Without encountering copyright infringement issues.
7. Add additional effects
Adding other effects, such as card titles, can help you add more detail to your video, but you can also separate your content. You can add a final page to your video using the templates on YouTube. These templates can help you finish the video by asking viewers to follow your other videos or clicking on your page’s Subscribe button. If you want, you can create your final slide from scratch.
You can also use the “add blur” button to blur faces while playing a video. This way, you can choose to blur all the faces or select some faces to blur. You can scroll through the video and select the faces you want to blur.
8. Watch your video.
Before you finish the editing process, it is best to watch the full video once. Find the bad transitions carefully, and you may also want to edit sections. Be sure to watch the video with audio so you can check how well the music or soundtrack matches the video.
9. Share your video on YouTube.
Once you are satisfied with your video, you can share it on YouTube. Click export to upload the video to YouTube and share it with your followers. Once your video has been uploaded, you can add captions and title tags to it so your potential viewers can understand what your video is about. Tags also help people search for similar content.
Why learn how to edit videos for YouTube?
Editing is one of the most important parts of post-production. Cutting and combining parts of your video will make it more appealing to viewers. While there are countless video editing apps, YouTube has provided some of the best tools for its users for free. These tools