

The ability to create moments on Twitter is gradually available to all users. Moments on Twitter allow the user to connect multiple tweets in the form of a story and multiple slides. Moments was first created to help users stay up to date with what’s happening in the world without following a large number of people or hot topics.
Moments was first introduced in October 2015. At that time, only Twitter and some of its selected partners organized various topics, including news, sports, and entertainment, into Moments. Then, in August 2016, Twitter made Moment production available to a wider group of internet influencers and content producers. After that, on September 28, this possibility was made available to the public.
Posting a story on Twitter
If you are reading this right now, you are probably one of those active on Twitter. It can be said that Google partially owns Twitter; therefore when it comes to ranking and indexing, Twitter is given a lot of attention, just like Google sites. You can use Twitter to increase your customers and promote your products if you have a specific business. Recently, Twitter has added a feature called Moment to its features, which is something like a story on Instagram. Today we will teach you how to post a story on Twitter.
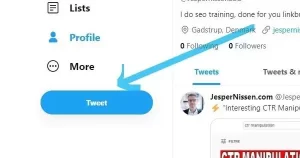
Step 1: Create a tweet with your own Twitter account
Log in to your Twitter profile, click the blue tweet button and create a tweet. Tweets can only contain text, photos, or text with a link to your site or YouTube channel. You can create multiple tweets simultaneously by clicking the small + button next to the tweet button. At this stage, you should tweet only one photo because you will choose the photo cover of your Twitter moments from among your recent tweets.


Step 2: Go to Create a Moment on Twitter
By clicking on the More option in the left menu and then clicking on the Moments option, you will be directed to the section on creating moments on Twitter.

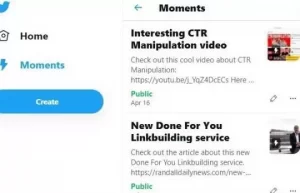
Step 3: Create your Twitter Moment
At this point, you will see the complete list of your moments. This list will be empty if you create a moment for the first time. Click the blue Create button to get started.

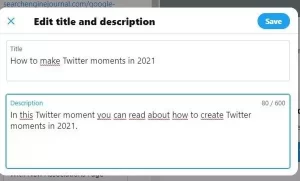
Step 4: Add the desired title and description to your Moment
You will now be presented with a split screen where you can see the list of tweets on the left side and a preview of your finished Moment on the right side of the screen. Click on the pencil icon on the right to add a title and description of your Moment. Remember to include relevant keywords in the description of your Moment.

Step 5: Add Tweets to your Twitter Moment
This part seems to have slightly reduced the user-friendliness of the Twitter user interface. You should look at the top left of your screen to see the different types of tweets, you can add to your Moment. These tweets include:
- Tweets I’ve liked: Includes all tweets you’ve liked.
- Tweets by account: You can search all your account’s tweets or any other account from this section.
- Tweet Search: You can use the search bar to search for a specific tweet, tweeted word, or hashtags used in tweets.
- Collection ID: You can enter the ID of the collection you created in Tweetdeck.
You need to select the tweet by account option now and then search for your Twitter account name in the search field. In this way, you can see the complete list of your tweets. Then you have to choose the tweets you want to add. After finishing, click on Add.
Twitter recommends adding about 8 to 10 tweets when creating a Moment. So do the same when choosing tweets.


Step 6: Add a cover photo
If there is a photo in your selected tweets, now you can choose it as your Moment’s cover or cover image. To do this, click on the camera icon at the top right of the screen. On the pop-up page, you see, you should see the images you tweeted and included at the Moment. Now select the image you want and click on Next.
If you click the Add from Tweet URL button, you can directly add the URL or the address of the tweet you want, along with the image you want.
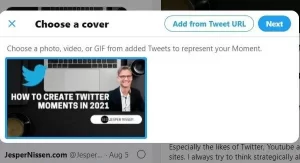

Step 7: Crop the Moment cover image
When you have chosen the image you want for the cover or cover of Moment, you have to cut it so that its size is suitable for display on a computer or mobile phone.


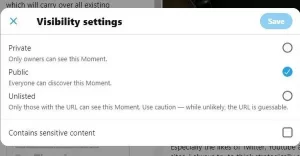
Step 8: Publish your Moment
Take a minute to go over everything again to make sure you haven’t missed anything. When sure, click the blue Publish button to publish and send the Moment. Remember to make it Public otherwise; others will not be able to see your Twitter Moment.

Step 9: Tweet your Twitter Moment
Maybe this step is not very understandable for you, But now it’s time to tweet your Twitter moment on the pop-up page. Click on the blue Tweet button to finish posting your Moment.
Step 10: Share your Twitter Moment
One of the good recommendations is to try sharing the moments you created on Twitter on Facebook, Tumblr, your WordPress blog, and other social media channels. You can also ask your friends to retweet your Twitter moment so it can be seen as much as possible.
We hope today’s article was useful for you and that you can enjoy tweeting and making moments on Twitter with the tips of this tutorial!
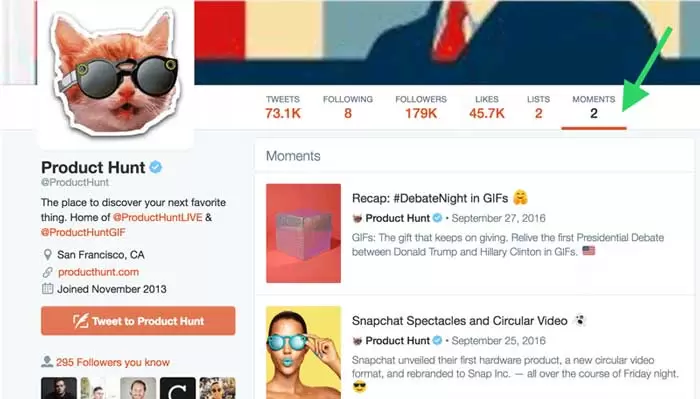
4 Ways to Use Twitter Moments
All of us have recently witnessed the spread of the phenomenon of “Story” in social networks Snapchat and later Instagram. The moments can also be compared with the stories in these networks. Of course, moments differ slightly from the stories created on Instagram and Snapchat.
Twitter has made organizing content for Moments very simple. You can get content from any Twitter account you want and easily tell your story using a variety of views and multimedia content. Also, since the beginning and end of the moments are clear and specific, it is easy to cover different topics by creating multiple moments.
In about a year since the experimental phase of Moments, several successful and practical cases have been observed. Here I would like to introduce you to four methods of using moments.
Let’s get started.
1- Organizing a Twitter storm
A Twitter storm is a series of tweets published rapidly (usually focusing on a specific topic). A Twitter storm is similar to a short essay and allows users to share their thoughts in more detail.
Now it is possible to publish Twitter storms in the form of Moments, and users can read a series of tweets without having to scroll through the timeline to find each tweet in the correct order. In this way, the more detailed publication of thoughts and opinions on Twitter increases the possibility of increasing clicks and views.
2- Show your followers behind the scenes
By behind-the-scenes publishing content, you can communicate well with your audience and share the human side of your business on social networks. Using moments is a great way to express the behind-the-scenes stories of the company, which can be done in the form of a series titled “Day of the Days” or a special show of the daily life in the company and how things are done.
For example, Allure magazine created the next Moment to show its followers a behind-the-scenes look at a day in the life of magazine editor Michelle Lee:
Step into the heels of our Editor in Chief @heymichellelee for a day! ?? https://t.co/g1zEgagtIM
— Allure (@Allure_magazine) August 9, 2016
Walk in the footsteps of our editor @heymichellelee for a day!
— Allure (@Allure_magazine) August 9, 2016
3- Organizing news and timely content
One of the strengths of Twitter is its instantaneous nature, and usually, content that is published at the right time and covers a hot topic will achieve great success on Twitter. Moments were created to inform Twitter users of what is happening in the world around them.
In a blog post written to introduce Moments, Twitter product manager Madhu Mutkumar wrote:
“People post hundreds of millions of tweets every day. Among them, some phenomena do not happen anywhere else: conversations between heads of state and famous figures, citizens reporting events in real-time, cultural memes, live reporting of a big game that is going on, and many more. Other things. We know it can be challenging to follow Twitter-specific moments like this, especially if you don’t follow specific accounts. But there is no need for these difficulties anymore.
“Moments help you easily find the best content on Twitter, no matter who you follow.”
4- Creating a product profile
It has become common for every new product to be presented with content for social networks: GIF files, videos, photos, and tweets that announce the new product and how to use it. Moments provide a space to gather all these contents in one place and use them to publish key details related to the product offering.
Now it’s your turn: How do you use Twitter Moments?
I’m excited to see that all users have found the opportunity to use Moments, and I look forward to seeing the creative ways people and companies use this Twitter feature.
Are you excited to try Moments too? Which method do you prefer to use them? Please write us your opinion in the comments section at the bottom of the page.