


How to completely uninstall WP Super Cache Plugin?
How to completely uninstall WP Super Cache Plugin?
This tutorial will teach you how to delete WordPress cache using the WP Super Cache plugin. Are you trying to make changes to your WordPress website, but all seem to be in vain?
For example, you just added an image, edited a topic, or fixed a mistake in the text of a blog post. However, you will not be able to see the changes on your site.
This is most likely due to a problem with saving pages. This tutorial will teach you how to clear the cache using the WP Super Cache plugin.
By the way, what is cache? A cache is an intermediate buffer that allows you to store frequently used data in your memory or hard disk, which can significantly speed up issues.
Some good examples where caching has positive results are:
- Request the latest Twitter post;
- request and output weather from a third-party service;
- request the latest entries from the database;
- Request site name from the database
However, as you can see, if you don’t clear it in time, the cache is harmful to the site’s performance. That’s why today we’re going to show you an easy way to clear the cache using the WP Super Cache plugin.
Creating a cache on the server side of the WordPress blog reduces the site’s loading time.
Before continuing the article, if you need to buy a WordPress host, visit the Ded9.com site and see the great plans at great prices.
Caching the WordPress page
There are three main types of caching in WordPress:
- Page Caching – allows you to cache entire pages and export them from the cache on subsequent requests.
- Object Caching allows you to cache the desired data type in memory.
- Transit caching – similar to object caching, it allows storing data for a specific period.
All three types of caches depend on each other under certain conditions.
It takes a lot of work to generate a page from the WordPress archive. These are multiple requests to the database to get the latest entries, widget settings, theme settings, active plugins, site name and description, background image, title, and more.
Page cache (page cache) allows you to save the result of the entire page. The next request to the same address gives the same page from the cache faster and less load on the server.
When the contents of pages or entries change, the page cache is reset, and a new page with updated data is cached on a subsequent request.
In WordPress core, the page cache is not implemented. However, all the necessary functionality to implement this is present in modern plugins. WP Super Cache and W3 Total Cache are two of the best page cache plugins.
WordPress Super Cache is one of the most popular cache plugins used by over 1 million WordPress users.
This Plugin allows you to create and export static HTML files for your pages.
Additionally, you can configure the output of these pages directly by your web server (Apache or Nginx), bypassing the processing of PHP files. There are also additional functions like CDN setup, mobile integration, etc. WP Super Cache is suitable for both beginners and experienced WordPress users.
Delete cache with WP-Cache plugin
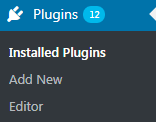
First, let’s enter the WordPress dashboard (admin panel). Find the Plugin> Installed Plugins tab or Plugin > Installed Plugins on the left and go to the WP Super Cache plugin. Click on the settings section to open its settings.
2. The Plugin must be active so that you can make changes to its settings. Please enable the WP Super Cache plugin before applying any changes to the settings.

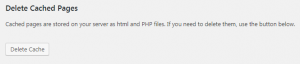
3. Now find the Easy tab and click Delete Cache to delete all stored cache:
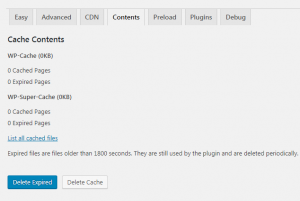
4. Go to the Content tab, where you need to click on the Delete Expired button:
5. You can now disable and remove the WP Super Cache plugin from the Plugins tab:

Saving data and deleting the WordPress cache will help you increase the speed of your site and significantly reduce the load on your server. Today, you’ll learn how to clear cache using the WP Super Cache plugin.