


How to Check the Gateway of an IP for MikroTik VPS by CLI and with Winbox?
How to Check the Gateway of an IP for MikroTik VPS by CLI and with Winbox?
The literal meaning of Default Gateway is almost self-explanatory
In the basic case, we have two types of routing. One through the network layer 2, which is the physical layer, which means that the routers are connected to Kyle
Layer 2 means that the Mac addresses of the network cards are visible in each other’s tables, and routing is done this way.
Layer 3 means that routing is done via IP
In a network of IPs, to access another IP, they have to go through routes to reach their desired destination.
We have two destination modes. There is a state of IPs within the local network called IPs within the subnet. Such as IP 192.168.0.1 with subnet 255.255.255.0 or CIDR 24. This means IP 192.168.0.1 to IP 192.168.0.255 is defined within the internal network, and IPs in this range do not need a router to access each other.
The whole destination system is like a query. This means that the query is performed before the packet is sent, which, for example, recognizes IP 1.2.3.4. If this IP is initially in the initial subnet of the network, it will be answered, and routing will be done.
In previous articles, you got acquainted with how to find a microcontroller, and you were able to define an IP to your microcontroller router through the microcontroller console. And you were able to connect to your microcontroller through inbox software. Why were you able to connect? Because your system IP and your MikroTik IP are in the same range and can see each other without needing a router.
Now to define the Default Gateway to your MikroTik and the so-called Internet to your MikroTik, you must enter the IP address of the next router that is supposed to take the routing operation to your Microtek router.
In the routing network, it reaches its final destination by passing through several routers
To get started, log in to your microcontroller via the inbox program and go to ip> Route
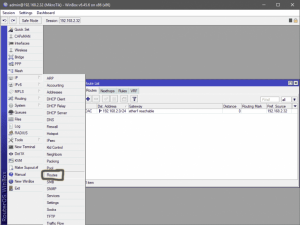
There are sections in this location that include Routes, nachos, rules, and VRF. We are working with the Routes section, and the Default Gateway is defined in this section. Click on the positive sign on the page to open the page for creating a new Route

There are several cases in this section
1 – Dst. Address: This is the place to define the destination IP to which the routing is to be defined
2 – Gateway: This section is to define the Default Gateway to which routing is to be sent to the desired IP
3 – Check Gateway: This place is used to check the Gateway, which has two options arp and ping. This option is done to check the availability of the IP gateway of 2 types of ping and arp, and if the Gateway is not available.
The desired root view goes to Unreachable mode and is practically disabled
4 – Type: This option is to define our Route type. There are four modes for this
- Blackhole: This routing to the desired IP eliminates the so-called silence and does not allow routing operations to be performed. Silence means it does not send a message to the sender and the origin of the packet and only destroys it.
- Prohibit: This type prevents routing for the target and sends a message not to allow routing for this IP to the packet sender behind the router
- Unicast: This type of operation performs routing for the desired IP, and the default is set to this value
- Unreachable: This type also prevents routing for the desired IP; the only difference with Prohibit is the message it sends to the packet’s sender. In this type, it sends a message to the source or the sender of the packet stating that the path is unreachable
5 – Distance: This option means your microcontroller distance to the destination IP, which is adjustable. In-network routing, a path is selected that has a shorter distance. For example, you may have two gateways, but your priority is the first Gateway. If this Gateway is available, you must use it to transfer packets and route the next,
so the distance value for this Route You were lower than the other Route you created. When the packet enters the router for routing, it follows the routes defined by the router for the desired IP, selects any route with a lower distance value, and transmits the packet.
6 – Scope: This option means the response range to other routers after this Route was selected after checking the distance. For a better understanding, consider this value as a meter. For example, the scope useful for this Route that we have defined is 10 meters, meaning that this roll has a radius of up to 10 meters. If someone asks him, he is available and can answer.
7 – target scope: This option means the response range of our next IP router or our Gateway. Consider this meter and pay attention to the following example (for a better understanding, we consider this value a meter).
8 – Routing mark: This section is used to select marked or marked packets, and if you have defined specific packages, you can select them here to navigate only to this group of packets.
(These markups are in the Mangle section, which we will refer to in later articles)
9 – Pref Source: This section is used to define an IP. When routing, the router performs this routing from one of its IPs and sends the routing to the next router through this IP. This option is practically nothing special and is just a choice for which EPA router. Of course, note that this routing will not be done if you define the IP in this section and that IP is not in your router.
These are the main items in ip> Route to create a new route. MikroTik and other routers fill in these high values according to the existing standards, and 99.99% of the time, you do not need to consider these values of type, distance, scope, and numerical target scope. You only need the best value. Define your address and Gateway and leave the rest to the router to use these values according to defined standards.
After defining the values and getting acquainted with them, we will return to defining the Default Gateway as MikroTik.
After pressing the + button, a page will open like the previous image, with the default values defined in the midst. Address section, you will see that a value of 0.0.0.0 has been eaten. This value in all routers means all IPs. We also intend to send routing for all IPs in the world to the next router or the same Gateway to continue routing, so the value is 0.0.0.0/0. Stay tuned and go to the Gateway value. In this section, we enter the Wimon IP Gate. This IP is our next IP router, which we call the Gateway.
The steps are complete, and if you are sure of the accuracy of your IPGate, routing will be sent to this router for all IPs that the router does not recognize, and the next router is responsible for continuing the routine.
Also, In the Following, for better understanding, You can Use the Below Video for How to Check the Gateway of an IP for MikroTik VPS by CLI and with Winbox.