


How to Burn CDs in Windows 10 (and all the practical tips)
They were widely used after introducing optical storage devices such as CDs or DVDs in 1935. Even today, they are very useful for storing data due to their reliability. When files are burned to an optical storage device (CD / DVD), they are permanently placed on it and converted into read-only files.
The only way to delete files is to remove the storage device (CD / DVD). This reliability is one of the main reasons for using them in optical storage systems, while many advanced storage systems are available.
This article will examine this attractive feature of optical storage systems and explain how to burn files to CDs and DVDs in Windows 10.
prerequisites
All you need to burn files to CD or DVD is a computer with a Windows 10 compatible CD / DVD burner and a blank disc (CD / DVD).
Make sure you buy the right type of disc. For example, you may not be able to use the CD you use to burn files as a DVD, and vice versa. So make sure what you are looking for and buy the right type of blank disk for your needs.
How to burn media files to CD or DVD
Step 1: Open your computer disk burner and insert the blank disk.
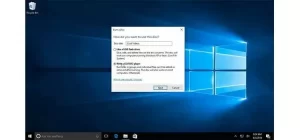
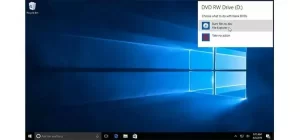
Step 2: You will receive a message on your system immediately after inserting the blank disk. Asks you what you want to do with the disk. Click on it, then click on the Burn files to disc option to burn the files to disk.
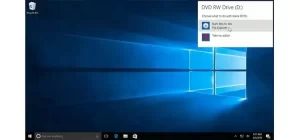
If you did not receive this message, go to This PC and double-click on the CD / DVD drive.
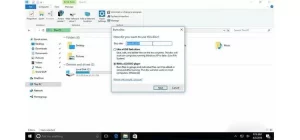
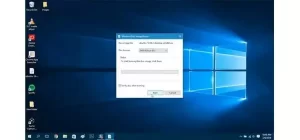
A window will open asking for the disk name and how to use it.
Step 3: Enter the disk’s name in the name field above. The disc title can have up to 16 characters. Then select With a CD / DVD player from the bottom of the window.
Step 4: Navigate to the folder containing the media files you want to burn and select them. You can use the Ctrl + A shortcut keys on the keyboard to select all files. Then press Ctrl + C to copy them.
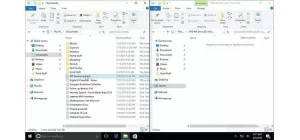
Step 5: Go back to the burn window and paste the copied files to the disk. You can do this by pressing Ctrl + V.
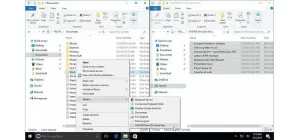
Step 6: The files have not been burned yet, but it shows that they are ready to burn. Go to the Manage tab of Drive tools at the top of the window to burn.
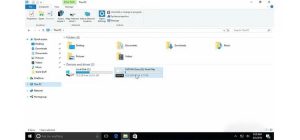
Step 7: Below the Manage tab, the Finish burning section is shown with a red circular icon. Click Finish burning.
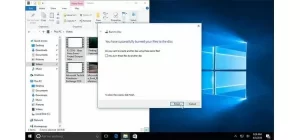
Step 8: A new box will open. To re-edit the disc, you can set the disc title and the burn speed here. Otherwise, leave them as they are. There is no problem with the default settings. Click Next at the bottom right of the window to start the process of burning files to the drive.
Step 9: Depending on the size of the files, the burning process may take several minutes. When done, click the Finish button in the lower right corner of the box.
The window closes, and the disk is ready to use. Using this method, you can burn music, photo, and movie files to CD or DVD.
How to burn Iso files to CD / DVD
Iso files are slightly different from other media files. An iso image file is a compressed copy of a CD or DVD. These files are mostly used to distribute software, games, and other media files of very large sizes. Like media files, iso files can be burned to a CD or DVD, just like those you download from the Internet. Here’s how to burn Iso files to a CD or DVD.
Step 1: It is much easier to burn iso files than media files. This is why iso files are widely used to distribute large files. Insert a blank CD or DVD into your computer burner and close it.
Step 2: Ignore any message if it opens. Also, close any window if it opens.
Step 3: Go to the iso file to burn. Then select it by clicking on the iso file.
Step 4: After selecting the file, click on the Manage tab under the Disc image tools tool in the upper left corner of the window.
Step 5: In the Manage tab, you will see two options. Click Burn, and a window will open.
Step 6: If you only have one CD / DVD RW drive on your computer, the same is automatically selected as the burner in the Disc burner option.
But there are several CD / DVD RW drives; choose a CD / DVD RW to drive with a blank disc as a burner from the Disc burner options.

Step 7: Verify the disc after burning to check if the burning process is complete. Note that the burning process takes a little longer by activating this option. So if you are in a hurry, ignore it.
Step 8: Then click on Burn in the lower-left corner of the window and wait.
Step 9: Once the burning process is complete, click the Close button to finish the process.
Finally, the iso file has been successfully burned to CD or DVD.
We hope you find the complete picture on a CD / DVD drive. As we have seen, you do not need any software to burn files to CD or DVD in Windows 10. Be sure to use the right type of disk for your purpose. Otherwise, you may not be able to use the burned files properly.