


How to Add Image Icons With Navigation Menus in WordPress
One of the advantages of having a WordPress website is that you can customize it as needed. For example, you can put fancy icons for menu options in WordPress.
Buy cheap WordPress hosting
Adding icons to the WordPress navigation menu can make it look more attractive, accessible, and easily recognizable. Menu icons also help communicate your menu structure to an international audience.
There are two ways to add icons to your WordPress website – coding them manually or using a menu icon plugin. The first method offers flexibility in achieving your ideal design but requires CSS knowledge. If you are not confident in your coding skills, we recommend using the second method.
Read on to find out how each method works so you can choose the best method for your needs.
Method 1. Add menu icons using CSS
This method involves adding an icon type from a library to your WordPress website using custom CSS. There are a variety of icon types available to use, meaning you don’t have to design them from scratches, such as Dashicons, Elusive Icons, Foundation Icons, and Font Awesome.
For this tutorial, we’ll be using the Font Awesome icon library. Here’s how to add WordPress menu icons using CSS:
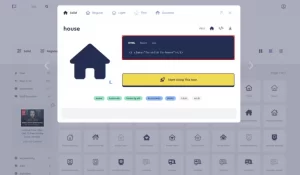
Go to the Font Awesome home page and select Start for Free.

2.Enter your email to receive a free kit code, which will allow you to retrieve Font Awesome icons from their library. Here is what the library kit code should look like:
3.Now that you have the library code, the next step is to get the CSS class of the Font Awesome icons you want to use. Go to the Font Awesome search page and save the ones that fit your needs. For this example, we will use the home icon for our home screen.
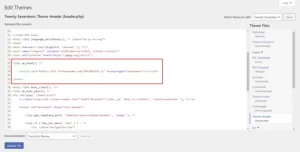
Access your WordPress admin dashboard and go to Appearance -> Theme File Editor.
Open the header.php file and add the kit code above the </head> line. Click on Update File.
Go to Appearance -> Menu and expand the menu item you want to customize. Add the CSS class you got in step 3 to the Navigational Label text box in the Menu Structure section. Hold if you want to display the current menu text next to the picture icon.
![]()
Repeat steps 3 and 6 to add more icons to other menu items, then click the Save Menu button.
The steps to add WordPress menu icons are different depending on the type of icons. For example, you can use the Dashicons library without editing the theme file, since it is the officially managed font of WordPress since version 3.8. Some libraries use CSS classes to implement image icons in WordPress menu items.
Method 2. Using menu icons using a plugin
Many plugins simplify the process of customizing your navigation menu with great menu icons. We recommend the following menu icon plugins:
Menu Icons by ThemeIsle – A free plugin that supports a variety of icon types including Font Awesome, Dashicons, and SVG.
Menu Image – A freemium plugin that can turn menu items into callback buttons.
WP Menu Icons – Another free plugin that supports multiple icon types and offers various customization options including icon position and color.
The following tutorial will show you how to add icons using the Menu Icons by ThemeIsle plugin:
Install and activate the WordPress plugin
![]()
Go to Appearance -> Menu and expand the menu item you want to customize. You will see a new menu item called Icon: under the Navigation Label text box.
Click Select and choose a Dashicons icon from the drop-down menu. Customize the new icon’s visibility, position, vertical alignment, and font size via the menu icon settings on the right. When done, press the Select button.
![]()
The newly selected icon should appear inside the Menu Structure section. Repeat the same process for other menu items and click Save Menu.
Here is an example of a WordPress menu with the default Dashicons icon added using the plugin:
conclusion
Adding menu icons to your WordPress website is a great way to improve its navigation and aesthetics. It’s relatively easy, so anyone can do it without the help of WordPress experts.