How to Add Content Locking in WordPress with OptinMonster plugin?
What is a content lock, and why do we need it?
Content locking is a technique site owners use to encourage their users to take a certain action. This action can be anything from signing up for email newsletters to paying for premium content. Content lock works like a content upgrade. When you offer valuable content on your WordPress websites, such as a course or e-book download, you are compelling your visitors to purchase a subscription to access that content.
Like big sites like Netflix and Spotify, you must get a premium subscription to use them fully.
Doing it correctly can help you increase engagement rates, build an email list, and grow your business. But if you don’t set the content lock the best way, it may have the opposite result.
Add content lock with the OptinMonster plugin.
If you want to use your content to get users’ emails, OptinMonster is the best option.
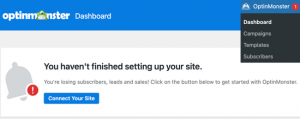
The first thing you need to do is install and activate the OptinMonster plugin. After activation, you need to connect your site to the OptinMonster account. You can do this by clicking the OptinMonster menu item in your WordPress admin bar and clicking the Connect Your Site button.
After successfully connecting, you should go to OptinMonster » Campaigns in your WordPress dashboard. Since you haven’t created a campaign, you’ll be prompted to create a new one.
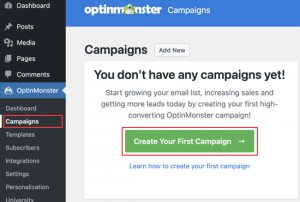
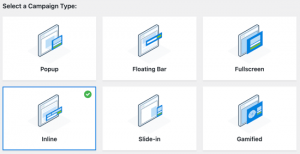
When you click the Create Your First Campaign button, you’ll be redirected to the OptinMonster website and asked to select a campaign type.
To add a content lock, you need to select the Inline option.
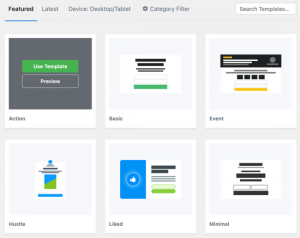
Now you have to scroll down and select a design. OptinMonster offers over 65 templates that work best on any device.
You can see a preview of each template by clicking the Preview button. When you find the template you want, you need to click on the Use Template button.
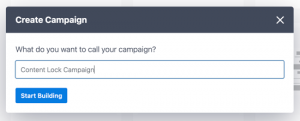
Here you will be asked to provide a title for your campaign.
After entering the title, click the Start Building button.
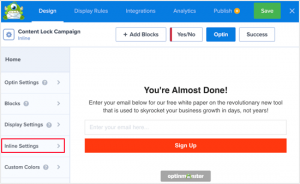
After this, the OptinMonster editor will open. Here you can take time to complete the content and appearance of the desired pop-up window and edit it.
Here you can change the main text. Add and remove images, edit the color and font of the text, and… also edit the message displayed after the users finish their work.
If you are looking for a good web hosting service provider, don’t leave Ded9.com on your list.
If satisfied with the changes made, you should activate the content lock. To do this, you need to go to the Inline Settings tab. Then activate the content lock by clicking the “Lock Content Below Campaign” button.
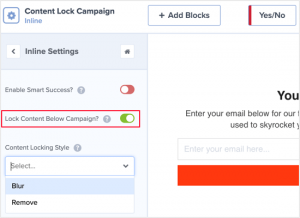
You can also set the content behind the pop-up window to be blurred or not to be displayed at all.
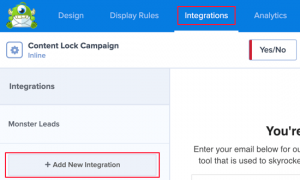
The next step is to connect the email marketing service. You must click on the “Add New Integration” button. You should find your email service in the drop-down menu.
Now you need to activate the campaign. Click the Publish tab at the top of the page and then click the Publish button. After finishing this step, press the Save button.
We need to go to OptinMonster » Campaigns from the management dashboard at this stage. Here you can see the list of your campaigns.
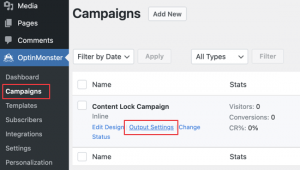
Click the Output Settings link to customize how content locking works.
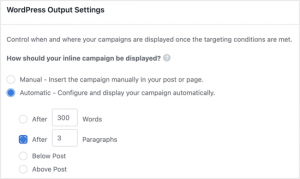
Here we have two options: Automatic and Manual. The Automatic option is the easiest to set up. Automatically locks content after a certain number of words or paragraphs. For example, you can lock all content after the first three paragraphs of each post.
You can lock any page you want using a Shortcode in the manual setting.
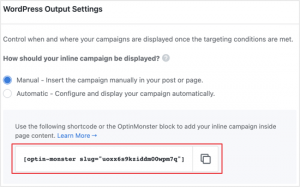
You can easily copy the shortcode in any part of your desired post to apply the changes.
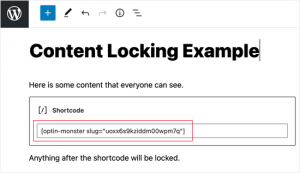
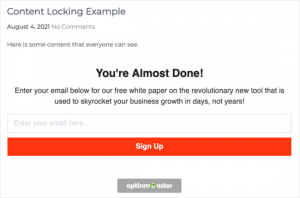
The result :
In the post that you have locked, this pop-up window will be displayed, and until you enter your email, the content will not be visible.