


Fixing the problem of sending email in WordPress
You do everything you can to get your emails to the recipients of the site, but they have not been sent, and you cannot send them to your recipients in any way. This story does not end here and can happen in cases such as not sending an email when registering in WordPress, not sending an email when posting a comment on the site, and not sending an email when sending a contact form in WordPress. Do not send to WordPress. Therefore, in this training from the knowledge base of the host FaI am going to address this issue first, why are our emails not being sent in WordPress at all? And then, I will introduce alternative solutions that you can use to send your emails to users in WordPress safely, so stay with us until the end.
Why are WordPress emails not sending?
As you know, WordPress uses the mail () function in PHP language to send emails. If this function is not activated on the host for any reason, no emails from WordPress will be sent to the recipients, so this function must always be on. Be active on the host and work properly; On the other hand, it sometimes happens that your emails are sent correctly, and there is no problem with the email function of the PHP host. Still, for various reasons, email servers detect your email as spam. In this case, the emails are usually sent to the spam folder. They will be.
So, we can see that in the general mode, we have two problems for not sending email in WordPress; in an available way, no email is sent, or the email is sent, but because your email is known as spam, every email you send will be sent to the spam folder. It turned out that the only way to solve this problem is for many people to register their email as not spam so that the email service providers do not consider their email as spam and spam, and the emails enter the user’s inbox correctly.
Fixing the problem of sending emails in WordPress
So, according to the explanation above, in the first step, you should contact the management of your host and ask them to check the problem of email not being sent on the host, and if your host has a problem with the PHP email function, fix it so that it is possible to send emails to you. be provided
But to solve the problem of not sending WordPress emails, the best solution is to use a method to send an intermediary email. It means you can use sites that can send your emails to users by placing an API. Maybe now you ask yourself what advantages such a solution can have. In response to this question, the following points can be mentioned:
- They ensure that sent emails will be delivered to the inbox and never be detected as spam or in the spam folder.
- The proper use of hosting resources is because the emails sent are not sent by the php email function of the host, in which case there is no chance that your site will be identified as spam. If your site is highly visited and many emails are sent daily, You will not be limited in sending emails.
So we can see that sending emails as an intermediary will be better for our site, and we will have complete confidence that the emails will reach the users in the inbox 100%. Therefore, you can use the solution I will discuss further to set up an intermediary service.
- WP Mail SMTP by WPForms plugin, which is easier to work with in the opinion of most users. Because the values of the fields are filled automatically.
- The Easy WP SMTP plugin is more compatible with the content management system from the users’ point of view.
In the following, we will describe both plugins and how to use each one.
 1. WP Mail SMTP plugin by WPForms
One of the quick ways to solve the problem of not sending emails in the WordPress content management system is to use the WP Mail SMTP plugin. So far, this plugin has more than one million active installations and registered a 4.3 out of 5 scores in the WordPress repository. The remarkable thing about this plugin is its simplicity and ease of use. Because by selecting the desired options, the fields related to that option are automatically set, and you no longer need to look for specialized settings and port numbers.
To start working, first, refer to your WordPress counter with the help of the tutorial on how to enter the WordPress administration. Then follow the steps below:
- From the WordPress dashboard, click on Plugins.
- Click on the Add sub-menu to be redirected to the Add-ons installation section.
- Enter SMTP in the search field and search for it. Or download the plugin from the link below and install and run it with the help of the WordPress installation guide.
To solve the problem of sending and receiving emails, you can download and install the WP Mail SMTP by WPForms plugin on your WordPress by referring to the WordPress repository.
Download the WP Mail SMTP plugin by WPForms
If you search for a plugin: you will see many plugins in this list with almost the same function. Find the WP Mail SMTP by WPForms plugin from the list. Click the “ Install Now ” button to start installing the plugin. After that, a button titled “ Active ” will be displayed. Click on it to activate the plugin.
After installing and activating the plugin, a new menu under the title will be added to your WordPress dashboard.
wp mail smtp by wp forms plugin settings
From the WordPress dashboard, go to the email menu and the settings sub-menu. You will come across a page that has two tabs as follows, which we will discuss in detail below:
- General: In this section, you can apply general settings related to the plugin’s configuration.
- Email test: In this header, we send an email as a test to evaluate the functionality of the plugin.
Be careful; before starting work, you must create an email on your host so that sending and receiving WordPress emails can be done based on it and through your host’s email service. If you have not yet created an email in the host, proceed with the help of the following data.
Creating email in cPanel host Create email in Direct Admin
In the general tab, apply your settings based on the following description:
- Sender’s email: Enter the address you want to send and receive emails in this field. (Email registered in hosting services)
- Sender Name: Enter the name you wish the recipient to see.
- Return path: If the sent emails encounter problems or are returned for any reason, you will receive a report from them. If you want, put the engine in active mode.
- Email sender: In this section, click on the email sender service of your choice. Which is set to default (none). In the primary mode or php mail, the default mode of the server is used. But the critical point here is that the sender wants the recipient to see the correct email address of the collection, not the server address! Therefore, we choose the next suggested option, other SMTPs.
By selecting the other SMTP sender mode, the settings of this section will be as follows:
- Host (SMTP Host): Enter your domain name in this section.
- Encryption: In this section, three items are presented under none, SSL, and TLS. You should always pay attention to the fact that some options may not work correctly according to the security settings of your host server. Accordingly, testing all the possibilities once is recommended if you do not receive proper performance from this section. We chose TLS in this section.
- SMTP port: enter the SMTP port in this field. By default, port 587 is entered in the relevant field.
- Authentication: Enable the authentication button to insert the email address and introduce it to the plugin. By activating the authentication section, two fields will appear at the bottom of the screen.
- SMTP Username: Enter the relevant email to send and receive. (This email must be the same as the email you entered in the sender email field.)
- SMTP Password: Enter your email password.
Now click on the Save Settings button at the bottom of the page.
Checking the status of not sending emails from the host
So far, we have only completed the basic settings and configuration necessary to solve email problems in WordPress. We use the email test header to ensure the settings are applied correctly, and the emails are sent correctly.
- We refer to the email test tab. To check whether the email sending is done correctly or not.
- In the ” Send to” field, enter your desired email address for testing and checking.
- Click the send email button.
![]() If with the message Test plain text email was sent successfully! It means the email sending and receiving system works correctly, and this plugin runs without problems. Also, you will see this test email if you check your inbox.
If with the message Test plain text email was sent successfully! It means the email sending and receiving system works correctly, and this plugin runs without problems. Also, you will see this test email if you check your inbox.
![]() If you encounter a problem while sending the test email, it means there is a problem in sending the email. The problem is usually solved by checking the email and password.
If you encounter a problem while sending the test email, it means there is a problem in sending the email. The problem is usually solved by checking the email and password.
If this plugin does not solve the problem of sending emails in WordPress, you can also use the Easy WP SMTP plugin. The plugin is much more compatible than WP Mail SMTP by WPForms.
 2. Easy WP SMTP plugin
Easy WP SMTP is another very popular and used plugin to solve the problem of email not being sent among WordPress users. So far, this plugin has registered over 400,000 active installs with a 4.3 out of 5 rating in the WordPress repository. The positive and important thing about this plugin is its compatibility with different services, although its settings are more specialized.
To install and configure the plugin, log in to your content management system by learning how to log in to WordPress administration, then:
- Click on the Add-ons menu.
- See the Add sub-menu.
- Search for SMTP in the plugins field.
Find the Easy WP SMTP plugin and click the ” Install Now” button. After installing the plugin, click on the ” Activate” button next to it.
After installing and configuring the plugin, a new sub-menu titled Easy WP SMTP will be added to the settings section of your WordPress dashboard. Click on it to be redirected to the plugin configuration section.
Note: If you are unfamiliar with installing plugins in WordPress, you can use the tutorial on installing and working with plugins in WordPress and installing and activating the desired plugin.
Email sending plugin settings with SMTP.
Now, as you can see in the image below and the settings of the Easy WP SMTP plugin, customize the configuration of each section based on the description provided below.
As mentioned earlier, you must create an email on your host so that sending and receiving can be done based on it. Use the following data for this purpose.
Creating email in cPanel host Create email in Direct Admin
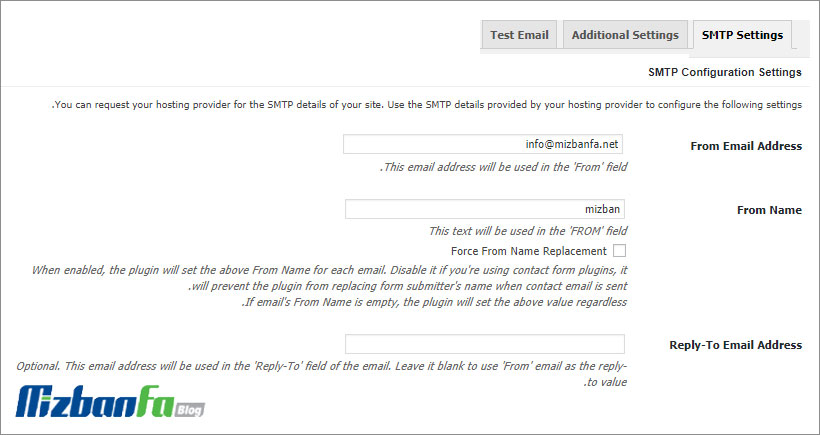
- From Email Address: Enter your email address in this field.
- From Name: Enter your desired name in this field. This name will be displayed in the emails sent to users as the email sender.
- Reply-To Email Address: If you want to receive a reply from your users, enter an email in this field. From now on, you will see your user’s response in this email.
A little lower, we reach the settings related to our email, which must be customized according to the following description:
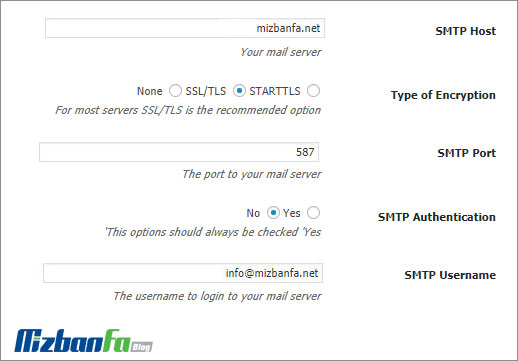
- SMTP Host: Enter your email’s SMTP address in this field. Put enter your domain name.
Note: Every email server has an SMTP address; if you use Gmail, you should use smtp.gmail.com in this field. - Type of Encryption: Select STARTTLS from this section. The settings of this section depend on the configuration of your server. If you encounter errors during the test, test the other two items.
- SMTP Port: In this field, enter port 587 for your SMTP.
Note: To send emails from your Gmail account, you must enter the port available for Gmail, 465. - SMTP Authentication: Set this option to YES and enter your email address and password.
- SMTP username: In this option, enter your email address to check and use WordPress SMTP.
- SMTP Password: Enter your email password in this option and save the settings.
Now save the settings. Go to the TEST EMAIL tab and send a test email.