


Fix System Idle Process High CPU Usage Windows 10/8/7
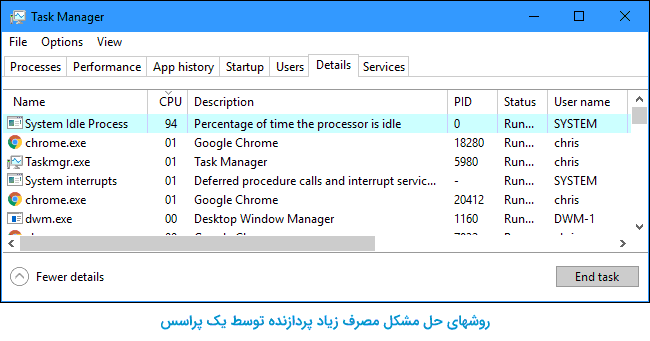
Suppose you have recently noticed that Windows runs very slowly or does not respond to mouse clicks, and the System Idle process in the Task Manager consumes more than 90% of the CPU. In that case, you should familiarize yourself with the System idle process. And find out why it causes excessive CPU usage in Windows. Usually, System Idle Process is a system process that runs in the background and measures the amount of CPU idle time. And a high CPU percentage indicates that a lot of CPU power is not being used.
If you notice that the idle system process uses too much CPU, don’t worry because the CPU resources used by the idle process are the same resources that are not being used.
Note that this method of solving the problem is the same for Windows 7, 8, 10, and 11, and it solves the problem in all Windows.
How to disable the idle system process?
If you notice that the idle system process in Windows consumes almost 90 to 100% of the CPU, that’s OK. It’s normal. But if you experience slower performance than usual, it is not the fault of the System’s Idle Process. It could be due to low memory, slow memory, or something else using your computer’s resources. In this article, we will look at some effective solutions that may help you find and fix the problem of excessive Windows CPU usage.
Tip: Run a full system scan with the latest antivirus or anti-malware program to ensure that a virus is not causing this problem.
1- Restart the computer
If this is the first time you’ve noticed 100% CPU usage in Windows or your computer is unresponsive, it’s probably best to restart your computer to fix temporary bugs and fix major problems.
2- Install Windows Update
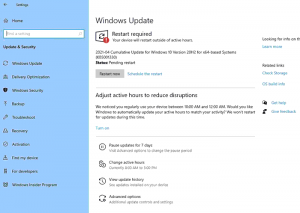
Make sure that the latest Windows update is installed on your computer. Microsoft regularly releases Windows updates with the latest security and bug fixes previously reported by users. The latest Windows update may contain fixes to fix the CPU overuse bug in Windows.
- Press the Windows key and X, then select Settings.
- Go to the Update and Security section, then press the Windows updates button.
- With this, available Windows updates are checked and automatically downloaded and installed.
- To apply these changes, you need to restart your computer, then check the system idle process status
3- Disable startup processes
Clean and boot your computer. This will help you find out if a startup program or service is causing excessive Windows CPU usage or an idle system process in Windows.
- Press the Windows key and R, type MSConfig, and click OK.
- This will take you to the System Configuration window. Go to the Services tab at the top of the screen.
- Check the Hide all Microsoft services option (this will hide all related Microsoft services and leave the third-party service).
- Now click on Disable all, located at the bottom of the screen near the left side of the window.
- All third-party services will not be disabled. Click Apply and OK to save changes and restart the computer.
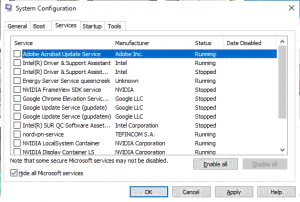
Now Windows comes up with only the necessary drivers for your device. Check the System idle process status, and it should be normal now. If so, you should enable these processes one by one and check which one is causing your computer to slow down.
4- Disable some processes at the startup
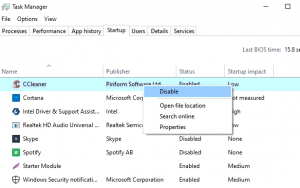
It will help if you disable startup programs that may affect Windows boot time or cause Windows to become unresponsive at startup.
- Open Task Manager using Ctrl + Shift + Esc.
- Go to the Startup tab. Here all the startup programs are displayed with their effect.
- To disable any program when the System starts up, you must right-click on the program name and select Disable.
- Do the same with all other unnecessary programs. And close the Task Manager window.
5- Check the drivers for problems
Most likely, the presence of an old incompatible device driver has caused this problem. Use RATT to create a log file to identify the problematic driver. (Note: RATT is an event tracking tool developed by Microsoft for developers). If you find an old driver there, update it by doing the following steps:
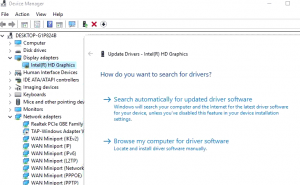
- Press the Windows key and X and select Device manager.
- Here the list of all installed device drivers is displayed. Scroll through all of them to find the problematic driver (e.g., display driver).
- Open Display Driver, right-click on the installed driver, and select Update Driver.
- Select the first option, Search for updated driver software, and follow the on-screen instructions to download the updated drivers from Windows Update.
6- Run the file system search tool
The system files may be corrupted, and Windows hangs or becomes unresponsive during startup or using 100% CPU. Run the system file check tool, which helps to recover lost system files with healthy files and fix high CPU performance due to idle system processes in Windows.
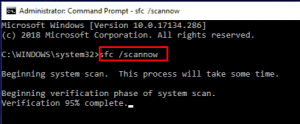
- Open command prompt as admin.
- Type the command SFC /scannow.
- Allow the scanning process to complete 100%. Once completed, reboot the System.
If there is still a problem, install one of these Windows repair software and let it scan Windows, and then restart, the problem will be fixed!