


Eight iPhone Camera Settings For Better Image Capture
The iPhone Is A Great Tool For Photography And Offers Many Features To Users. In This Article, You Will Get Acquainted With Some iPhone Application Settings For Photography.
Do you think you know everything about the iPhone camera? If you are a professional photographer who loves working with camera settings, you may answer yes to this question. Still, for other people, there is always something new to learn about photography.
If you want to become one of the most potent iPhone users, read this article. In this article, we provide some settings for working with the iPhone camera that is worth knowing.
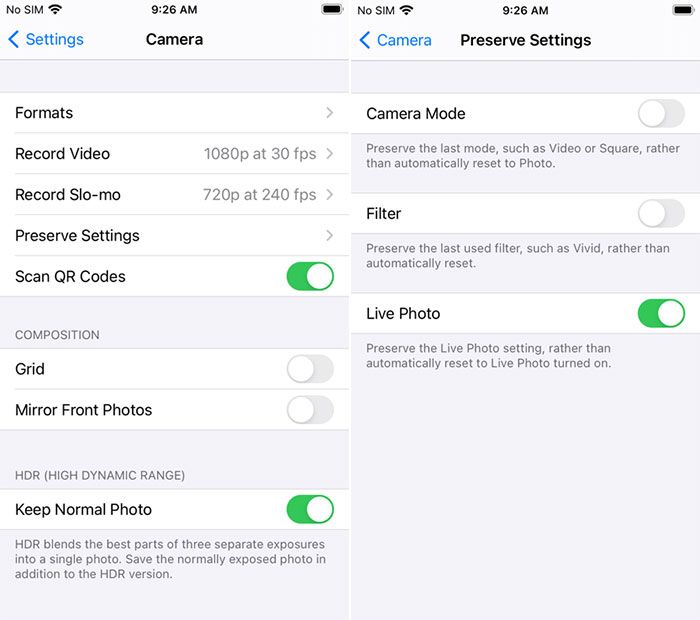
Preserve Settings
Do you have a filter or camera mode that you work with regularly? In this case, it is very tedious to search your Camera every time to find the desired settings; Because you may miss a moment while adjusting the Camera to your liking.
To solve this problem, you can use the iPhone Preserve Settings feature. To set this mode, open the Settings app and go to Camera> Preserve Settings. You have three options:
- Camera mode
- Filter
- Live Photo
Camera options vary by iPhone model; But Apple has included a brief description of each of them, according to which you can choose the option you need.
Activate grid lines
Most photographers are familiar with the one-third rule. One-third rule is one of the essential rules of image composition. According to this rule, you have to place the main subject in one of the four intersections of the 3 in 3 grid lines.
It’s best to enable display grids so you can see the intersections. Gridlines are also helpful for other compositional problems, such as maintaining the horizon line or ensuring that walls and buildings are at a 90-degree angle. To activate gridlines, go to Settings> Camera> Grid and slide the bar to On.
Burst Mode
Have you ever tried to capture an image of a fast subject? Often the issue is out of frame before you can adjust your Camera. Even if you can take a picture, the matter will appear blurry and distorted.
The solution to this problem is to use Burst Mode. In this case, you can first record fast and consecutive collections of the subject and then choose the best photo from them.
To use Burst Mode, go to Settings> Camera and enable Use Volume Up for Burst. Then hold your finger on the volume up button to capture the image. Burst Mode continues capturing the image until you release your finger.
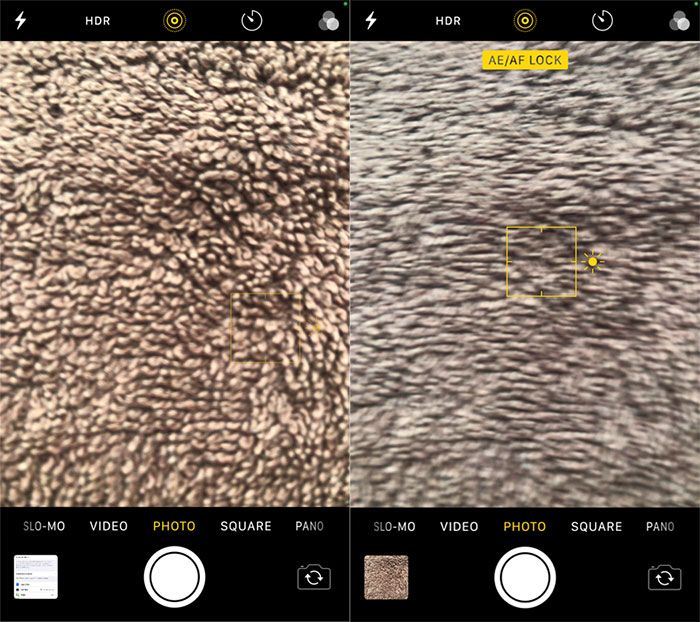
Lock focus and exposure
If you want to increase the quality of your images, you have to experience focus and exposure. Without understanding these concepts, you can not create good-quality photos. Exposure means the amount of light that strikes the Camera’s electronic image sensor; While focus determines the image’s resolution.
You can manually lock both values on the iPhone camera. This way, you can optimize your images more optimally. To manually lock the focus and exposure, open the Camera app and select the desired focal point of the photo. After a few seconds, the AE / AF Lock banner will appear at the top of the screen. You can tap anywhere on the screen to unlock the focus.
Use iPhone Camera Timer.
If you enjoy taking selfies, using a timer is recommended. Instead of making acrobatic moves with your arm, you can use the edge to place the phone and take a selfie with the timer.
To use the timer, touch the arrow icon in the top bar of the camera window and then press the Stopwatch button that appears at the bottom of the screen. Here, you can select a timer of three to ten seconds. The timer starts when you tap the shutter button.
Mute the Camera
It is not clear why mobile phone manufacturers think users love to hear the Camera’s fake shutter sound. This sound is often annoying to users.
Note: In some countries, such as Japan or South Korea, you cannot turn off the Camera.
Unfortunately, there is no way to turn off the Camera permanently. Instead, there are two ways to prevent this noise. You can press the Mute button on the side of your device or use the volume buttons to eliminate the sound. If you choose the second method, you must do so each time before opening the camera app.
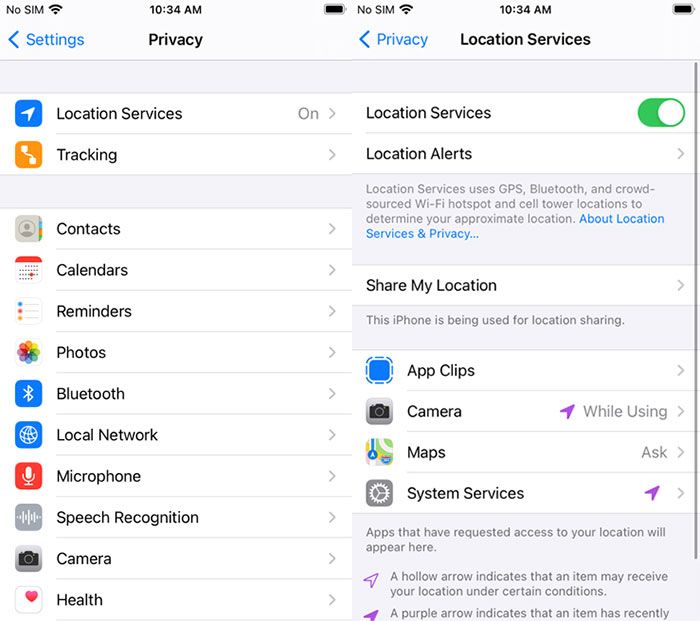
Enable geolocation on images
If you travel regularly, you can tag the desired geographical location on your pictures. This way, you can recall your travel memories much more quickly. iPhone enables geotagging, But you can not find this option in the camera app or its settings menu. Instead, it would be best if you went to the Privacy menu. Go to Settings> Privacy> Location Services> Camera and select While Using the App.
Exposure change
In the previous sections, we showed how to lock the exposure; But how can the amount of exposure be changed? To do this, open the camera app and click anywhere on the screen to show the focus point. Next to the focus point, you see the sun icon.
Hold your finger on this icon and then move it up or down to adjust the exposure. Here, you can choose between negative eight to positive eight-stop values.