


Edit Images In Photoshop; Everything You Need To Know To Get Started
Photoshop Is One Of The Most Complete And Optimal Image Editing Tools That Provides Photographers With All The Features At Once.
In this guide, we will provide the essential tips for photo editing in Photoshop.
One of the most critical steps in photography is the final editing, which is no less important than the photography itself. By correcting the images, you can fix the errors and problems of the photo and even change the mood of the picture. Adobe Photoshop is one of the most influential and popular image editing software for photographers.
However, using this software can be confusing for many novice photographers. This guide will point out some basics of this popular software and then provide tips for image editing in Photoshop.
You must have heard this sentence a lot: This photo is Photoshop. Even non-photographers use the term to refer to manipulated images. In other words, Photoshop is known for editing images.
The titles you will read in this article:
- The complexity of Photoshop
- Lightroom vs. Photoshop
- Open images in Photoshop
- Open the RAW File
- Storage and file format recommendations
- Introducing the Photoshop Toolbox
- Global و Local Adjustment
- Layers in Photoshop
- Layer Masks
- Photoshop filters
- Steps to edit images in Photoshop
The complexity of Photoshop
Although there are many tools for editing images, Photoshop excels in terms of features and capabilities. Undoubtedly, Photoshop is a vast and complex software with many built-in features and add-ons. Photoshop tools have evolved over the years so that similar results can achieve with very different means.
If you search for a way to do something in Photoshop online, you will be confused by the results. In many instances, photographers use different techniques to achieve the final output, which can confuse beginners.
No one can say I know zero to one hundred Photoshop. Instead, you can become proficient in using some tools for specific tasks. It is the right way to learn Photoshop. After learning the tools you need in Photoshop, you need to practice to become proficient.
Practicing and repeating the process seems slow, but you will get great results when you get used to it. So keep in mind that this guide does not cover all Photoshop tools but is the basis for editing images, especially for novice photographers.
Lightroom vs. Photoshop
Professional photographers seldom publish their camera output directly, so their journey begins with essential image editing tools like Lightroom. Of course, when you open Lightroom software for the first time, you will notice a massive difference between it and Photoshop. In Lightroom, understanding everything is relatively simple, and with a bit of research, you will get acquainted with this software very soon.
On the other hand, when you open Photoshop for the first time, you may be confused. All you see are unfamiliar tools, tabs, and windows; So, most people ask themselves this question: Why should we use Photoshop when we have Lightroom?
Photoshop is a more comprehensive software than Lightroom. Everything you see in Lightroom is also available in Photoshop, But the full features of Lightroom are not even 10% of the features of Photoshop.
The difference between Lightroom and Photoshop is between riding a motorcycle and driving a race car. However, most photographers ignore more features.
Most of the features of Lightroom are related to photography, and it is straightforward to work with it. This software also has a built-in capability for image editing. In general, if you are looking for simple edits such as adding or removing a few dots of light, adding contrast or color saturation, sharpening or blurring a photo, Lightroom does it all for you; But if you want to take your editing skills to the next level and have access to a collection of the best tools, choose Photoshop.
Open images in Photoshop
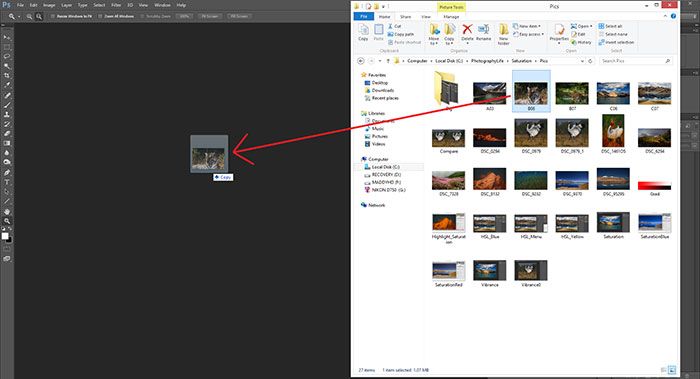
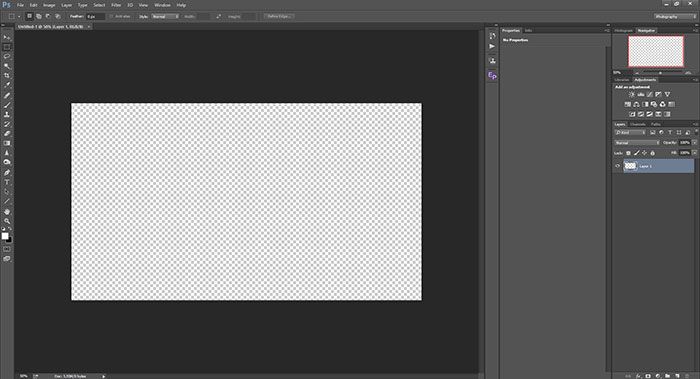
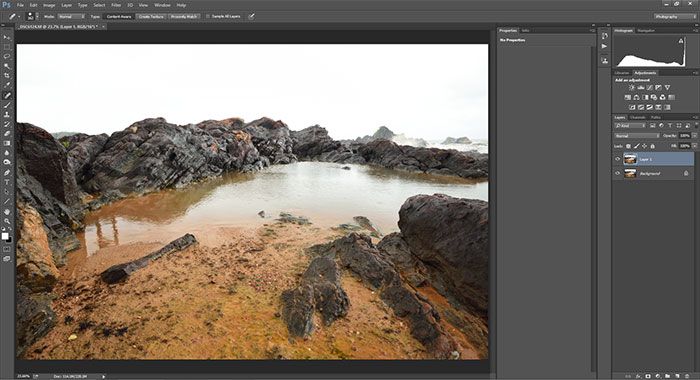
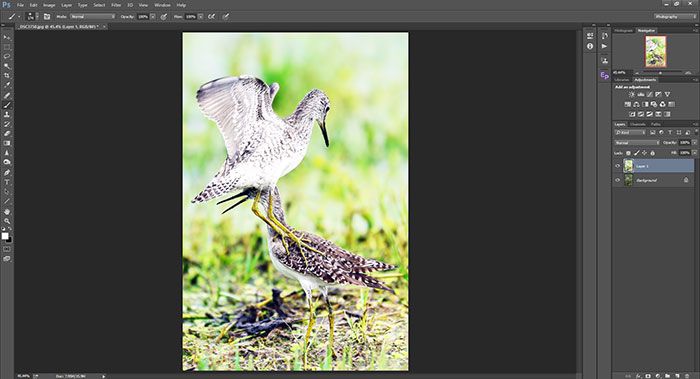
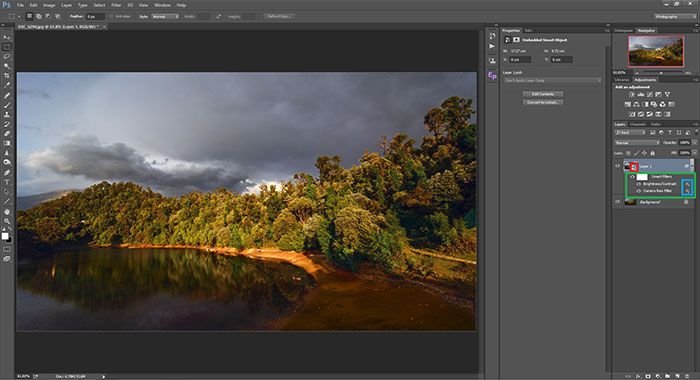
As mentioned above, there is more than one way to do things in Photoshop. The most common way to open images in Photoshop is to drag the image into the Photoshop window (Image below).
After opening the image in Photoshop, you will see a tab on the top left (red rectImage in the Image image. You can open multiple image documents. At the bottom left, you can see the crop percentage (orange rectangle in the Images below). You can zoom in with Ctrl + plus (+) and zoom out with Ctrl and minus (-). Pressing Ctrl + 0 will adjust the image to fit the workspace, and Ctrl + 1 will give 100% crop mode. These keyboard shortcuts make it very easy for you to use Photoshop.
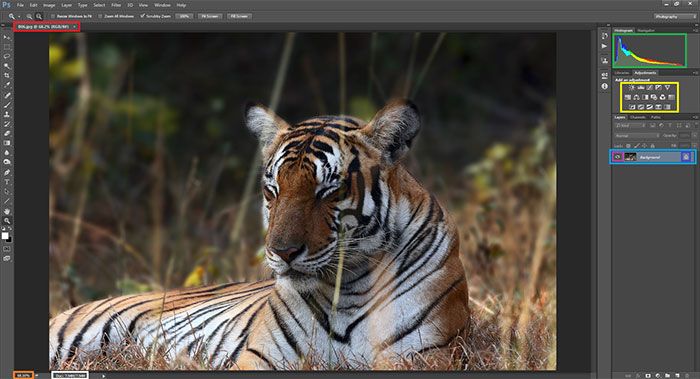
Next to the crop percentage is the file size (white rectangle, image above).
Depending on the type of File you are working with, the file size will gradually increase. For example, the 24-megapixel size of a full-frame RAW file would be about 30 megabytes. If you add layers, the scope of this File can reach up to one gigabyte. When you convert the image to JPEG format with the exact resolution, you get an 8 to 12 MB file. For each layer you add to the Photoshop document, the file size is multiplied by the original state.
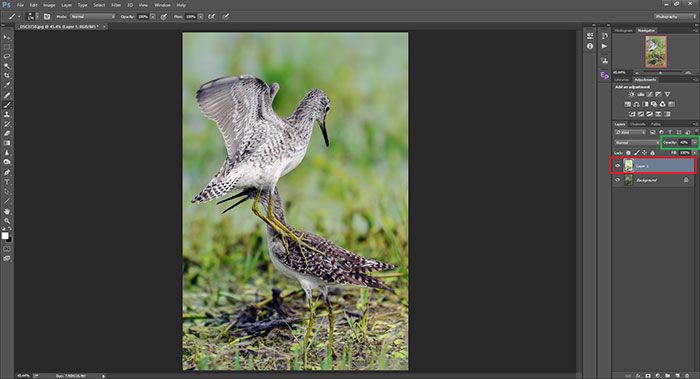
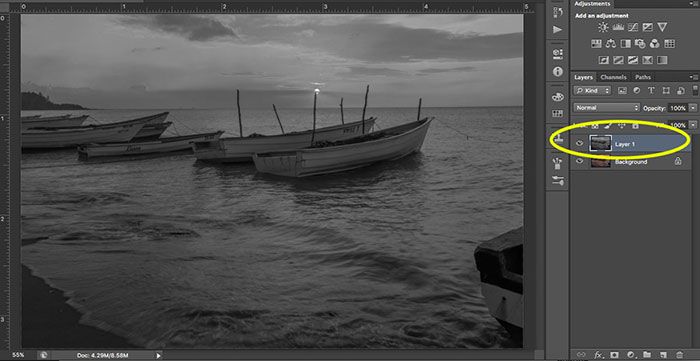
In the upper right corner, you will see the RGB histogram (green rectangle). Just below that is the Adjustment toolkit (yellow rectangle). This part of the current layer in the Layers tab is selected (blue rectangle). On the left, you will see an eye icon that you can click on it. After clicking, the eye icon appears, indicating that the corresponding layer is visible.
Clicking on the layer again will make the eye icon and its corresponding layer disappear. On the other side is the lock icon (purple rectangle), which, if enabled, will lock the layer, and no settings can apply for it.
Open the RAW File
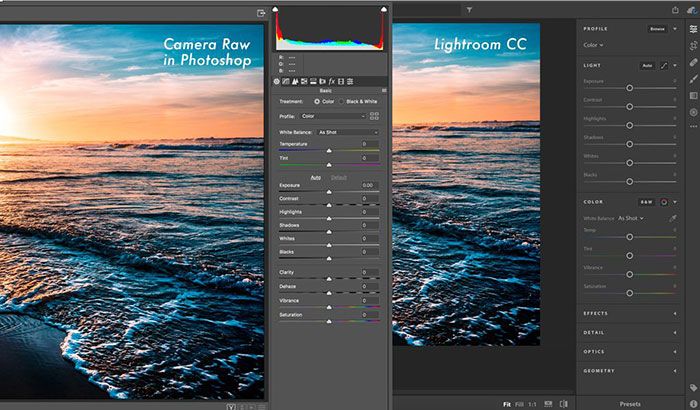
Most photographers shoot in RAW format. Photoshop has a distinct feature for opening RAW files. After dragging the RAW File to Photoshop, you will see a window called Camera Raw. The camera is a unique Adobe tool for reading and editing RAW files. If you are familiar with Lightroom, Camera Raw will not be new to you.
Adobe Camera Raw (ACR for short) has basic features that are very similar to the elements of Lightroom, but if you have a new camera and do not install the latest ACR update, you will not be able to open RAW files. In such cases, you have two options. The first option is to use Adobe RAW to DNG Converter, which is available for free. After converting the images to DNG format, you can also open them in older versions of Camera Raw.
Suppose Adobe does not provide enough support for your camera. In that case, you should try the second option, which involves using secondary software to convert the RAW File into something readable for Photoshop, such as TIFF. You also need maximum data while editing the image.
That’s why photographers shoot in RAW mode. If the RAW Image is converted to JPEG, you will only have 8 bits of data, but if you choose the TIFF format or a format like DNG, you can work with all the original data.
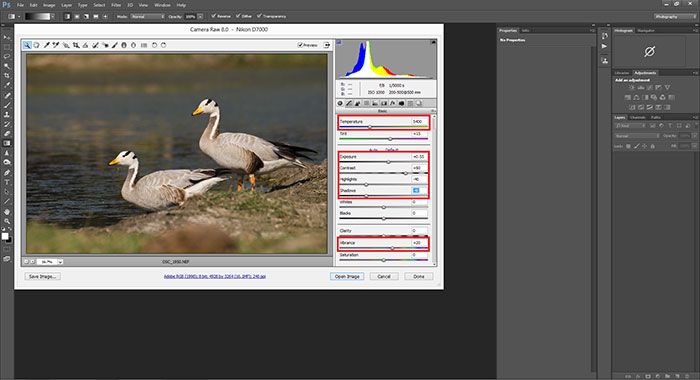
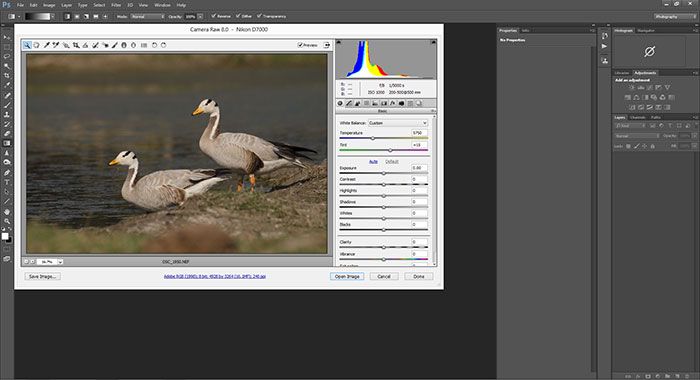
You can change the initial settings in the Raw Camera window, such as exposure, contrast, and saturation.
Lens Correction is another necessary editing you can do in Camera Raw. The ACR has built-in profiles for lens problems such as distortion, color distortion, and darkening of the image margins. After finding the lens profile in ACR, select the camera and lens model to apply the desired shape to the image.
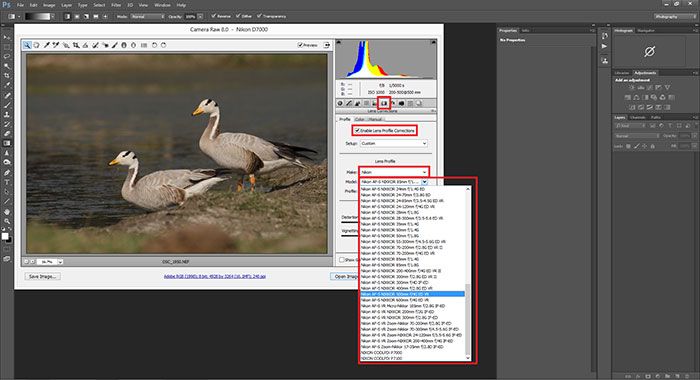
When done, click Open Image to open the RAW File in Photoshop with the settings applied.
Storage and file format recommendations
After completing the image editing, go to File> Save As to save the File for the first time or make a new copy. This way, you can select the type of File you want to save. It is recommended to choose one of two types: Photoshop with * .PSD, *.PDD or TIFF extensions with * .TIF, * .TIFF extensions). Photoshop PSD files only run in Photoshop, while TIFF opens in most image display and editing software. The above formats take up a lot of space, but both retain maximum data.
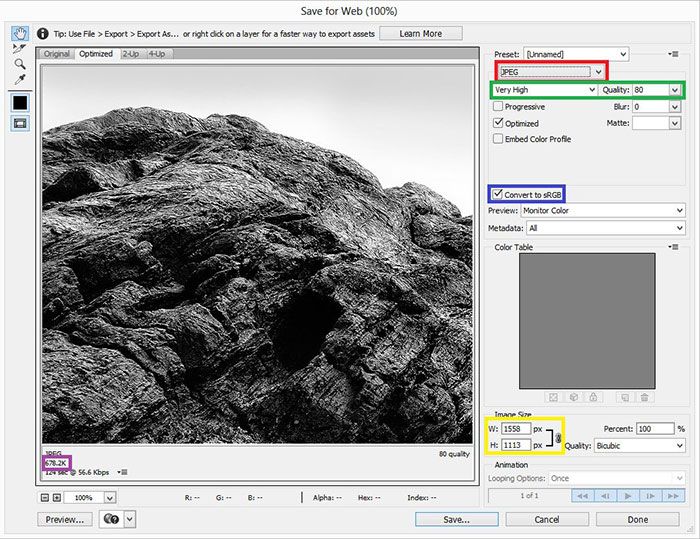
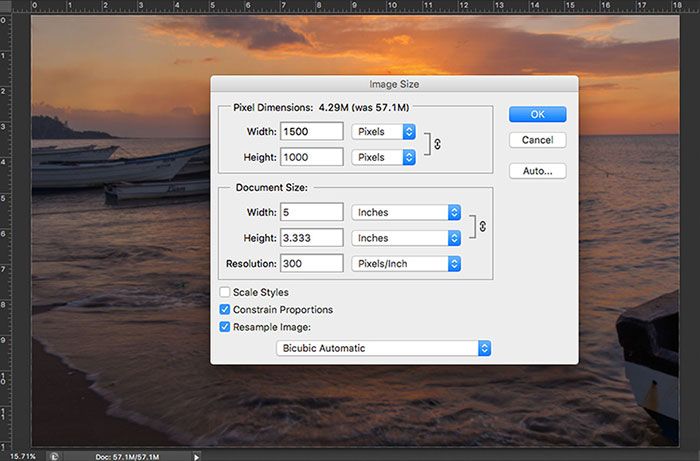
You generally save two copies of the image. One in PSD or TIFF contains all the data and the other in JPEG copy for use on the web. If you are using Photoshop CC 2015 and above, you can save the File in JPEG format via the menu File> Export> Save for Web (legacy). A window will open. Make sure the format of choice is JPEG (red rectangle, image above).
You can then set the image quality (green rectangle, top image), which varies from Low to Maximum based on the amount of data you want to save in the JPEG image. The higher the image quality, the higher the file size due to the loss levels. You can see the corresponding file size in the lower-left corner (purple rectangle).
After selecting the quality, make sure the Convert to sRGB option is enabled.
Then you can type the desired resolution (yellow rectangle). In general, the answer of 2048 on the long side of the image is sufficient. Make sure the link icon is enabled as the other side of the image will be adjusted automatically. Then click Save تا to have a JPEG copy of the edited images.
In addition to PSD, TIFF, and JPEG formats, the PNG format is also noteworthy. The main difference between PNG and JPEG formats is the ability to maintain transparency. For example, the best PNG storage format is to put a transparent logo on other images.
Introducing the Photoshop Toolbox
When you open Photoshop, you are faced with a variety of tools. Before doing anything, it is better to get acquainted with the work environment. Photoshop applications go far beyond image editing. Go to Window> Workspace> Photography. The workspace opens with photography tools. Now you see the toolbar on the left (red rectangle, pictured below).
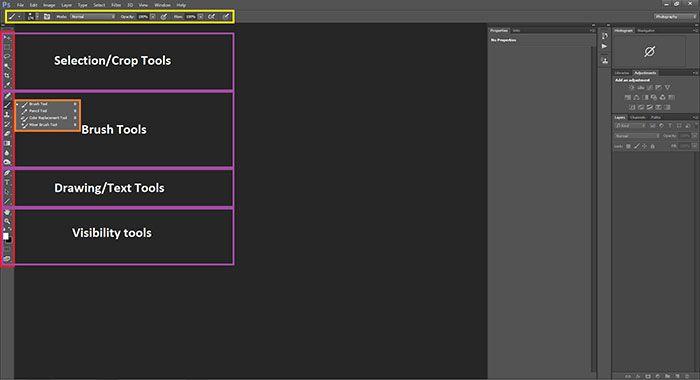
Most of the tools you see in the toolbar include subsets of different devices. By clicking on the small arrow next to these tools, you can see a subset of them (orange rectangle, image below). After selecting a tool from the toolbar, the features or options available for the device appear at the top of the page and just below the menu bar (yellow rectangle, image below).
For example, in the image above, the brush tool is selected. As a result, brush tool properties such as brush size, blend mode, opacity, and other pen tool features are shown above. Remember that tools and pallets can be adjusted as needed. Here’s a look at some of the most common Photoshop tools:
Crop. Lazar
Cropping or cropping an image is one of the first steps in image editing. You can select crop lines by clicking on the crop tool (green rectangle in the image below). You can drag the eight corners to resize the crop or remove the image from all four corners.
When you hover the mouse over one of the corners, the mouse pointer becomes the resize icon. When you move the mouse slightly from the image to the corners, the mouse rotation icon appears, and you can rotate the image clockwise or counterclockwise.
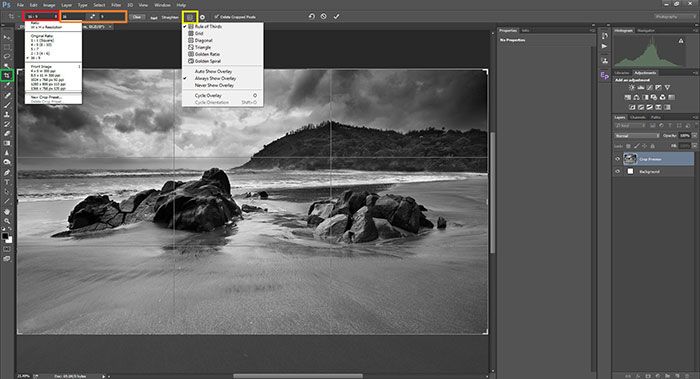
You can also change the aspect ratio while cropping. This ratio is between the length and height of the image.
By default, Photoshop retains the original aspect ratio. You can change the aspect ratio by selecting one of the slider bar proportions (red rectangle). You can also change that ratio directly by entering the length and width in the left pillars of the drop-down menu (orange rectangle). If you do not want to use predefined proportions, click the clear button to get Photoshop a custom ratio.
The next option during crop is Overlay (yellow rectangle). Most photographers are familiar with rules such as the one-third rule or the golden ratio. There are also more complex overlays. You can select one of the overlays, such as the Golden Spiral, and change its direction by pressing the O key. You can then click the tick button to let Photoshop override the pixels outside of the crop.
Spot Healing Tool
Sometimes dust settles on the camera sensors. Dust is not very noticeable if it is in the form of a point with great detail, but if it is placed on clean and smooth issues of the image, such as the sky or light background, it looks like a dark spot. Sometimes you want to remove some extra objects from the picture frame. In this case, the spot healing brush tool is the best option.

In the image above, the flag (red oval) is one of the additional elements of the impression that the photographer cannot physically remove. And in this case, the sports healing tool does almost the same thing with less hassle.
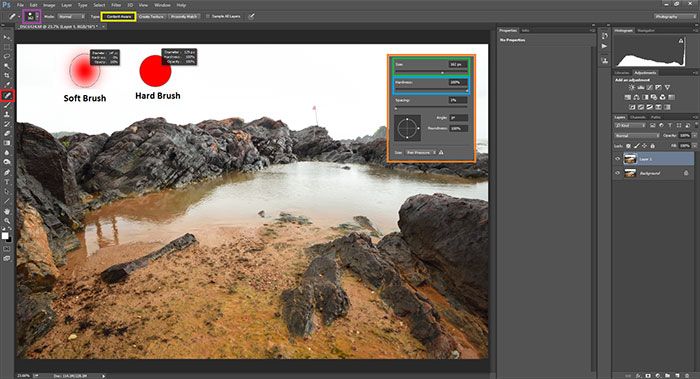
To use this tool, click on the spot removal tool (red rectangle, image above).
Then in the properties section, make sure the Content-Aware option (yellow rectangle) is enabled. This tool works for 90% of cases. By right-clicking on the desired point of the image or by clicking on the size menu (purple rectangle), you can change the size and hardness properties of the selected brush (orange rectangle)
Select the Brush Size (based on pixels). Then increase or decrease its hardness. Stiff brushes have sharp corners, while soft brushes create smooth corners in the image. After selecting the necessary options, hover the mouse over the desired spot to remove it.

No trace of the flag can be seen in the image now. In this example, a stiff brush is used because the background is uniform. If the experience were non-uniform, a soft brush would work better. Each photo is unique and requires a certain amount of softness or hardness. The soft brush is suitable for creating blurred corners. As a result, you need to change the size and hardness of the meeting to fit your image.
Clone Stamp tool
The Clone Stamp tool is an advanced version of the spot healing tool. The spot healing tool automatically removes extra and abnormal pixels by scanning the surrounding pixels. This tool works well with a simple background, but it becomes problematic against a complex environment.
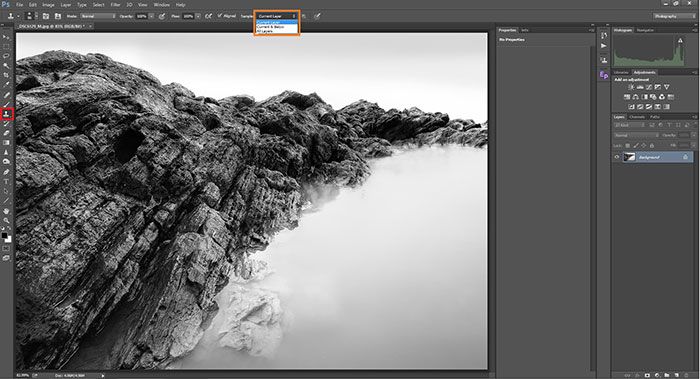
But the clone tool allows you to sample the source and target it. You can do the sampling by clicking on the head and pressing the Alt key simultaneously. Then all you have to do is drag the brush to the target point. Photoshop usually replaces target pixels with sample pixels. Often a soft brush works better for a clone stamp tool.
Most of the properties window options in the clone tool are similar to the spot healing tool. There is only one additional option called Sample (orange rectangle, pictured below). With this option, you can select the desired layer for sampling. This option is set to the current layer by default.
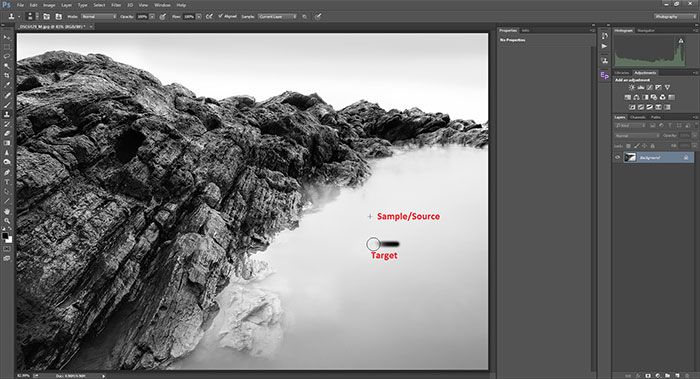
In the example above, you can see the clone stamp tool copies the Sample from the source and replaces it with the target. To sample, hold down the Alt key and click on the area. By moving to the target location and dragging on it, you will see the samples are placed on the target.
Brush tool
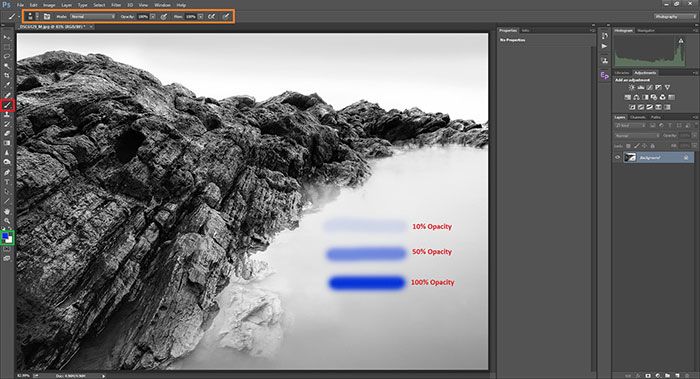
The brush tool is one of the most valuable tools in the tool palette. In general, the brush tool does what a brush does in the real world. Select the brush tool (red rectangle in the image below), the background color (green rectangle), and the brush size. Finally, select the opacity. Opacity is the equivalent of hardness in the spot healing tool, except that this value determines the amount of brush strength.
Using the brush tool goes far beyond drawing a single color on an image. This tool is handy for editing images when working with layer masks.
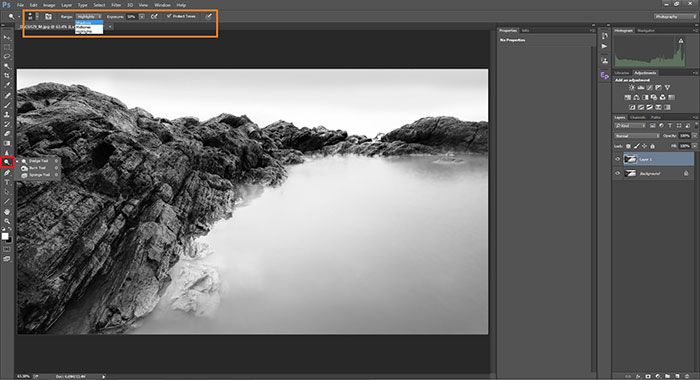
Dodge and Burn tool
Dodging and Burning are two examples of techniques that have survived film photography; But what exactly do Dodge and Bern mean? SimpDodget, Dodge makes light, and Berne makes it dark. In addition, to dodge and burn, there is a submenu called a sponge. The sponge tool changes the color saturation instead of brightening or darkening the pixels.
After selectDodgehe Dodge, burn, and sponge tools in the properties menu, you can select the desired areas of your Image (Highlights / Mid-tones / Shadows). Other features like brush size and opacity are similar to the brush tool.
Then you can drag the brush on the desired areas. For example, if you select the burn tool and then Highlights from the Range section if you remove it, only the highlights will darken, and the rest of the teams will remain intact.
Similarly, only the shadows will be brighter if you use the Dodge tool and select Shadows from the Range. When the sponge tool is selected, the Saturate / Desaturate option appears instead of the range menu.
Global و Local Adjustment
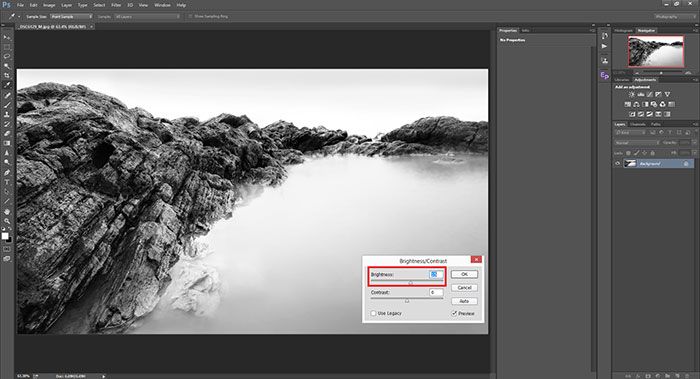
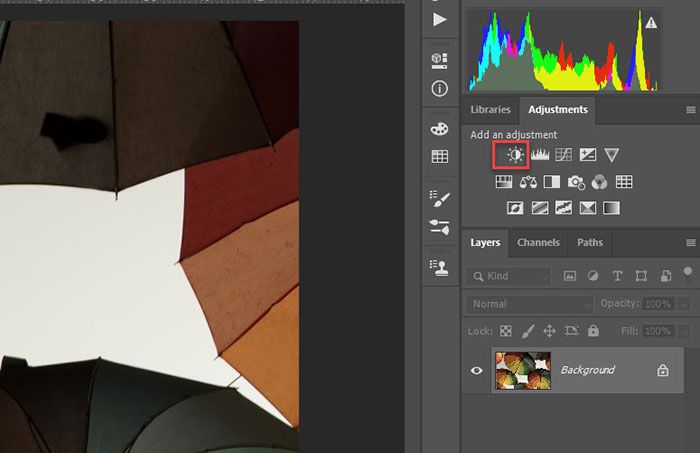
Suppose you need to increase the brightness of the image. One way is to go to Image> Adjustments> Brightness / Contrast. You will see a window with two sliders where you can increase the brightness or contrast of the photo. When you increase the image’s brightness with this method, you will see that the brightness is applied to the whole image.
These settings are called global adjustment or global adjustment. In contrast to the dodging method, consider the previous section. Instead of highlighting the whole image, we used a brush to illuminate selected areas of the picture. In addition, we applied these settings to a specific range called Highlight, mid-tones, or shadows. The method of selectively using an effect on a particular area is called a local adjustment.
There is another criterion for the superiority of local engagement to global engagement. Suppose parts of the images need more substantial opacity, and parts of the image should be expected. In these cases, the use of local ointments is recommended. In short, retrieving shadow detail in an image is called a local adjustment, while adding light to an entire image is a global adjustment.
Layers in Photoshop
Layers are one of the main reasons for choosing Photoshop. You must have heard about layers and tried to understand them. First, let’s give a summary of what we did in the previous sections of this article. Select a tool and apply it directly to the image globally or locally. But what if you did something wrong and want to go back? You can use the history tool to go back, but unfortunately, a limited number of edits go back, not all of them; Because the history tool usually acts as a temporary repository.
After closing, Photoshop history will also delete unless you have saved it as an action. In another scenario, suppose you want to increase or decrease the intensity of the effect you applied earlier. For example, consider improving the overall exposure; you open the same File a few days later, and you want to change the settings.
It is where non-destructive editing options like layers come into play.
First, you need to know the difference between malicious and non-malicious editing methods. Suppose you select the eraser tool to delete part of the image. When you open the idea after a few days, you cannot restore the lost pixels if you do not have a copy of the picture. This type of editing is malicious.
Now suppose you open an image document and then reduce its exposure and increase the color saturation. Instead of directly implementing all the edits on the image, it is better to use layers placed on each other. As a result, the primary layer of the image below and the improvements are made on the top layers. For example, you can add exposure on the top layer.
Then apply the contrast to the two underlying layers, the original and the exposure. Then a saturation layer is placed on top of the two. As a result, if the layers are removed or added, the primary layer remains unchanged.
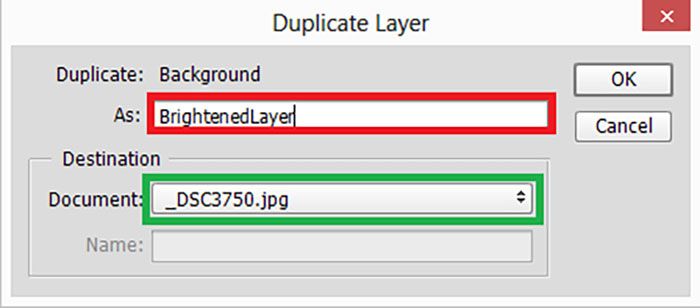
In the image above, the primary layer is called the background layer. In the next step, a copy of the layer is taken and placed on the leading layer. You can copy layers by right-clicking on the layer, selecting Duplicate Layer from the drop-down menu, or pressing Ctrl + J. In the Duplicate Layer window, you can enter the name of the new layer.
You can also copy the desired layer to a separate document by selecting the Destination option.
The top layer acts as the foreground. The underlying layers are usually considered as the background. Consider the role of the environment relative to the experience in photography.
The foreground usually changes all or part of the background depending on the location. It is precisely what the foreground layer does. The layers are stacked on top of each other to hide the underlying layers.
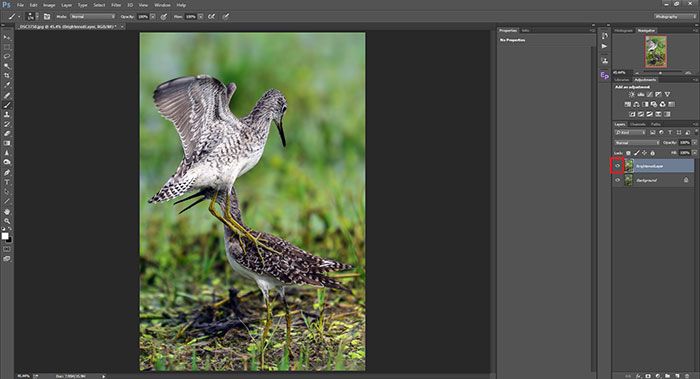
![]()
As mentioned in the previous section, the eye icon next to the layer shows or hides the selected layer. It is revealed by selecting the layer. There are two layers here: the background layer, the main layer, and the layer called BrightenedLayer, which is placed on top of it.
Then you can change the brightness of the layer by selecting BrightenedLayer and going to the menu Image> Adjustments> Brightness / Contrast and slider settings. At the same time, the background layer remains unchanged. If you turn off the eye icon, you can see the changes.
So far, we have provided basic information about layers and their function. To better understand their process, you need to be familiar with opacity and layer masks.
Opacity
See the image below. In this image, the brightness is maximized. The light in the picture is too high. There are several ways to modify this IImage and achieve the desired results.
With the opacity slider, you can set the display percentage of the top layer on the bottom layers. By default, the opacity for all layers is 100%. For example, by reducing the top layer’s opacity to 40%, only 40% of the top layer and 60% of the bottom layer are displayed. Photoshop does this seamlessly without making the image look artificial.
As a result, whenever you feel you have made too many adjustments, the simplest way to solve this problem is to drag the opacity slider to reduce the visible percentage of the top layer. In addition to opacity, there is another option called to fill. In most cases, opacity and fill have the same function, and their performance is different when working with specific blend modes.
Adjustment Layers
In the previous section, you learned how to implement adjustment on a layer, but this method has problems. You can use the opacity slider to reduce the editing effect. When working with adjustments during the last process, you had to delete and reapply them or use the history tool; For example, if you increased the brightness by +25, you would need to add more layers to improve it further, and the editing would be in the malicious editing group.
Instead, suppose you can change the settings without changing the opacity slider. It is where you can use adjustment layers.
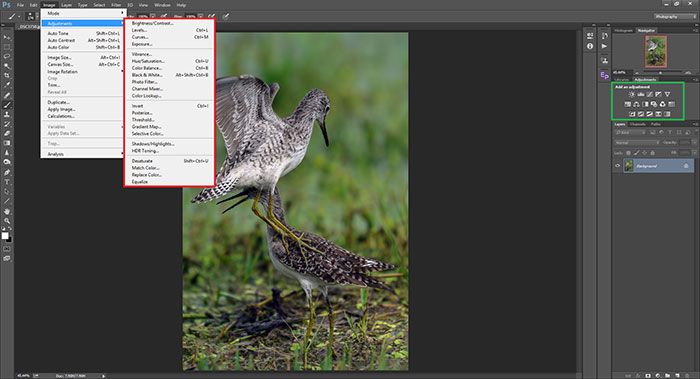
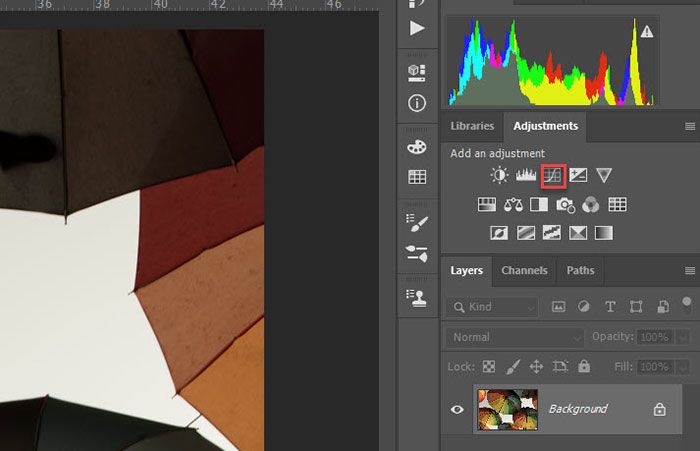
If you compare the menu settings Image> Adjustment (red rectangle in the picture above) with Add an adjustment (green rectangle), you will notice the similarity of their function.
However, there is a significant difference between the two.
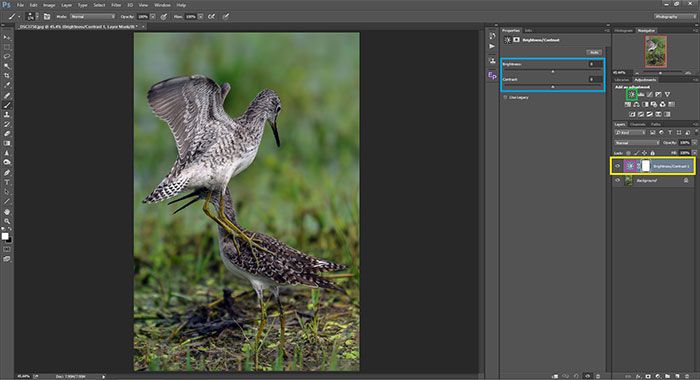
Instead of selecting items from the menu, clicking the equivalent icon in the ad, an adjustment palette will display a new layer of things above the existing layer. Click the Brightness / Contrast icon. You will see a new layer (yellow rectangle). When you do the same with the menu, a window that applies brightness directly to the selected layer will appear.
The advantage of using adjustment layers is that even after saving and closing the document, you can open it again and double-click on the layer icon to see the amount of brightness slider you changed earlier. This type of editing is entirely non-destructive.
There is a fundamental difference between the other layers and the adjustment layer. In the previous example, when you copied the primary layer. In contrast, the adjustment layer only applies the desired settings to the underlying layers.
Layer Masks
Now that you have a basic understanding of layers, it’s time for layer masks; But what exactly is a layer mask? In the previous section, you saw how the foreground is placed on the background; But sometimes, we need to show part of the foreground (top layer) and part of the background (bottom layer).
In other words, you may want some of the background to be opaque and some to be transparent. In transparent sections, the underlying layers are visible. Layer masks, as their name implies, are used to represent specific sections of selected layers. A critical aspect of layer masks should remember: it shows white, hides black, and 50% gray equals 50% matte.
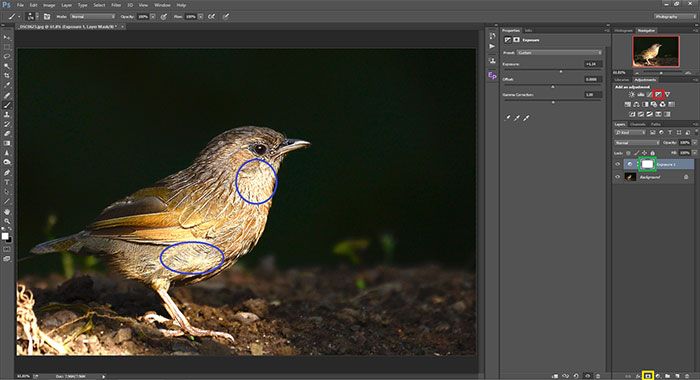
You can better understand this with an example. An Exposure setting layer has been added in the image above by clicking on the related icon (red rectangle). In the properties section, you can increase the exposure by one stop. See the green rectangle icon. This icon is a layer mask. By default, each layer of the agent comes with a layer mask. You have already seen that the layer of glass applies changes to the bottom layer.
The same thing applies to espresso masks.
Try it By selecting the add new layer mask icon (yellow rectangle). The layer mask is white by default. It means that the top layer is evident.
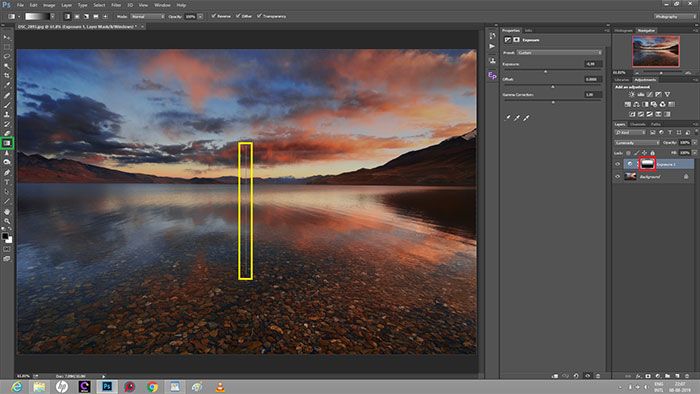
In the image above, the exposure is applied uniformly to the entire layer, while the light is too high in some Image areas. As a result, you can reveal some desired areas of the coating by creating a black mask and dragging on the white cover.
To do this, first, select the layer mask and turn it black by pressing Ctrl + I. Now you see the show’s color becomes a black layer, which means that the current layer is transparent (because it hides black). As a result, the underlying layers are visible.
Now you can draw on dark areas by selecting the brush tool (red rectangle, photo below) and adjusting its diameter and softness (hardness = 0). There are two things to keep in mind when working with masks.
First, you need to make sure the background color is white (green rectangle, photo below), and secondly, make sure the layer mask is selected (blue rectangle, image below).
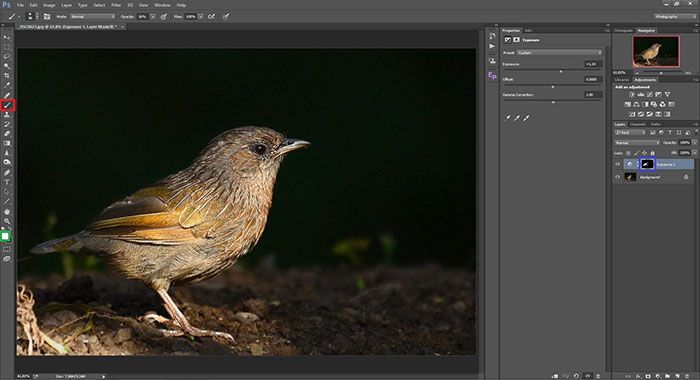
Also, check that the layer mask is attached to the Exposure layer.
You will now see the areas where you painted the mask are displayed while some regions remain black. You can see the show’s preview by clicking on the layer mask and pressing the Alt key simultaneously.
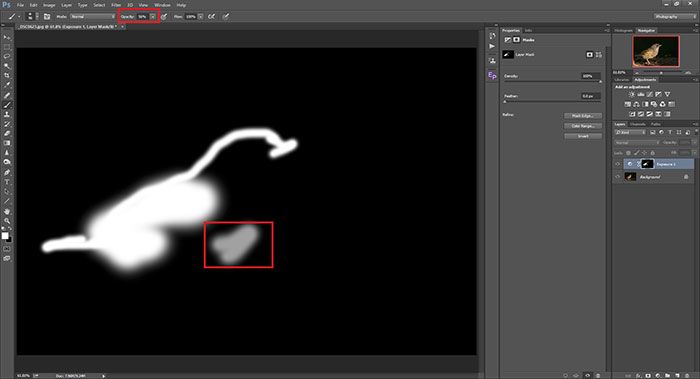
In the picture above, you can see the spot inside the red rectangle. Here, instead of using 100% black or 100% white, fifty-six percent opacity is used to control the amount of the mask.
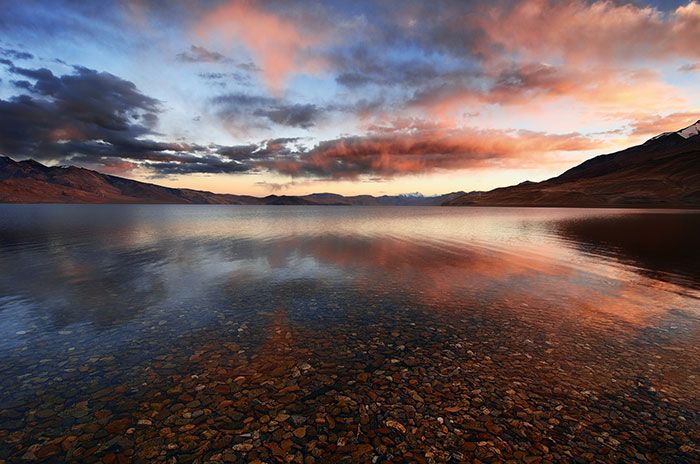
Image recorded with the Nikon D7000, focal length 11 mm, ISO 100, shutter speed 1.8, aperture: f / 8.0
Now let’s look at another example of a layer mask application. In the picture above, the color of the sky is very light. Its integrated darkening makes it look better.
An Exposure layer called Exposure 1 has been added here. Make sure the exposure layer mask is selected here. Then select the gradient map tool (green rectangle), place the mouse in the middle of the image, and drag it down (yellow rectangle).
You can see a gradient from white at the top to black at the bottom of the mask layer. This effect is similar to the impact of a neutral saturation density filter. There are several methods such as Blend-if or Luminosity masks for selecting parts of the image.
Blend Mode
In the previous sections, you understood layers and their uses in Photoshop, along with layer masks. In addition to these features, you can also change the blend mode of the layers.
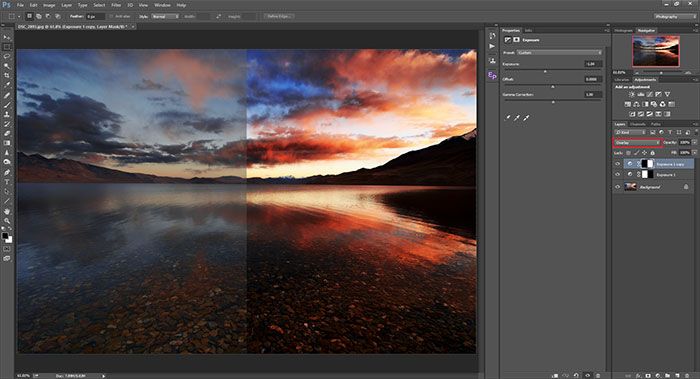
Take a look at the image above. The Exposure tool has been added to thisImagee, and its value has been reduced by one stop. These settings are masked on the right side of the image, so the exposure layer is only visible on the left. In the next step, a copy of the Exposure installation layer is created with the same settings.
This time, the left side of the image is masking. Both parts look the same; But the Blend mode menu of the Exposure 1 Copy layer is set to Normal, which is the standard blend mode. At the same time, the default blend mode of this setting is Overlay (red rectangle).
You can see the difference in extended modes is significant.
Although the settings of the Exposure layers are the same, two different blend modes produce different results. Blend mode Determines how the layer on top of another layer will look. In the example above, normal extended mode reduces exposure by only one stop, while overlay mode adds more contrast to the image.
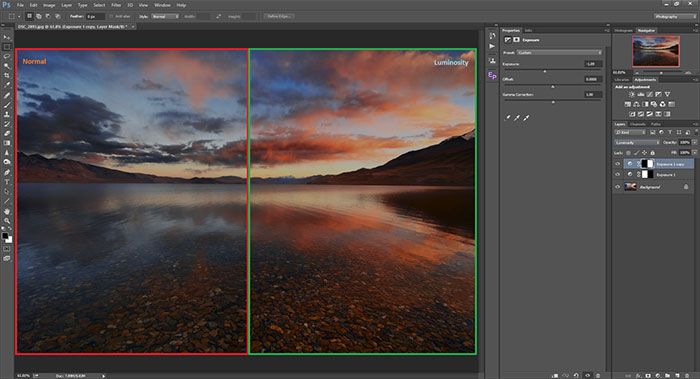
In the image above, similar to the previous embodiment, the light on the left is reduced by one stop, and the normal fusion mode is used for it. The same operation was repeated for the right half, except that the blending mode is setting to Luminosity. Although the exposure to the left of the image is small, you can also see the decrease in color saturation.
The Luminosity blend mode is selected in the right half, affecting the exposure characteristic and leaving other properties such as saturation intact. Photoshop categorizes blend modes by type (Image below).

Understanding all the extended modes requires another article that is beyond the scope of this article.
Photoshop filters
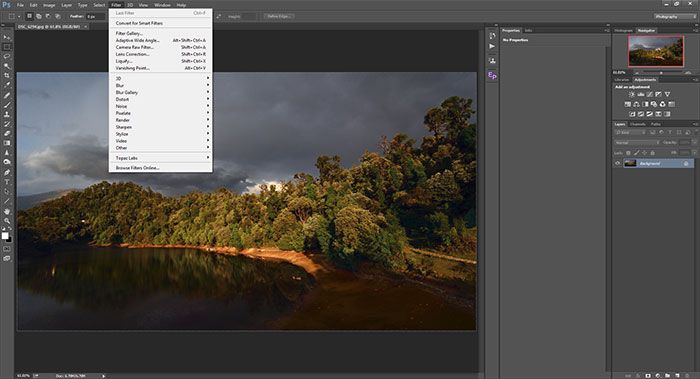
What happens when you install a filter like ND or CPL on the camera lens? Photoshop filters have a similar function. By default, when you enter the Filters menu, you are presented with a set of filters to increase the sharpness, blur the image, add or remove noise. In addition, there are various plugins for implementing filters.
Remember that filters are applied to the selected layer. Some filter menus may be disabled if an adjustment layer is selected. So make sure you choose the layer you want to use the filter. It is generally better to copy the desired layer and then apply the filter on it.
Adobe Camera Raw can also be applied as a filter on layers.
Smart Objects
Like layers and masks, smart objects are one of Photoshop’s most widely used features. You’ve seen before that filters and other components can be malicious if applied directly to a layer, and settings can not change again. On the other hand, intelligent objects are the solution to this problem. When you convert a layer to a bright object, Photoshop intelligently applies all the elements and filters.
You can convert any layer to a bright object by selecting it, then right-clicking on the layer, and selecting the Convert to Smart Object option. After this, the innovative object icon will appear on the layer (red rectangle). In the example above, two objects are created.
In the first element, the Camera Raw filter is used. The brightness of the image then changes with the Brightness / Contrast object. You can see that both changes have been applied to the layer as intelligent filters.
Now to change the values, all you have to do is double click on the filter. Just like the application layers, a window opens in which the selected values are displayed. You can change these values as you wish. You can change the blend mode of a specific filter by double-clicking on the icon marked in blue. The use of intelligent objects goes far beyond what is not covered in this article.
Steps to edit images in Photoshop
If you are new to image editing or do not know how to use the above settings, in this section, we will point out the steps and steps necessary to achieve a high-quality image. Although there are hundreds of ways to edit photos in Photoshop, you can use the following settings and tips as a step to get started.
Smoothing the horizon line for professional photos
It is easily visible to the naked eye when the horizon line is not straight. A novice may not know where the flaw is, but something missing in the picture seems to be. For this reason, you must ensure that the horizon line is smooth. Fortunately, there is a straightforward way to smooth the horizon in Photoshop:
1. Select the Crop tool.
2. Click on the Straighten option at the top.
3. Click on the side of your horizon and smooth the horizon line by dragging.

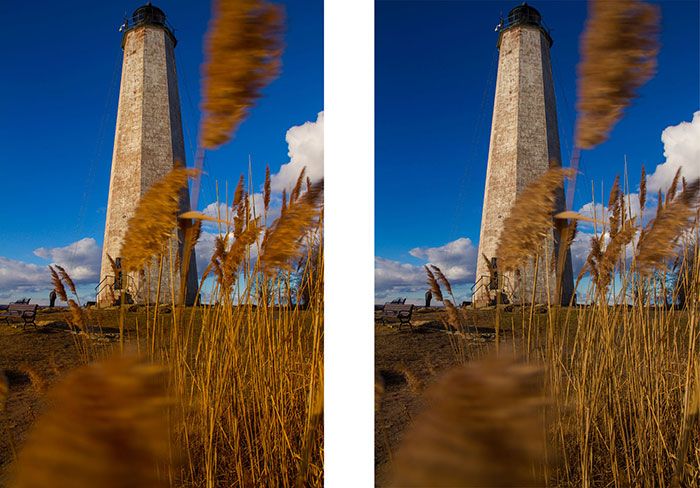
Adjust white balance for naturally looking images
White balance is used to balance the color of light and approach natural white light. When the subject color changes due to the existing lighting conditions, you can use white balance to save your photo.
The correct way to adjust the white balance is to change the camera directly. However, some photographers prefer to capture RAW photos with auto-white balance settings and then modify them in the final edit.
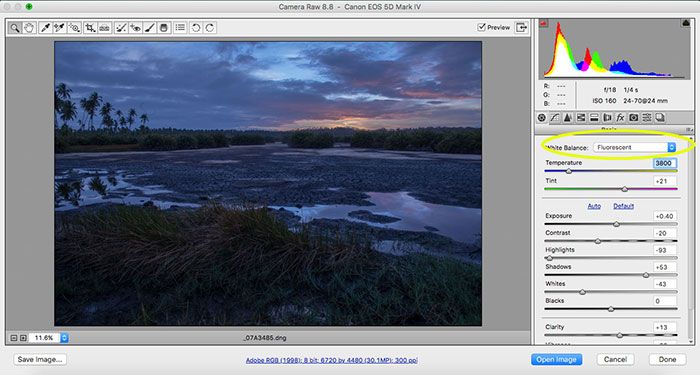
In this case, you need an image editing program. Adjusting the light level to fit the photo is easy. For example, in the image below, Adobe Camera Raw uses the Fluorescent white balance setting.
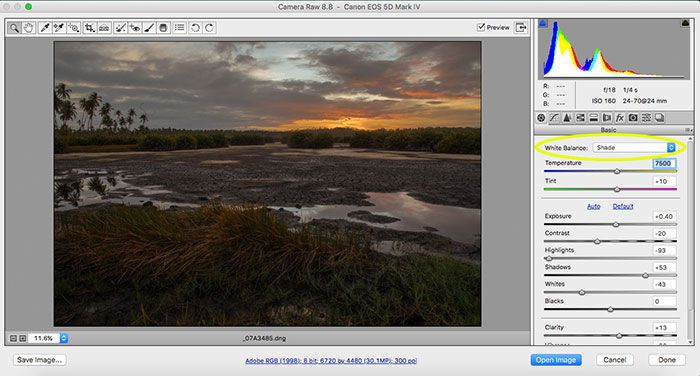
In the image below, the same landscape is set with the Shade white balance.
Increase the contrast of images
Do your images look flat? One of the easiest ways to make your pictures stand out is to adjust the contrast. Contrast settings cause the dark and light areas of the image to be separated. In other words, dark bodies become darker, and delicate bodies become lighter.
Increasing the contrast adds a three-dimensional sensation to the image. For example, compare the picture above with the image below; The difference of the second image has increased. One way to adjust the photo’s contrast is to use the Brightness Contrast object, marked with a red rectangle in the image below.
Exposure settings
Adjusting the exposure in Photoshop is similar to the settings in the camera. One way to adjust the direction is to apply curves to the image. The angle allows the photographer to change the exposure by separating the exposure levels of the picture. A red rectangle indicates these settings in the image below.
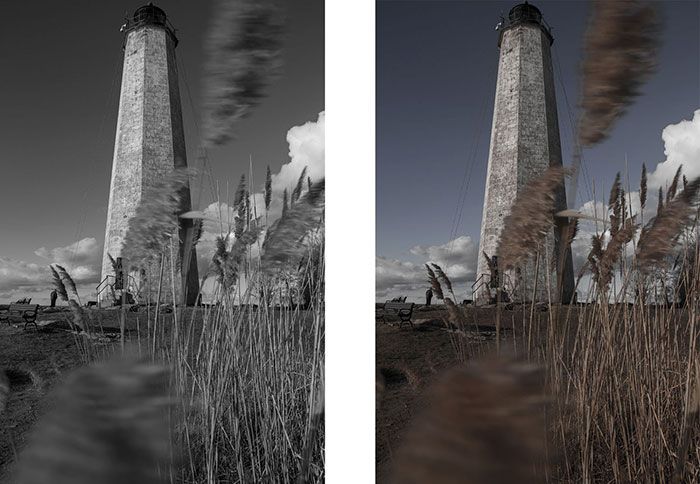
Adjust color saturation and intensity
Saturation and vibrance sliders are used in Adobe camera raw and other parts of Photoshop to add color to images. Saturation is to adjust the intensity of all the colors in the picture. If you change the saturation slider, you will see the color saturation increase throughout the screen.
In contrast, vibrance settings are a more innovative tool and only apply to matte colors in the image. By increasing vibrance, you can improve less saturated colors; But these settings do not affect sufficiently saturated colors. Here are two examples:
The saturation of the left photo and vibrance of the right picture has increased. Note that your images take on a more matte effect; Like the Image below.
Increase the resolution of images for better display on the web
Photographers usually share their pictures on the Internet. However, when you output your images to software such as Photoshop, you may encounter completely blurry images. Unless you increase their resolution for the web. There are several ways to improve the sharpness of images, one of which is mentioned below.
1. Resize your Image to fit the size you want to display on the web. If the original image has a high resolution and resizes it, you will lose your image resolution. It can be increased by increasing the resolution of the quality on the screen.
2. Copy your layer.
3. Remove the color saturation of the new layer by going toImagee> Adjustments> Desaturate.
4. Blend mode Change the layer to overlay. You can use soft light to achieve less clear effects.
5. Now select the high pass filter by going to File> Other> High pass menu and set the radius value to 2 for an image with a resolution of 730 pixels (on the long side). The Overlay option allows you to see the effect of the filter on the bottom layer.
Tip: The more extensive your image, the more radius you need to apply. Draw in black on the point where you want to hide the effect.
6. Save the Image to the web by going to File> Save for Web. Also, select the Convert to sRGB option.
Concluding remarks
If you are just starting in professional photography, you need to know the basics of image editing. Photoshop is one of the best-known tools for editing images with comprehensive features. In this article, we tried to provide the basics of working with Photoshop to edit pictures.
Although these are just a few of the many uses for Photoshop, you can use them as a beacon to enhance your image and get started.