

In Windows 10, you can format a USB flash drive, and this feature is helpful in various situations. For example, you may sometimes need to format the external driver to ensure there is no malicious code, or you may be forced to do so due to misreading.
Sometimes, the flash drive File System is incompatible with your device configuration. You may want to delete the files on the USB flash drive if you do not like your personal information displayed on someone else’s System. You may need to use the Flash Format to solve several situations.
According to a Windows Central article, for whatever reason, Windows 10 offers several tools that you can use to format all types of storage, including USB flash drives. This report introduces various methods for formatting drives, including File Explorer, Disk Management, Command Prompt, and PowerShell.
This tutorial will explain how to format a USB flash drive using any of the above methods.
How To Format A USB Flash Drive In Windows 10
Warning: The instructions in this guide will delete all files on the selected drive. If you have an essential File, back it up before continuing and store it in a secure folder.
Learn how to format a USB flash drive in File Explorer.
To format a USB flash drive using File Explorer in Windows 10, follow these steps:
- First, open File Explorer.
- Select This PC on the left side of the screen.
- Right-click the flash drive in the Devices and drives section and select Format.
- Use the File System drop-down menu and select NTFS.


Note: If you plan to use removable storage (such as a USB flash drive) in Windows 10 and macOS, you may want to opt for exFAT for better compatibility.
If you are considering using it on a Linux-based device, FAT32 is the best choice, even if it is limited to 4 GB files.
- Use the default selection in the Allocation unit size drop-down menu.
- In the Volume label field, confirm the drive name in File Explorer, such as workFlash.
- In the Format Options section, select the Quick Format option.
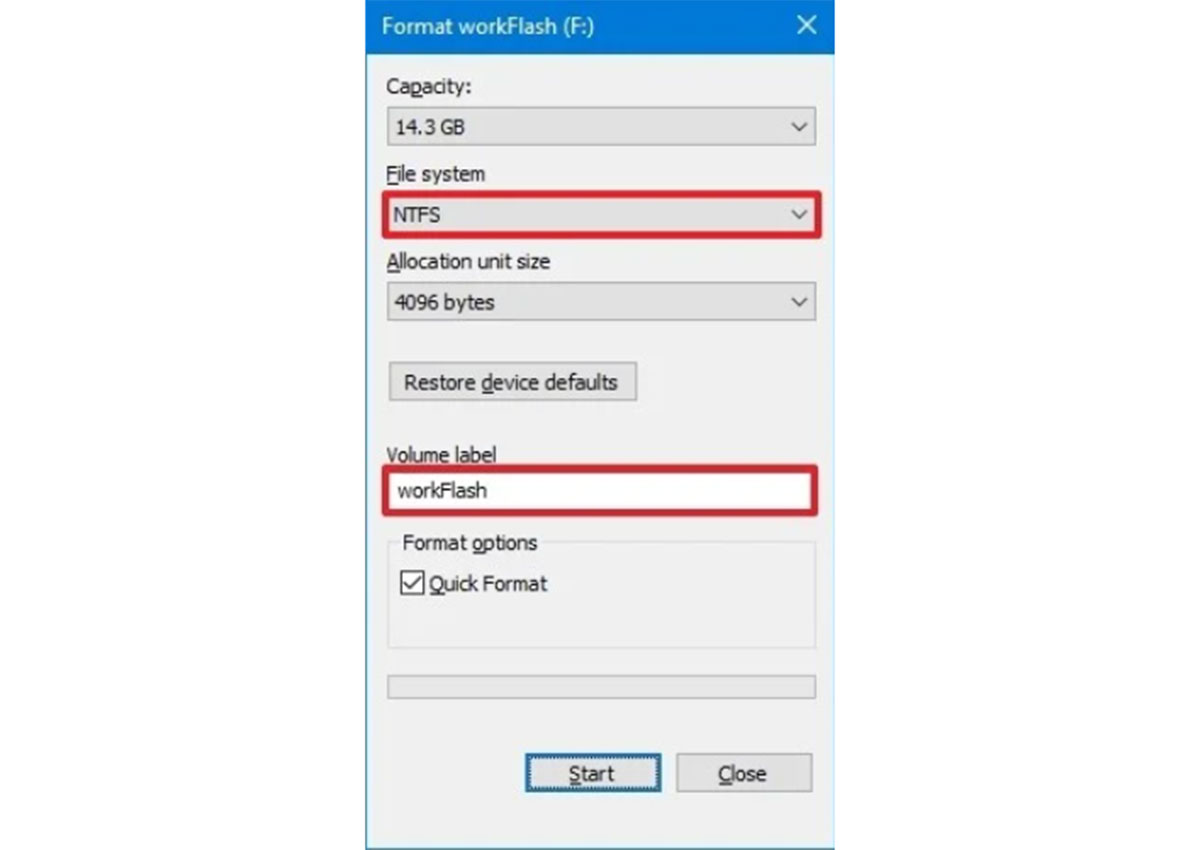
Note: The Quick Format option only deletes the root File and folder, but the data can be retrieved. The entire Format operation will be performed if you do not select this option.
Such an operation scans all the different sections and converts them to zero, eventually wholly deleting all the files and data. Depending on the size of the drive, the process may take longer.
- Open the Start menu.
- Click the Yes Button.
- After completing the steps, the flash drive is ready to save documents, images, videos, and other files to the drive.
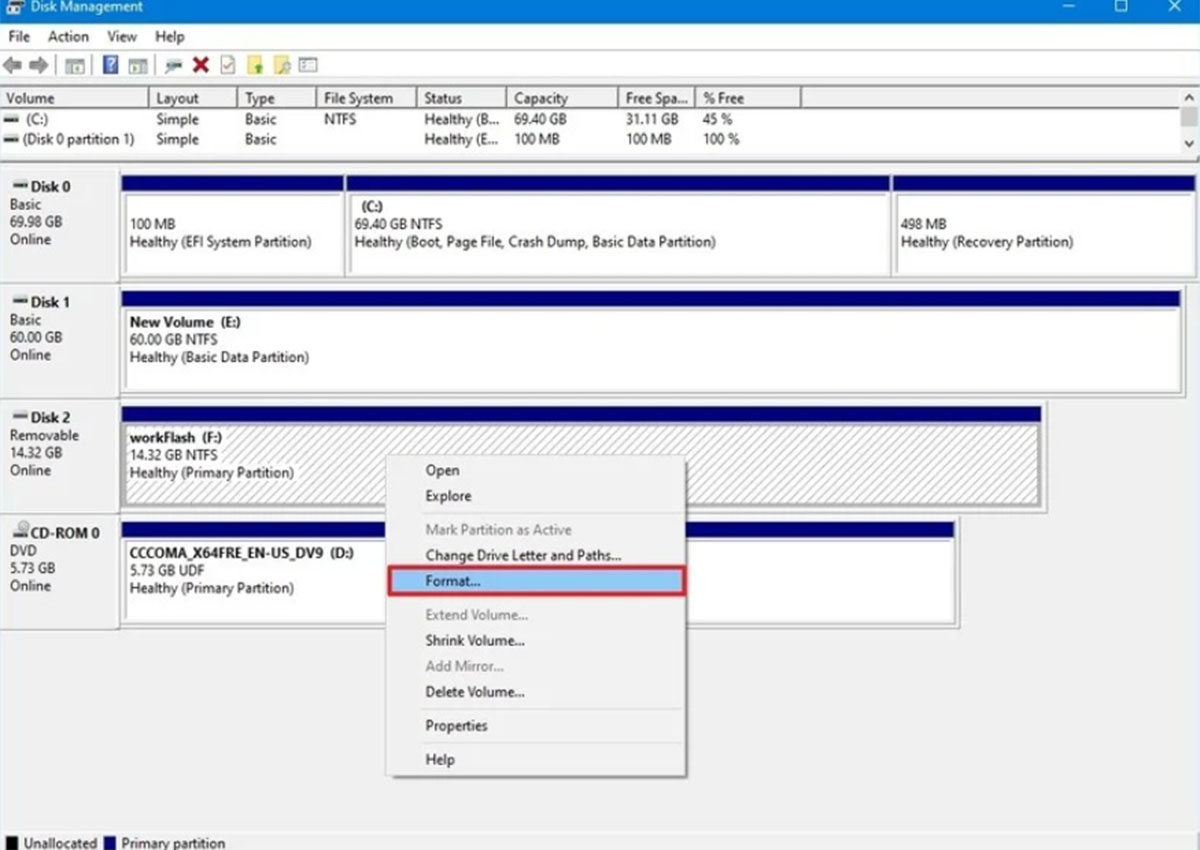
USB flash drive Format via Disk Management
The Disk Management tool provides at least two ways to format a USB flash drive. Using the two methods, you can delete the storage space to rebuild the filesystem table and fix the filesystem content Format or a specific partition to fix memory problems.
Flash Drive Format
To use Disk Management for USB drive formatting, use these steps:
- Open the Start menu.
- Search for “Create and Format hard disk partitions” and click on the first result to open the disk management tool.
- Right-click on the removable drive and select Format.
- In the Volume label field, enter Formatme to identify the storage space in File Explorer.
- Use the File System drop-down menu and select NTFS (you can choose FAT32 or exFAT, depending on your needs).
- In the Allocation unit size drop-down menu, use the Default option.
- Check the Perform a Fast Format option.

- Check the Enable File and Folder Compression option (optional).
- Click the OK Button.
After completing the steps, the existing files on the drive will be deleted, and the data will be re-formatted so that the flash can be stored again.
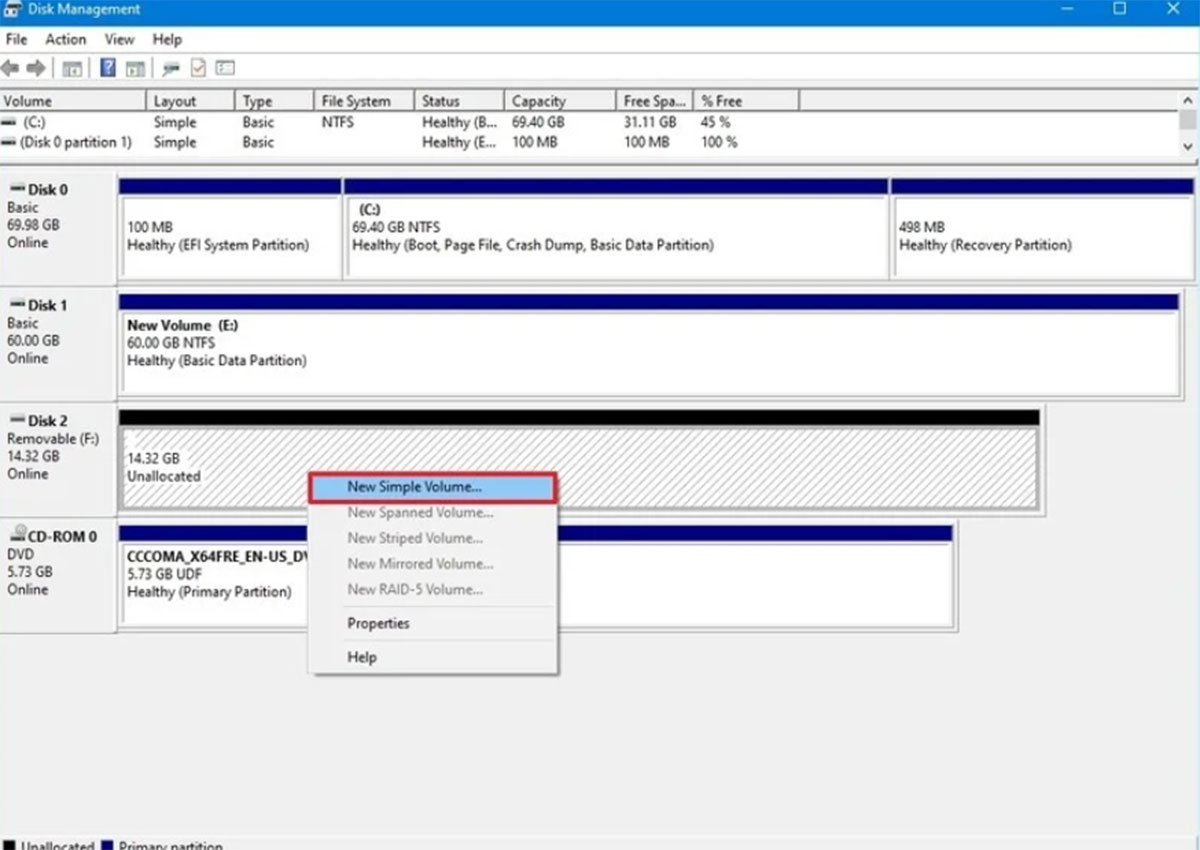
Clean and Format the Flash Drive
If you encounter errors or other problems in this area, you can clean the USB drive with Disk Management and rebuild the File System from scratch with a new partition and a rebuilt File System.
To clean and format the flash drive, follow these steps:
- Open the Start menu.
- Search for “Create and Format hard disk partitions” and click on the first result to open the disk management tool.
- Right-click on the removable drive and select Delete volume.

- Click the Yes Button.
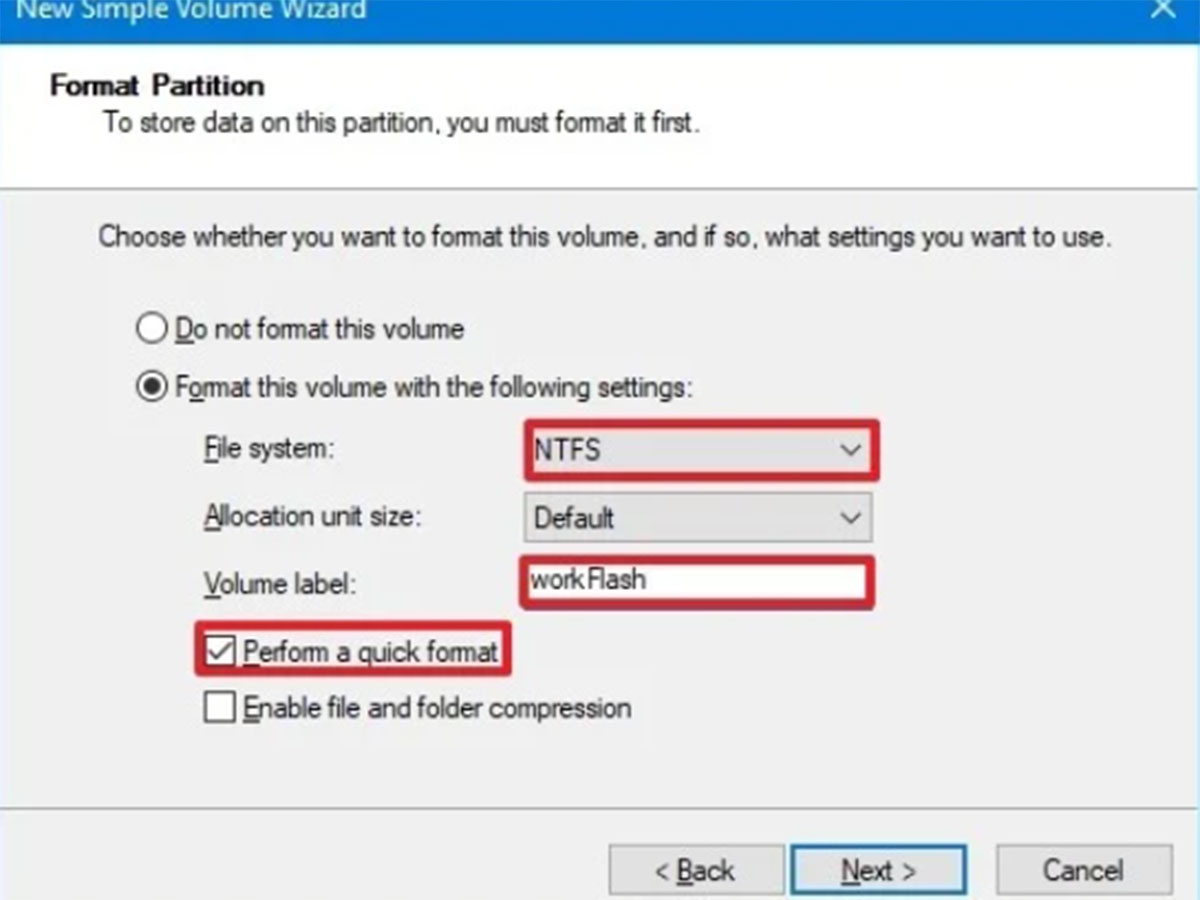
- Right-click on the Unallocated option and select New Simple Volume.
- Click the Next Button.
- Click the Next Button again to use all available space.
- Select the Assign the following drive letter option.
- Use the drop-down menu to select one of the available letters.
Note: If you want to select a letter and enter it manually, it is better to find the option you wish to in the reverse order of the letters of the alphabet (Z, Y, X, etc.).
- Click the Next Button.
- Select Format for this volume using the following setFormat option.
- In the File System drop-down menu, select NTFS and click on it.
Note: This method can only be used with NTFS or FAT32 formats. To access exFAT at the end, you must use the Command Prompt or PowerShell methods.
- In the Allocation unit size drop-down menu, use the Default option.
- Type a name in the Volume label field to quickly identify the flash drive in File Explorer.
- Check the Perform a Fast Format option. (If you do not do this or uncheck, the formatting is complete, so the process time may increase depending on the storage space.)
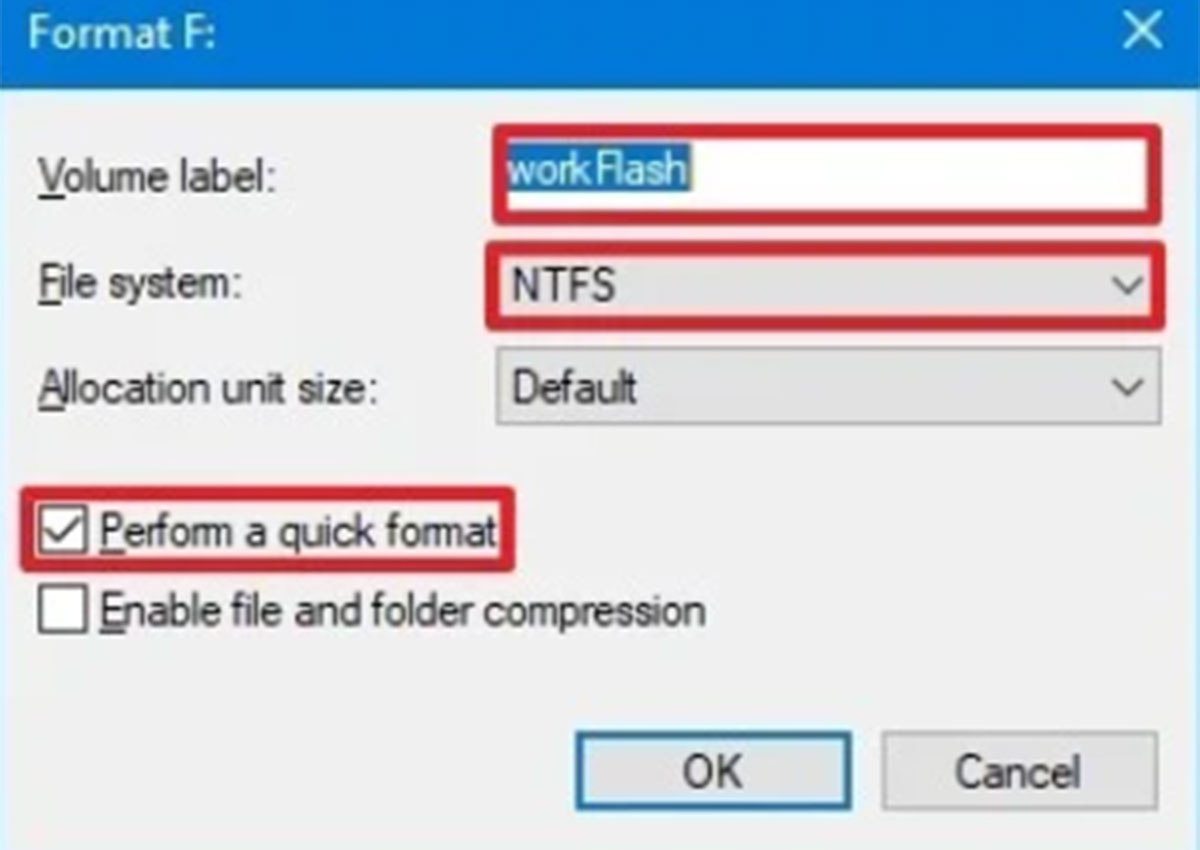
- Check the Enable File and Folder Compression option (this step is optional).
- Click the Next Button.
- Click the Finish Button.
After completing the steps, a new partition is created, the File System is booted, common problems with the flash drive are fixed, and other tasks are performed.
If you can’t format your flash drive, it’s probably broken. In this case, you have to create a new flash drive and use it to move your files. Numerous brands are producing USB flash drives, and this product is becoming more advanced.
USB flash drive via PowerShell
You can format the USB flash drive and delete its contents using PowerShell commands. Alternatively, you can use the command-line tool to clear and format the storage space to fix the existing problems.
Formatting a flash drive
To format a USB flash drive using the PowerShell commands, follow these steps:
- Open the Start menu.
- Search for PowerShell, right-click on the first result, and select Run as administrator.
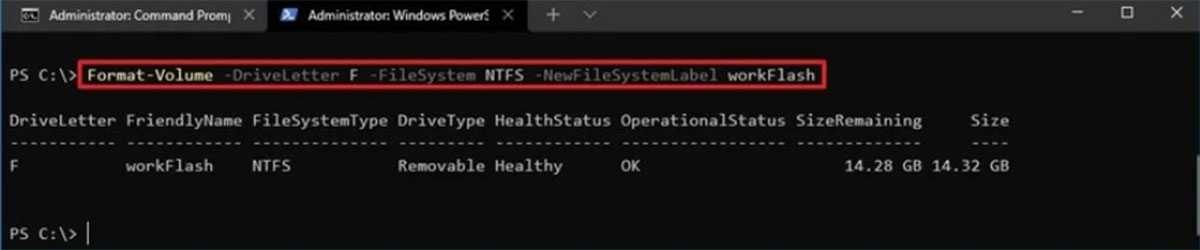
- To run a quick Format on the flash drive, type the following command and press Enter:
Format-Volume -DriveLetter DRIVE-LETTER -FileSystem FILESYSTEM -NewFileSyFILESYSTEMRIVE-NAME
- In the command line above, replace DRIVE-LETTER with the drive letter you want to format. The filesystemM with FAT32FILESYSTEMNTFS and the DRIVE-NAME with the name you wish to give the drive to appear in File Explorer.
For example, the following command code executes drive F with the NTFS filesystem:
Format-VofilesystemeLetter F -FileSystem NTFS -NewFileSystemLabel workFlash

- To complete the USB flash drive Format, type the following command and press Enter (this is optional):
Format-Volume -DriveLetter DRIVE-LETTER -FileSystem FILESYSTEM -Full -ForFILESYSTEMrammatical code, depending on the File System you want to use, DRIVE-LETTER with the drive letter that you want to format it and FILESYSTEM with FAT32FILESYSTEMor NTFS instead.
If you are a Windows 10 user and do not know which option to use, you can select NTFS. If the command code contains the phrase “Full,” the Format is complete.
For example, in the Format command code, the F drive Format is fully executed:
Format-Volume -DriveLetter F -FileSystem NTFS -Full -Force
After you complete the steps, PowerShell will format the storage space with the specified settings, and you can use it when the process is complete.
How to clean and format the flash drive
To clean and format a USB flash drive with PowerShell command code, use these steps:
- First, open the Start menu.
- Search for PowerShell, right-click on the top result, and select Run as administrator.
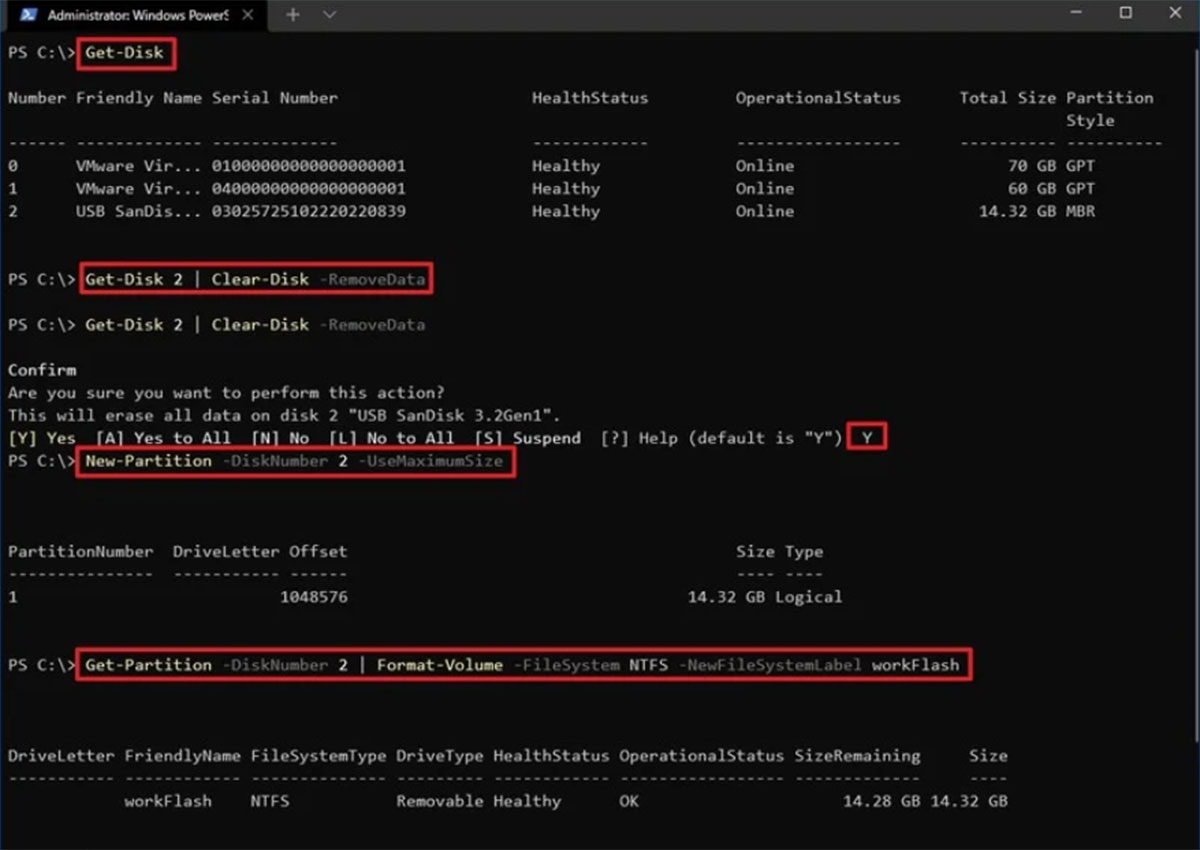
- To view the flash drive that you want to modify, type the following command, then press Enter:
Get-Disk
- Then, type the following command and press Enter:
Get-Disk DISK-NUMBER | Clear-Disk -RemoveData
In the command code above, change the DISK-NUMBER to the number representing the flash drive you want to format. For example, the following command code selects and cleans Disk 2:
Get-Disk 2 | Clear-Disk –RemoveData
- Type Y and press Enter to confirm the function.
- To create a new partition, type the following command and press Enter:
New-Partition -DiskNumber DISK-NUMBER -UseMaximumSize
In this command, change the DISK-NUMBER to a number representing your desired storage space. This example creates a new partition using all the space in drive number 2:
New-Partition -DiskNumber 2 -UseMaximumSize
- To run the formatting process quickly, type the following command and press Enter:
Get-Partition -DiskNumber DISK-NUMBER | Format-Volume -FileSystem FILESYSTEM -NewFileSyFILESYSTEMRIVE-NAME
In this command code, replace DISK-NUMBER with the number that indicates the storage location in the System, then change the FILESYSTEM to NTFS, FILESYSTEMAT, and DRIVE-NAME to the name by which you want the drive to be displayed in File Explorer. Change.
In this example, drive two is selected and formatted using the NTFS File System:
Get-Partition -DiskNumber 2 | Format-Volume -FileSystem NTFS -NewFileSystemLabel workFlash
- To assign a new letter to the drive, type the following command, then press Enter:
Get-Partition -DiskNumber DISK-NUMBER | Set-Partition -NewDriveLetter DRIVE-LETTER
In this command code, replace the DISK-NUMBER number that identifies the memory stored in the System, and change the letter that you want the drive to represent in File Explorer to DRIVE-LETTER. The following example sets E as the drive letter for disk number 2:
Get-Partition -DiskNumber 2 | Set-Partition -NewDriveLetter E
After completing the steps, PowerShell removes any USB storage information for troubleshooting, including data corruption, protection against unknown drives, and more. Then, the steps begin to create a new partition and configure the filesystem to store the files.
Learn how to format a USB flash drive using Command Prompt.
You can format the USB flash drive via the Command Prompt. You can also use this tool to clean the drive and start working with the new partition and File System.
USB flash drive Format
Use the following steps to quickly or entirely format a USB flash drive with the Command Prompt:
- Open the Start menu.
- Search for Command Prompt, right-click on the first result, and select Run as administrator.
- To quickly format a USB flash drive, type the following command and press Enter:
Format VOLUME: / v: FLASHDRIVE-LABEL / fs: FILESYSTEM / q
The directory of the file system with the letter representing memory is desired. The Flashdrive-LABEL with the name you want to drive in File Explorer appears, and a filesystem with one of the filesystemable options, including FAT32, exFAT, or NTFS, replaces it.
This example executes the fast Format of drive E:
format G: / v: workFlaFormats: NTFS / q
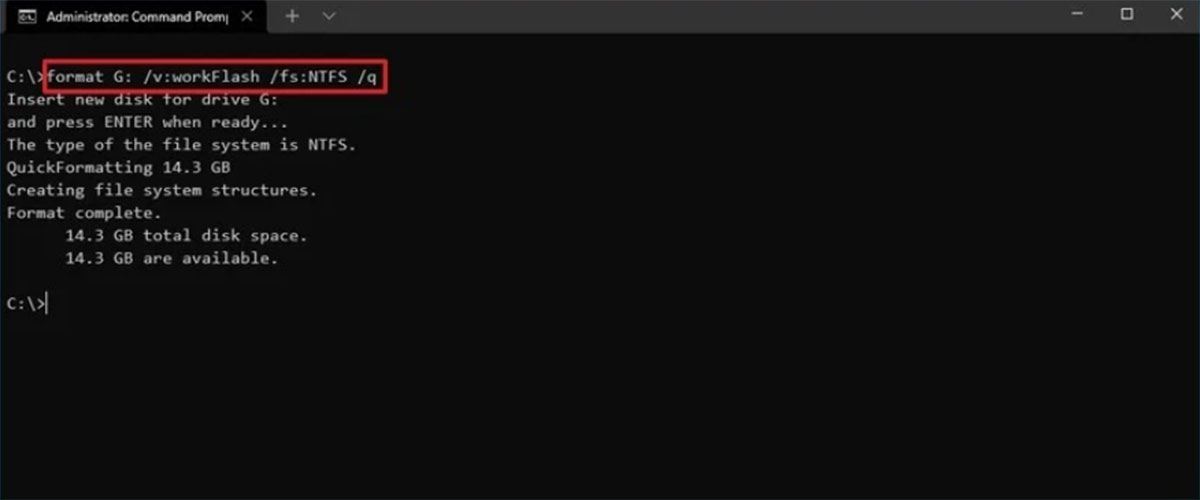

- Press Enter again to continue.
- To complete the USB flash drive Format, type the following command and press Enter (this step is optional):
Format VOLUME: / v: FLASHDRIVE-LABEL / fs: filesystem
This example is a complete Format of drive E:
format E: / v: “workFlash” / fs: NTFS
- Press Enter again to continue.
After completing the steps, the drive will be formatted with your specified settings.
USB flash drive formatting
Clean and format the flash drive with the command line. Use these steps:
- Open the Start menu.
- Search for Command Prompt, right-click on the first result, and select Run as administrator.
- To run the diskpart tool, type the following command and press Enter:
diskpart
- To view a list of available drives, type the following command and press Enter:
list disk
- To select the flash drive you want to delete, type the following command and press Enter:
Select disk DISK-NUMBER
Be sure to replace the DISK-NUMBER with the number indicating the drive you want to format in the command code. In the example below, the command driver selects the flash driver, which is represented by the number 2.
Select disk 2
- To clear all memory partitions, type the following command and press Enter:
clean
- To create a primary partition, type the following command and press Enter:
Create partition primary
- Type the following command to do a quick Format and then press Enter:
Format fs = filesystem label = DRIVE-NAME quick
In the command code, replace the File System with one from FILESYSTEM32 and exFAT. Also, replace DRIVE-NAME with the name you want to put on the drive.
Remember that the formatting will be complete if you do not specify that you want the process to be done quickly. In this example, the desired memory is formatted rapidly using the NTFS File System and renamed to workFlash:
format fs = NTFS label = workFlash quick
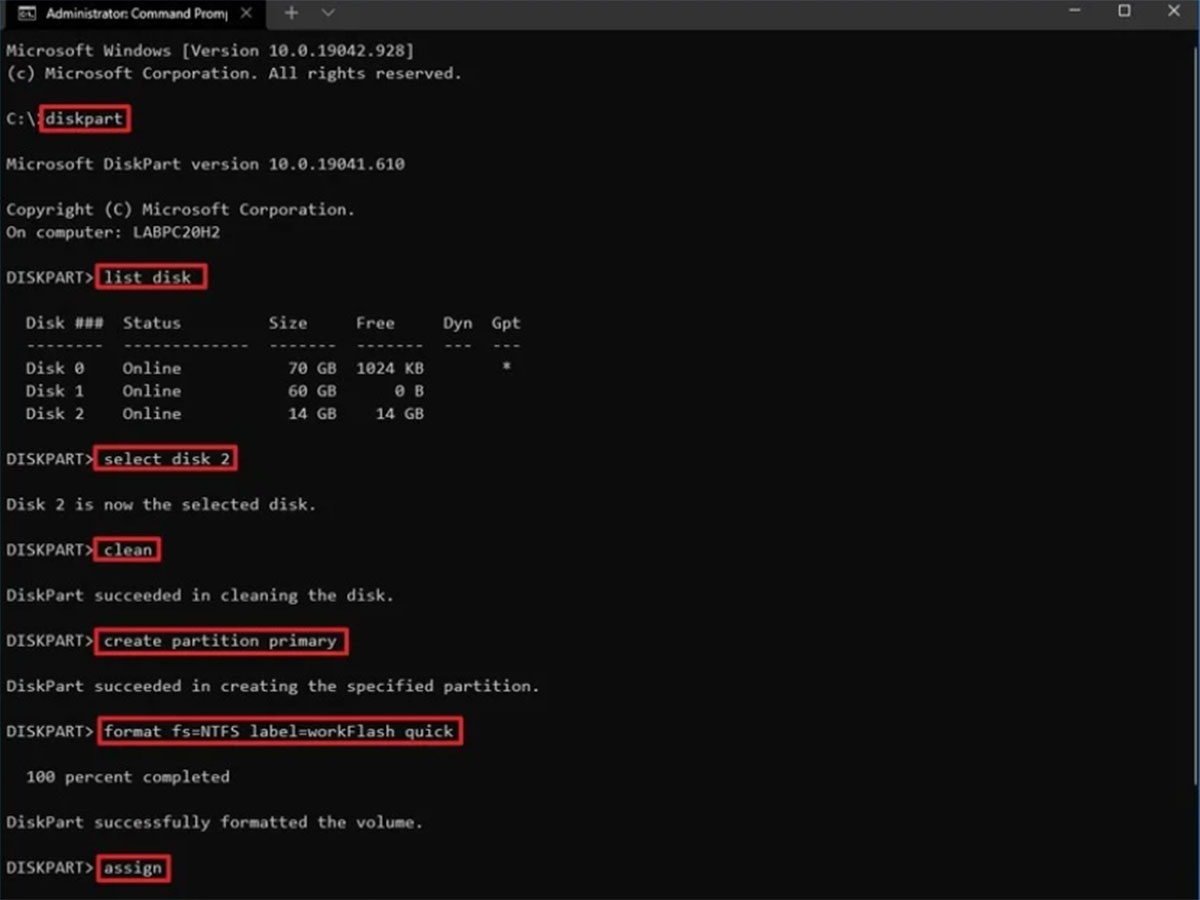
- Type the following command to assign a letter to your drive and press Enter:
Assign
- To close diskpart, type the following command and press Enter:
Exit
After completing the above steps, the command line will remove any information from the USB flash drive. This tool creates a new partition and configures a compatible filesystem to store the data.
FAQ
What does formatting a USB drive do?
Formatting erases existing data and sets up a file system so the drive can store new files.
How do you format a USB flash drive in Windows 10?
Open File Explorer, right-click the USB drive, select Format, choose the file system, and confirm.
Which file system should I choose when formatting?
Select NTFS for large files and Windows use, FAT32 for broader device compatibility, or exFAT for cross-platform use.