If you are looking for a specific GIF; But you can’t find it, maybe you should do it yourself and turn a piece of video on your iPhone into a GIF.
There are several apps available on the App Store that allows you to create GIFs from videos. You may have tried one or more of them already on your device. What’s different about this particular technique is that we’ll be making use of the built-in Shortcuts app on your iPhone or iPad. If you aren’t aware, Shortcuts gives you access to certain tools that aren’t natively available in iOS and iPad.
Currently, chatting and sending a text is the main method of communication for all digital citizens; But without stickers and gifs, the text may look cold and numb. These days, most of us realize that texts alone cannot convey our emotions well enough. Emojis and gifs bring our text conversations to life. By searching in cyberspace, we can access a large number of gifs; But we do not always succeed in finding what we want.
Fortunately, if you are an iPhone user, you can quickly create a gif of your videos and use it in your personal chat without the need to download a third-party app with just a few taps. In the following, you will learn how to make gifs from videos on your iPhone.
How to Convert video to GIF file on iPhone
The Shortcuts app is an iPhone app that allows users to automate processes. With this app, you can do many things such as monitoring your daily water consumption or turning your iPhone into a little monitor. If you have already uninstalled this app, you can download it from the App Store. After downloading the program, follow the steps below:
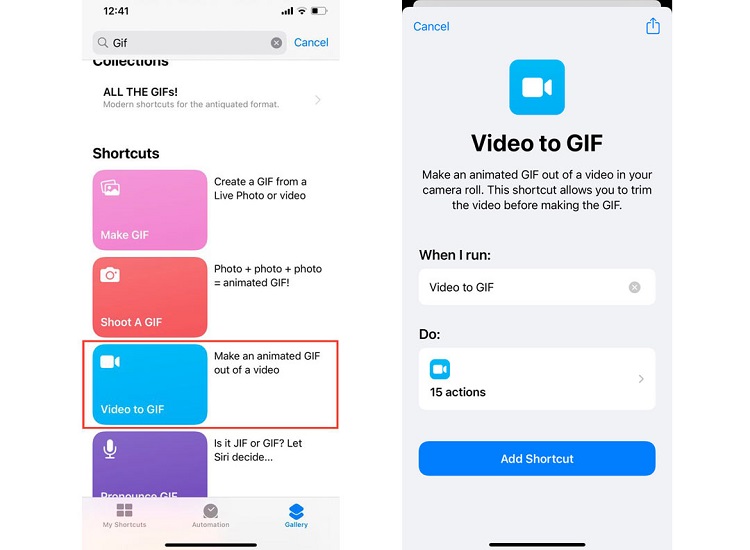
Open the Shortcuts app, tap the Gallery tab, and type GIF in the search bar. Select Video to GIF and then Add Shortcut.

You can now continue to make gifs from your videos. Once you have your video ready, follow these steps:
Open the Shortcuts app and go to My Shortcuts. Then, click Video to GIF. If this is the first time you have run Shortcuts, a message will appear asking you to access your photos. Next, click OK.
Select a video. You can select a specific part of the video by moving the sliders on either side of the video timeline. The yellow border that surrounds the video timeline indicates the selected portion of your video timeline. Then, click Save. Note that after saving, you can not go back and edit the selected snippet. If you are unhappy with the selected part, the only way is to do the above steps again.
After saving the gif, you will be shown a preview of it. Tap Done will take you out of the preview, But it will not save the gif on your phone. Tap the Share button to save the gif. Scroll down and touch the Save Image button to save the gif to Photos, or tap Save to Files to save it to Files. You can also share the gif directly with your friends.
Personalization of shortcuts
Based on our trial and error, this shortcut cannot generate gifs from videos longer than 20 seconds. Since shortcuts do not show the duration, it is best to check the length of your video beforehand. In the Photos app, you can view the duration of each video in the corner. To make it easier to select videos, you can change the shortcut to suggest only videos shorter than 20 seconds. Follow these steps to do this:
- After entering Shortcuts, go to My Shortcuts.
- In the Video to GIF shortcuts, tap the three-dot icon. In the … Find All Photos where section, click Add Filter. The default Album is the Recents option will appear.
- Click Album and change it to Duration.
- Click is and changes it to is shorter than.
- Finally, click on anything hours and change it to 20 seconds.
- Click Done
As we mentioned, shortcuts give you a gif; But it does not save it automatically. This means that after previewing the gif if you do not save it, you will lose it. If you want to save the gif automatically in Photos or Files, do the following:
- After logging in to Shortcuts, go to My Shortcuts.
- In the Video to GIF shortcuts, tap the three-dot icon.
- Scroll to the bottom of the page and touch the + icon.
- In the search bar, tap Save. To save Shortcuts to your gif in iCloud Drive, tap Save File, and to save the gif to Photos, tap Save to Photo Album
Conclusion
Gifs are a great way to express emotions and have fun. Making gifs is easy with the help of shortcuts on the iPhone. We hope that with the help of this tutorial, you will be able to create your favorite gifs and share them with your friends.