


Connect C-Panel hosting to standalone email service
C-Panel is known as one of the most popular control panels for hosting in users’ eyes and has provided desirable capabilities such as the ability to send an email. By default, after ordering a secure hosting service, C-Panel mail servers for their correspondence, but it is better to use independent mail servers in some cases. For example, it is better to equip your hosting services with a standalone mail server to send promotional messages and special emails. In this tutorial from the Fa Host Knowledge Base, we will look at connecting C-Panel hosts to a standalone email service. So stay with us until the end of this tutorial.
The topics that we will discuss in this educational article regarding the connection of C-panel hosting to independent service mail are as follows:
- How to connect an email host to the main host
- How to set MX record
- Define A record in C-Panel
- Check the SPF record
- Check the DMARC record
- Problem connecting to email hosting
- What is FQDN?
How to connect an email host to the main host
To connect the main host to the email host, you must go through 4 steps in the main web hosting, which are:
- MX record definition
- Define A records in C-Panel
- Check record SPF settings
- Email routing settings
Important points before connecting to email hosting
- First, you need to get a reliable host such as Iran shared hosting service, optimized hosting for WordPress, or even a hosting service for online stores.
- In the next step, you must check whether the domain connected to these hosts is activated or not?
- Make sure the servers related to the main host are set up and published on your domain.
- Email hosting services are provided and activated.
- Finally, you should check out the steps below in your web host, the source host.
How to set MX record (Step 1)
As mentioned in the tutorial on setting up DNS domain records in C-Panel, it is possible to define multiple records in C-Panel, each of which has a specific task. You need to edit MX records when it comes to email service. The MX record stands for Mail E x changer. Mail Exchanger or MX is a kind of converter. The purpose of defining this record is to identify the email server. By doing this, you specify from which server your emails will be sent and received.
MX record is the most important record that must be configured during connecting email hosts. If this record already exists, you can delete it and recreate it according to the steps mentioned:
- In the first step of connecting the C-Panel host to the email host, you must define an MX record in your host. Then log in to your admin panel with the help of the C-Panel hosting tutorial.
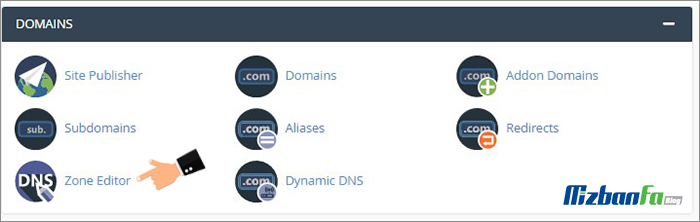
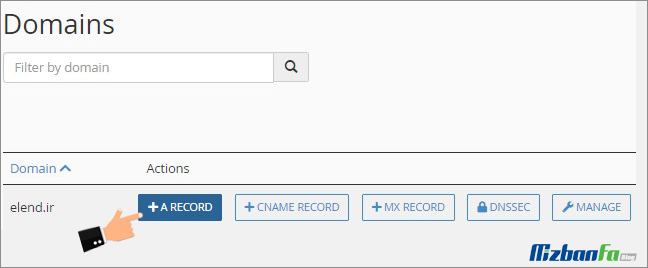
- From the DOMAINS, click on the Zone Editor option.
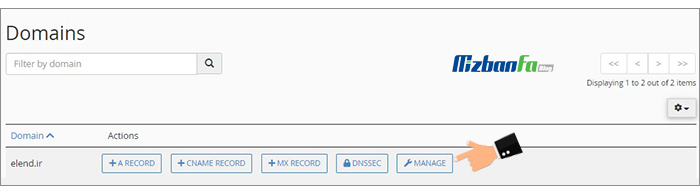
- In this section, you will see the names of all the domains defined on your host. Click the Manage button in front of the domain name you want to connect to the email host.
Click the MX RECORD + button to create a new MX record in the C panel. If the MX record already exists, look for an MX record to edit it on the opening page.
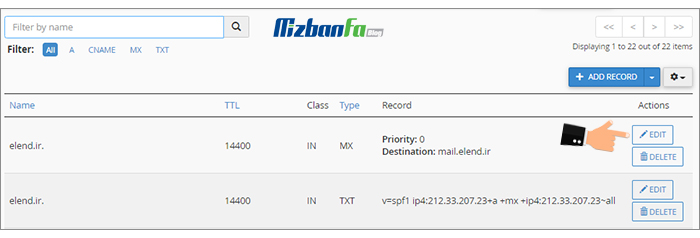
- To find this record quickly, you can also use the Filter field and search for the MX record.
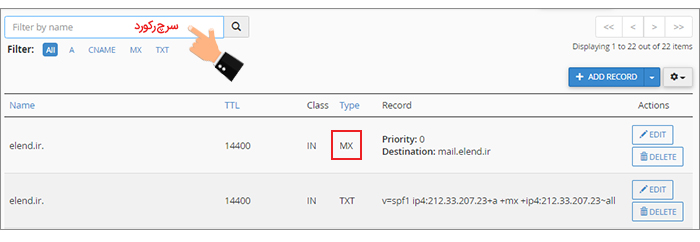
- After finding the desired record, click the Edit button in front of it.
- A box similar to the one below is displayed. In the Priority field, you must enter the corresponding values. The lower the number, the higher the priority, so the number 0 has the highest priority. To connect the email host to the Fa host, enter 0.

- The next field you need to edit is called Destination. You must enter your domain in .mail.yourdomain.com format in this field. Is this format called FQDN *. training section? Read.
- Leave the rest of the fields with the default values. Finally, click the Save Record button to create your MX record with the relevant specifications.

Important Note: Be careful not to fill in the Destination field with an IP. In this field, you must enter the correct FQDN, i.e., your domain name as mail.yourdomain.com. Replies to emails sent by this record.
Adding A Record in C Panel (Step 2)
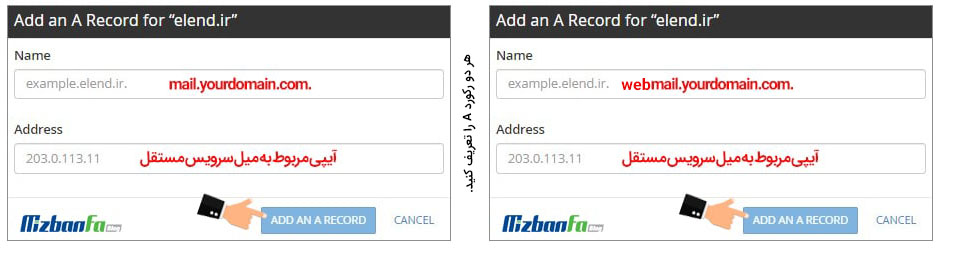
Be careful not to delete other existing A records in your Zone Editor section. Another step that should be taken to connect the email host to the main host is to add the following 2 A records:
- Define an A-type record with the same name as .mail.yourdomain.com. In this record, the IP of the destination server, i.e., the email server, is entered. This will refer to the email server.
- We also need a record for webmail in the form of .webmail.yourdomain.com. In this record, the IP of the email server must be entered.
To do this, you must follow the steps below:
-
- In your Host C panel, refer to the Zone Editor section.
- Then click the blue A RECORD + button to define record A in the C panel. If this record already exists, click the Edit button in front of it. (You may encounter an error at this point, which we have described below.)
- In the steps of setting record A, you will encounter a box similar to the following image, in which you must set the following values:
- NAME: Enter .mail.domain.com and enter your domain name instead of domain.com.
- Address: Enter the IP of your email server.
- In your Host C panel, refer to the Zone Editor section.
- Finally, click the blue ADD A RECORD button.
Important Note: Follow the same steps one more time, except that in step 3, type .webmail.domain.com in the NAME field. Enter your domain name instead of domain.com. Identifying set records may also take up to 24 hours.
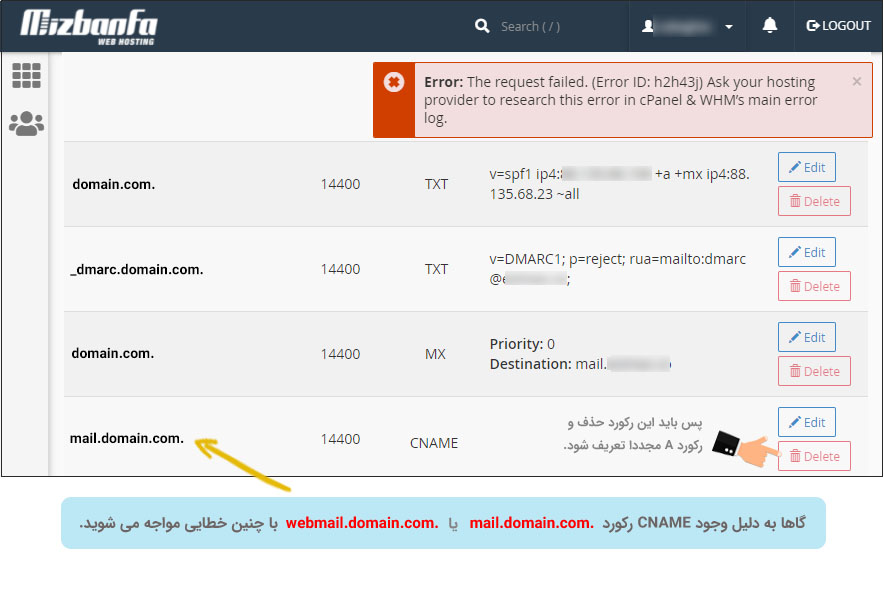
صورتی If you encounter the following error at this stage, you should check if there is a record named .webmail.domain.com or .mail.domain.com in the zone editor? Having a CNAME record with this name causes such an error that you can delete it and define record A.
Check the SPF record (Step 3)
After setting the MX records and the two A records, you should check if there is a record with SPF content in your Zone Editor or not?
- If there is such a record, click the Edit button in front of it, then change its content.
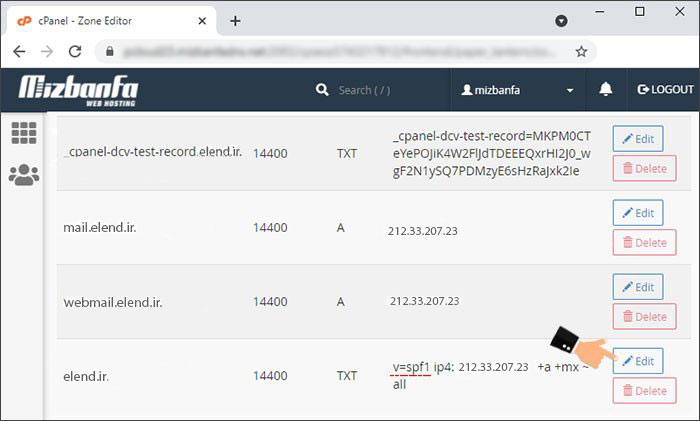
- Delete the IP previously entered in this record, the current IP server, and replace the IP mail server (email server).
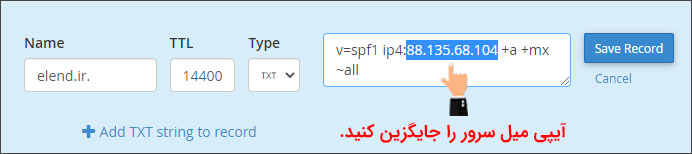
This will configure the SPF, which is very important for sending and receiving emails.
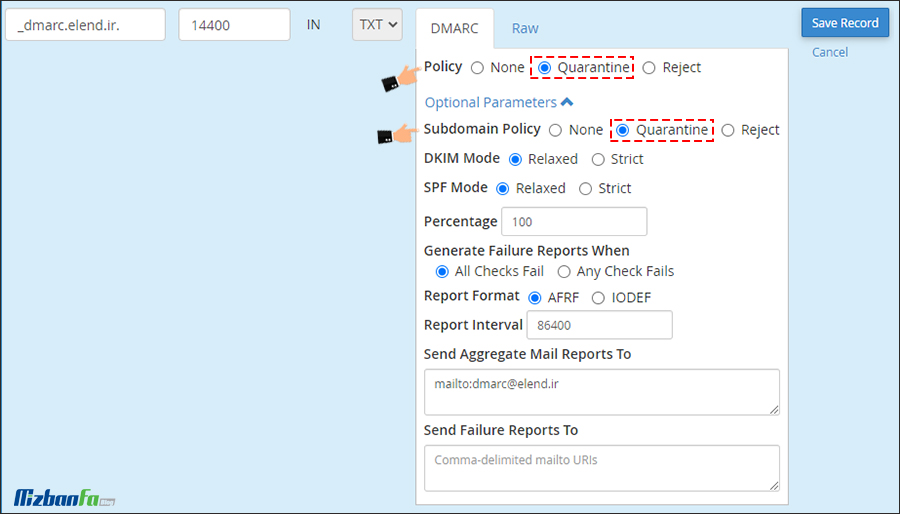
Check DMARC record in hosts (Step 4)
- Next, in the Zone Editor section of your host, you should check that there is a DMARC record among the defined records. If there is a record, refer to step 5.
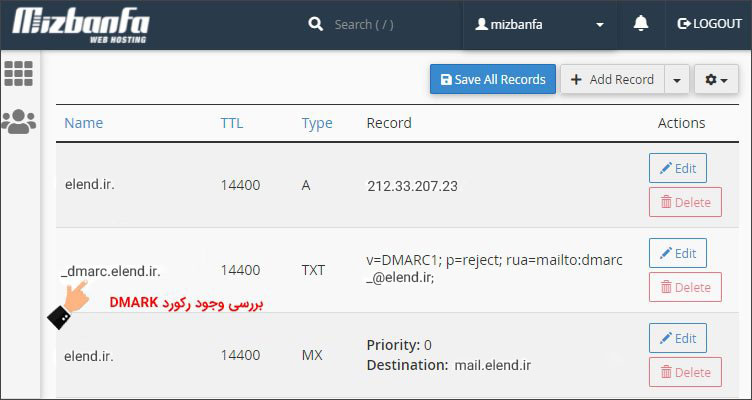
- This record is available, but if there is no such record, you can click on the Add “DEMARC” Record option and create it according to the image below.
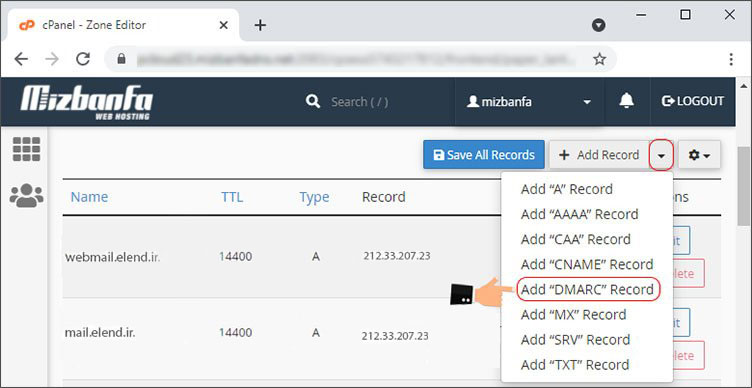
- The DMARC record settings are as follows:
You may encounter an error similar to the following error message while adding a DMARC record for managing email hosts. In such cases, you should configure the following image:
This message was created automatically by mail delivery software.
A message that you sent could not be delivered to one or more of its recipients. This is a permanent error. The following address(es) failed:
YOUR EMAIL
host gmail-smtp-in.l.google.com [IP] SMTP error from remote mail server after end of data:
550-5.7.26 Unauthenticated email from YOURDOMAIN.COM is not accepted due to
550-5.7.26 domain’s DMARC policy. Please contact the administrator of
550-5.7.26 YOURDOMAIN.COM domain if this was a legitimate mail. Please visit
550-5.7.26 https://support.google.com/mail/answer/2451690 to learn about the
550 5.7.26 DMARC initiative. v1si10762070wrr.549 – gsmtp
Reporting-MTA: dns;
Action: failed
Final-Recipient: rfc822;YOUR EMAIL
Status: 5.0.0
Remote-MTA: dns; gmail-smtp-in.l.google.com
Diagnostic-Code: smtp; 550-5.7.26 Unauthenticated email from YOURDOMAIN.COM is not accepted due to
550-5.7.26 domain’s DMARC policy. Please contact the administrator of
550-5.7.26 YOURDOMAIN.COM domain if this was a legitimate mail. Please visit
550-5.7.26 https://support.google.com/mail/answer/2451690 to learn about the
550 5.7.26 DMARC initiative. v1si10762070wrr.549 – gsmtp
Fix the problem of connecting to email hosting (Step 5)
A very important point that you must pay attention to is that the email configuration is done automatically by C Panel, and there is no need to do this step. Still, in 2 cases, the settings related to the configuration of emails should be examined according to the conditions. Here are the changes you must make manually:
- Case 1: If you are using a standalone service and C-Panel cannot automatically detect your email settings, you should follow the steps below.
- Case 2: C-Panel will automatically detect your host configurations. If your email service does not work properly and you have a problem, you can check your settings according to the following tips.
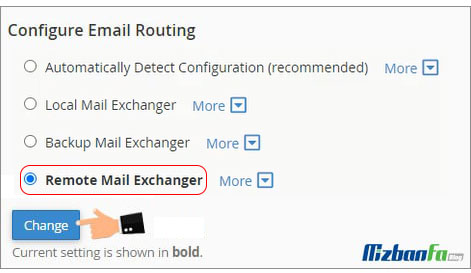
- Log in to your host and click on Email Routing from the EMAIL section.

- You will see a list of your domains; select the domain you want to configure.

- The four options are as follows: To connect to the email host, you must select the Remote Mail Exchanger option:
- Automatically Detect Configuration: This item is selected by default. This way, the settings will be automatically detected by the C panel. This option is recommended unless you have special settings.
- Local Mail Exchanger: By selecting this option, emails will be received in the mailbox of the same server.
- Backup Mail Exchanger: The settings in this section are very smart. This means that this section decides which section the email will be received for you. Receiving emails is based on prioritizing MX records. In other words, emails are managed like remote mail exchanger mode, but if the remote service is unavailable, it will act like local mail exchanger mode. For example, if you set Google as the remote service in MX records, emails will be received in this mailbox, and when Google servers are inaccessible, you will receive the email in the mailbox of the same server.
- Remote Mail Exchanger: By selecting this option, you will be able to manage all incoming emails from your domain remotely. You can pick them up at the postal service you defined in the MX record. Suppose you set Google as your mailing service, so you receive your emails on Google servers instead of inbox.
Test connecting to email hosts
Keep in mind that the steps to connect to an email host are very simple, and if you follow all the points mentioned in this tutorial, the connection will be successful. To ensure that the email host is connected to the main host, you can on your email host and send a message through it to another desired address such as Gmail, Yahoo, or even an enterprise email.
Use the Outlook service to receive and send emails.
Some users use Outlook services to manage their emails. In this section, you should also pay attention to some important points. In the guide on connecting C-Panel hosting emails to outlook software, we gave a detailed description of this issue and fully explained the Outlook settings for the 2016 and 2020 versions.
What is FQDN?
FQDN stands for Fully Qualified Domain Name, meaning eligible domain. This format consists of two parts: half and domain hosts. For example, in mail.domain.com, the word mail is the hostname, and domain.com is your domain name. In this format, enter the domain name you want.
Email service is considered a very important part of Internet businesses. Some people use the email service related to their hosting, and others take steps to provide independent email hosting and take specialized steps in the email. In this regard, special measures should be taken to connect C-Panel hosting to independent email hosting. To connect the host and email the host. You can then manage your emails on the same server or another server called remote. Please share your experiences with using email hosting services with us.