


Step-By-Step Instructions For Sending Group Emails In Gmail, Outlook And Excel
If you are looking for a step-by-step tutorial on sending group emails in Gmail, Outlook, or Excel or want to send bulk emails to grow your business.
Group emails Sending to a list of contacts at the same time is an easy and painless way to avoid wasting your time. This method first requires creating a list of audiences that has easy steps, But it may not be clear to all users how to do it.
In this article, we will introduce you to the step-by-step tutorial for sending group emails in Gmail, Outlook, and Excel, and we will also introduce some free services for sending bulk emails in email marketing.
Send group emails in Gmail

To send group emails in Gmail, you must first create a list of all the addresses that are your target audience. To create this list, follow these steps:
Step-by-step steps for building a Gmail Group mailing list
To create a group email list in Gmail, you must use the قابلیت “label” feature in the Google Contacts list. After creating the tag, it is very easy to add all the contacts in the tag to the email.
1. Open the Google Contacts page in a web browser.
2. Hold the mouse over the contact you want to add to the group, and then click on the box that appears to the left of the contact’s name until it turns blue.
3- Repeat this step for all the audiences you want to be on your list.
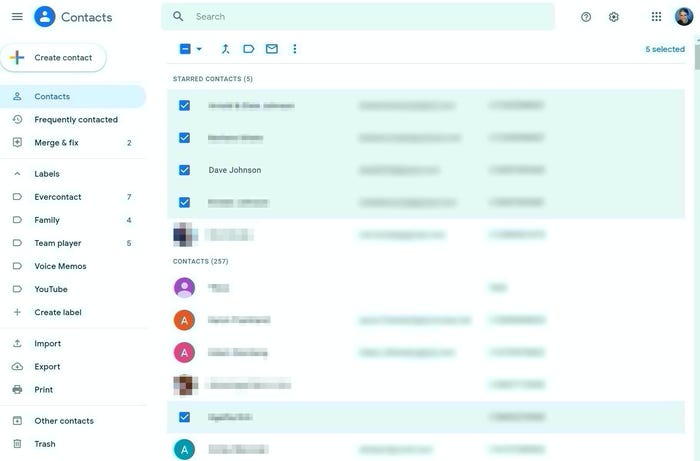
4- After selecting all the desired email addresses, click on the label icon at the top of the page.
5. From the menu that opens, click on the Create label option and choose a name for your list.
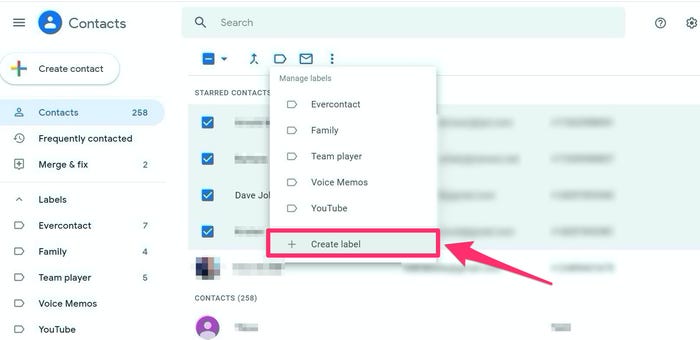
6. After selecting the name, click Save to create the Gmail group you want.
Note: If you are using the Gmail mobile application to create a Gmail group, click on the Contacts option from the left menu of the application and follow the steps to create a group list according to the above tutorial.
After creating a new group, the group name will appear under the Labels option in the left sidebar of the Google Contacts page. The number opposite the name of each group indicates the number of members.
You can create as many different groups with different members as you want. You just have to choose their names so that you do not get confused when sending an email.
If you need to add a new contact email address to a group that has already been created, just go to the Manage labels section after clicking on the group. From here, select the group you want to add a new contact to and click the Apply button.
How to send group email in Gmail
Now that you have created the group you want, it’s time to send out your first group email. To do this, follow these steps:
1. Open Gmail in the browser.
2. Click on Compose to write the email.
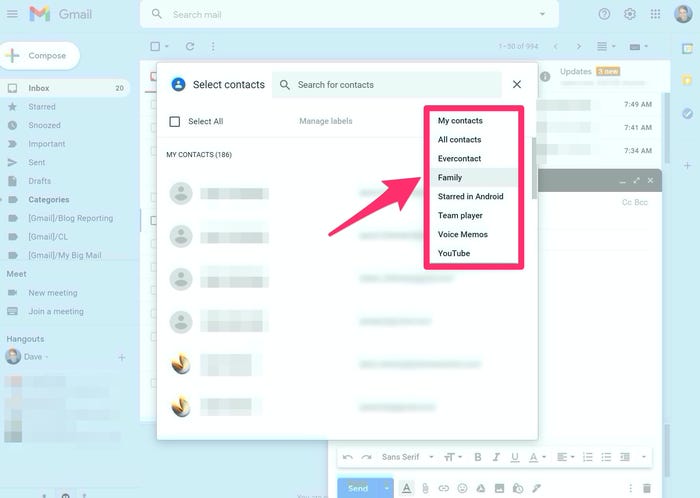
3- There are two ways to add your audience to your email message. If you remember the name of the group you created correctly, type it in the “To” section at the top of the page. When the group name appears, click on it. The address of all group members has now been added to the email you want to send.
But if you do not want to type the group name, click To, and in the window that opens, select My Contacts.
Now click on the desired group from the displayed list to add its members to To.
Tip: If you plan to send an email to a group of contacts who do not know each other, it is better to add the group to BCC instead of to To. In this case, the email address of the people is hidden from the eyes of other members of the group.
Send group email in August

If you use Outlook instead of Gmail, to send group emails you must first create a list of email addresses. Follow these steps to create a group email list in Outlook:
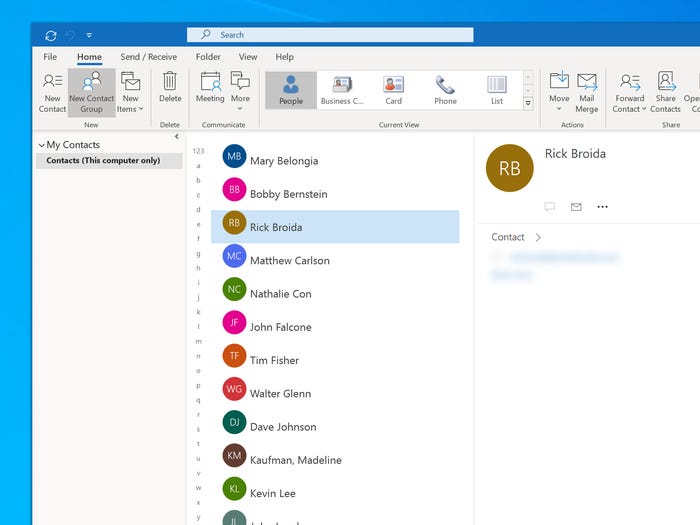
1. Open Outlook and click on the Contacts icon at the bottom left of the page.
2. In the top bar, click New Contact Group.
3- For the group, choose a name that is easy to remember.
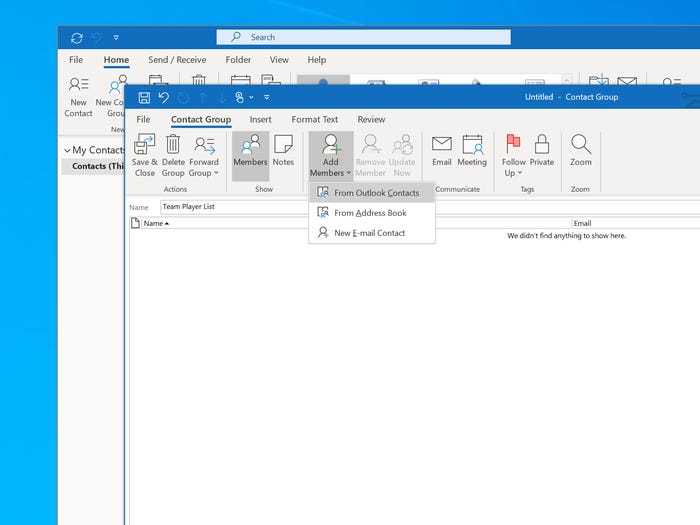
4. In the top bar of the new window, Add Click Add Members and then select From Outlook Contacts from the menu that appears. The Select Members dialog box is now displayed.
5. Double-click on any name you want to add to your audience. By adding members, their names appear at the bottom of the dialog box.
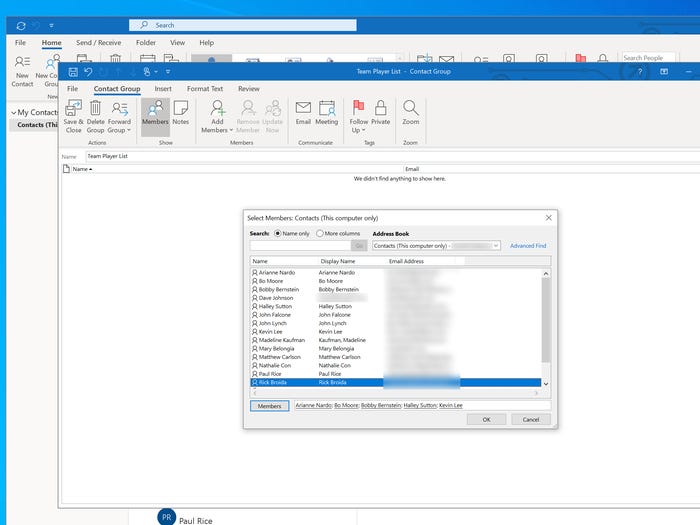
6. When all the desired members have been added to the list, click OK.
7. If an email address does not already exist in your contacts list, you can manually add it to the group. Click Add Members and select New E-mail Contact from the menu that appears. In this section, you can type the desired email address.
8. In the top bar, click Save & Close.
Note: You can create as many different groups with different members as you want in Outlook; Only their names should be chosen so that they are easy to remember.
How to send group email in Outlook
Now that you have your group of contacts in Outlook, it is time to send your first group email. To do this, simply type the group name in the To or CC (all recipients can see each other’s email addresses) or BCC (none recipients can see each other’s email addresses) section.
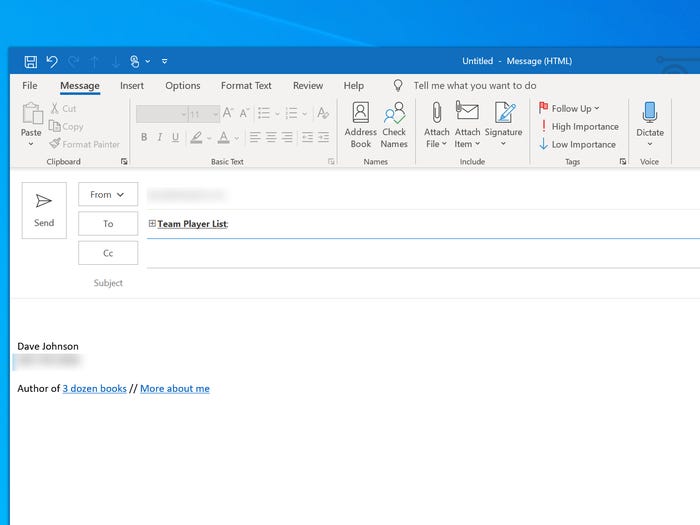
You may have noticed the plural on the left side of the audience. If you click on this icon, you can open the contact list and see the names of all the people in it. Just keep in mind that by opening this list, you can no longer restore it to its original compressed state.
Send group email in Excel
If you know how to create a spreadsheet in Excel and use Outlook as an email service, you can use the mail merge feature to send bulk emails to a group of your audience but with specific information for each contact.
To do this, you must merge the information entered in Excel into an email format. Here we will introduce you to a step-by-step tutorial on creating a spreadsheet containing user contact information and integrating it into an Outlook email message.
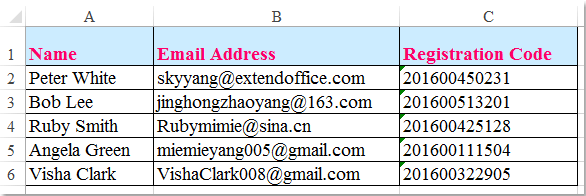
Suppose that on your spreadsheet, contact information is stored in three columns: Name, Email Address, and Registration Code, and you want to send a group message to each contact with the registration code. Post about him in Outlook.
To do this, you can use the Mail Merge feature in Word software.
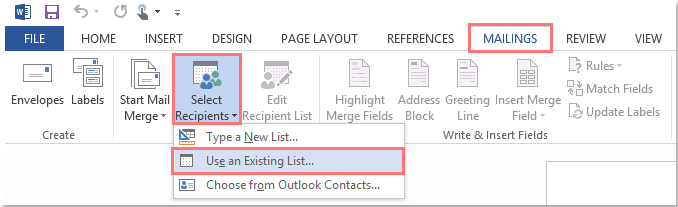
1. Open a blank page in Word software. From the Mailings section in the top bar, select Select Recipients and then Use an Existing List.
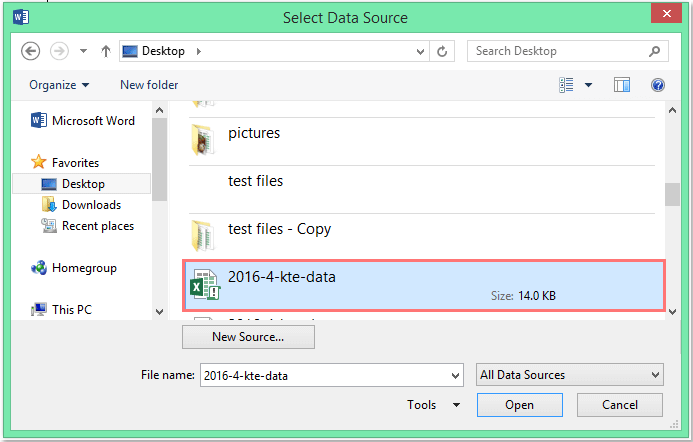
2. In the Select Data Source window, select the workbook that contains the data you need (the same as the saved Excel file), and click the Open button.
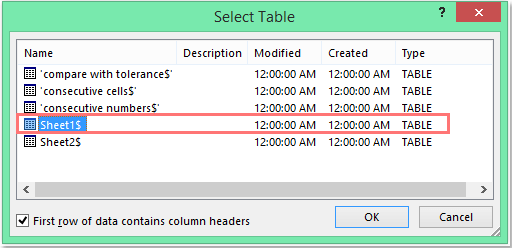
3. In the Select Table dialog box, select the desired page and click OK.
4. Now the text of the email to be written in Word and the list of email addresses stored in Excel are connected. In this step, you can type the text of your email and specify the location of the information to be sent to each contact separately (name and registration code).
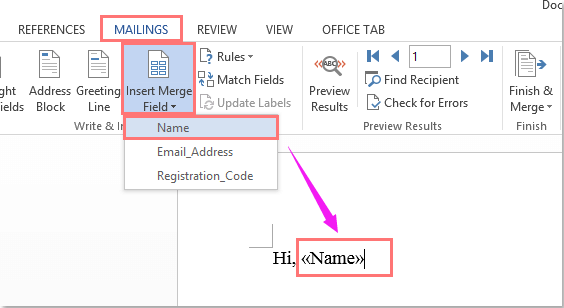
- To paste the name of each contact separately, follow this path:
Mailings> Insert Merge Field> Name
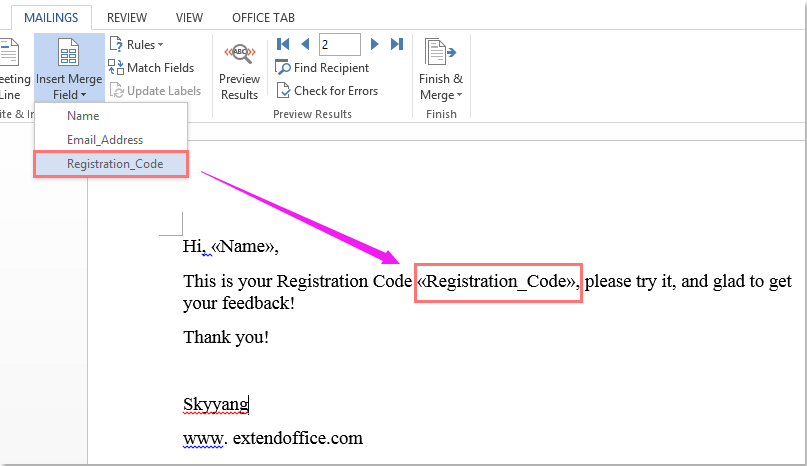
- Type the text of the message and select the path where the registration code is to be entered:
Mailings> Insert Merge Field> Registration_Code
5- After completing the text of the message, you can click on the Preview Results under the Mailing section and see its preview before sending.
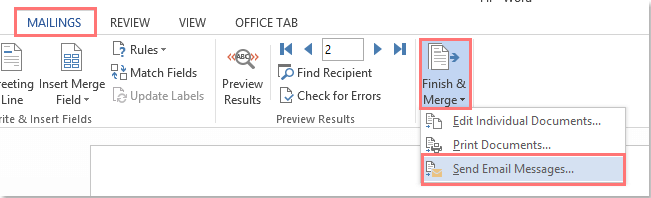
6- Now from this path you can send a group email to each contact separately but at the same time:
Mailings> Finish & Merge> Send Email Message
7. In the Merge to the E-mail dialog box that appears, follow these steps:
- From the To menu, select the Email_Address column.
- You can type the subject of the email in the Subject text box.
- From the Send records section, select All .
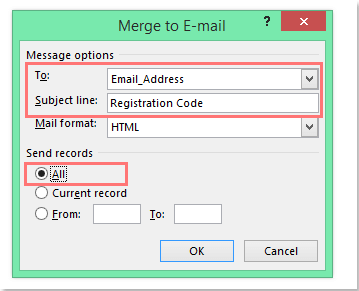
8. Click OK. Emails are now sent in groups but individually to each of the contacts in your Excel file. After this step, go to the Outlook software to make sure the emails have been sent successfully.
Send bulk emails for email marketing purposes

One of the reasons you may want to send bulk email is the issue of email marketing or email marketing. Sending promotional emails to a large number of audiences at the same time is a cost-effective way to grow your business.
There are services and software for sending bulk email in email marketing, here is the free version of 6 of the most popular ones:
- Sendinblue (Audience: Unlimited – Monthly Email Limit: 9000)
- Mailchimp (Number of contacts: 2000 – Monthly email sending limit: 10 thousand)
- MailerLite (Number of contacts: 1000 – Monthly email sending limit: 12 thousand)
- Benchmark (Audience: Unlimited – Monthly Email Limit: 250)
- omniscient (Audience: Unlimited – Monthly Email Limit: 15,000)
- Sender (Number of contacts: 2500 – Monthly email sending limit: 15 thousand)
Sending group emails is an easy and useful way to save time. In this article, we will introduce you to the steps of sending group emails in Gmail and Outlook, and also show you how to send group emails from an Excel spreadsheet.
In addition to these methods, if you are looking to send bulk emails for advertising purposes, you should go for email marketing services, which in this article we have mentioned some of the most popular ones and their limited capabilities in the free version.
If you have any other questions regarding group emailing, please leave them in the comments section.