


Step-by-step tutorial to create a glowing gold text effect in Photoshop
Here we will teach you how to make the letters and texts in Photoshop CC 2019 shiny and golden (like the picture above).
For best results, use the latest version of Photoshop CC, but Photoshop 2013 and above users can also use this tutorial.
How to create golden text in Photoshop
Let’s start with the steps of setting up the document and adding the original text. If you have already added text, go to step 8 where we will start creating the golden text.
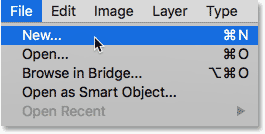
Step 1: Create a new Photoshop document: Create a new document by going to the File menu in the menu bar and selecting New:
In the New Document dialog box, set the document width to 1600 pixels, height to 800 pixels, and resolution to 72 pixels per inch. Then click the Create button in Photoshop CC and OK in CS6:

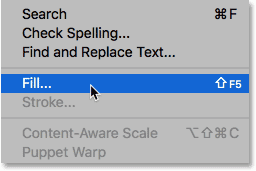
Step 2: Fill the document with black: To help highlight the golden letters, change the background color of the document from white to black. Go to the Edit menu in the menu bar and select Fill:
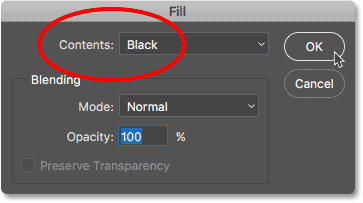
Then in the Fill dialog box, set the contents to Black and click OK. Photoshop fills the background with black.
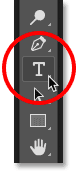
Step 3: Select the Type tool: To add text, select the Type tool from the toolbar:
Step 4: Select the font: Select the font in the settings bar. In this tutorial, we will use the Times New Roman Bold font, but you can use any font you like. Set the text size to pt 72:

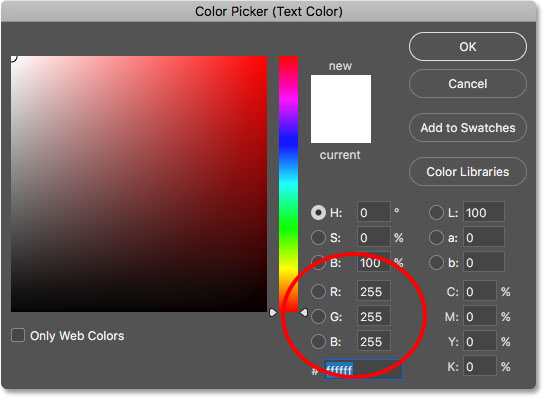
Step 5: Set the text color to white: To see the text on a black background, whiten the original color of the text. Later we add golden colors using the layer effect. Click on the color option in the option bar:

In Color Picker, select the colors R, G and B (red, green and blue) to 255 white colors. Then close Color Picker by selecting OK.
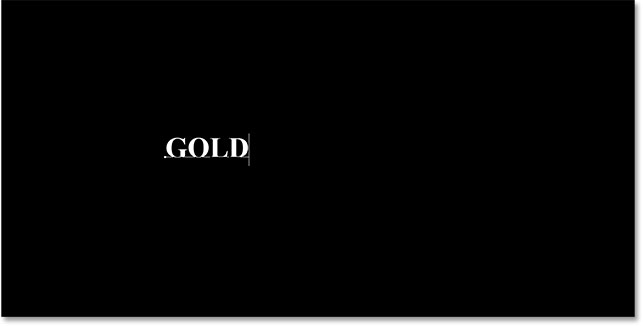
Step 6: Add text to the document: Click inside the document and add the text. Here we type the word “GOLD”. Do not worry about the small text. In the next step we will change it:
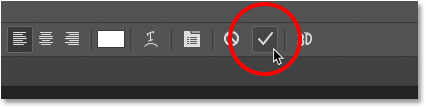
To accept the text, click on the check mark in the Options Bar:
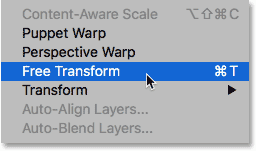
Step 7: Resize and move the text with Free Transform: To resize the text and move it to the center, go to the Edit menu and select Free Transform:
Then change the text by clicking and dragging any of the categories around the box that appears. You have to press and hold the Shift key and pull the knobs to change the dimensions. When resizing text, release the mouse button first, then the Shift key.
Once you have resized the text, click on the Free Transform box and move it to your desired position. When done, press the Enter key on Windows and the Return key on Mac to close Free Transform:

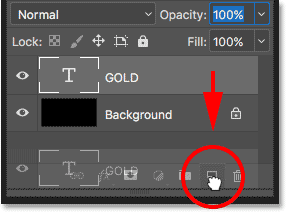
Step 8: Make a copy of the text layer: Now that we have added the text, we are ready to make the letters golden. In the Layers panel, make a copy by dragging the text layer on the Add New Layer icon at the bottom:
A copy of the text layer appears above the main layer:

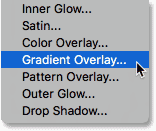
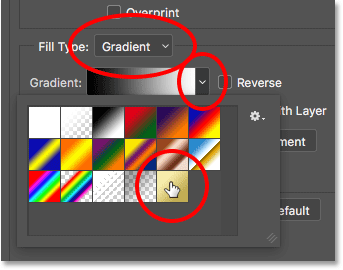
Step 9: Paint the text with the Overlay Gradient layer effect: We will use Photoshop layer effects to make the text golden. The first effect we need is Gradient Overlay. We use it to add some golden colors to the letters. Make sure the “GOLD copy” layer is selected in the Layers panel. Then click on the Layer Styles icon (“fx” icon) at the bottom.
![]()
In the Layer Effects menu, select Gradient Overlay:
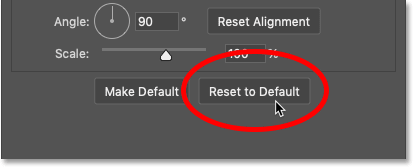
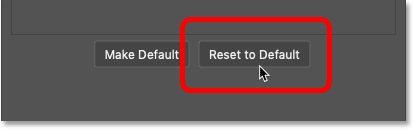
Step 10: Create a Custom Gradient: Photoshop opens the Layer Style dialog box on the Overlay Gradient option. First, clear any previous settings by clicking the Reset to Default button:
Then edit the gradient colors:
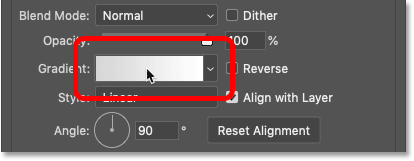
In the Gradient Editor, double-click the slider below the left of the gradient:
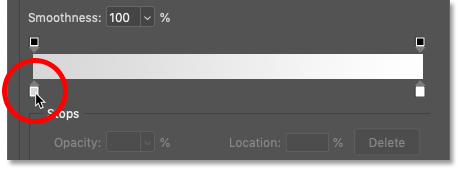
Add golden gradient color
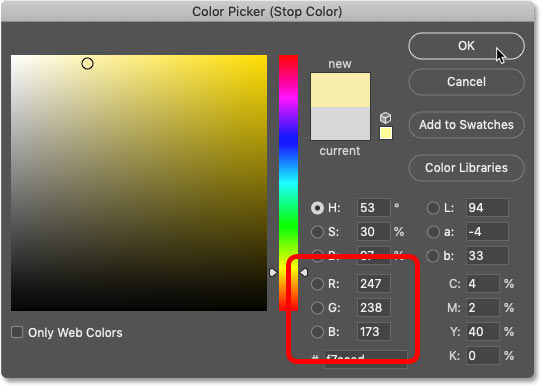
We want to create a custom gradient for the text. To do this, we sampled the colors from the photo of the gold coin. When choosing a color, set the R value to 247, the G value to 238, and the B value to 173. Then click OK to close the Color Picker:
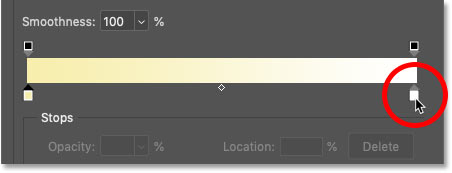
Return to Gradient Editor, double-click the slider to the right and below the gradient:
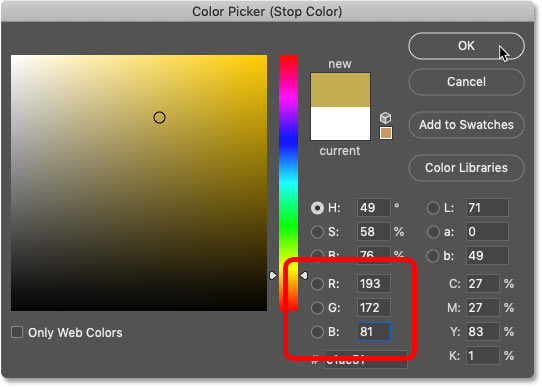
In Color Picker, set R to 193, G to 172 and B to 81. Then click OK:
Step 11: Save the golden gradient by default: You need this gradient, so save it by default. In the Gradient Editor, name it “Gold”, and then click the New button to save:
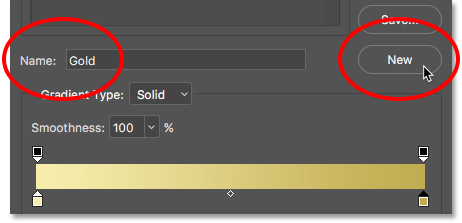
A thumbnail of it will appear in the Presets section:

Click OK to close the Gradient Editor, but keep the Layer Style dialog box open. Here is the text with the golden gradient:

Step 12: Change Gradient Style to Reflected: Return to the Layer Style dialog box, change the Gradient Style to Reflected:
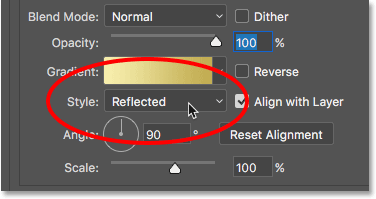
This shifts the darker golden color to the top and bottom of the text, making the middle of the text lighter.

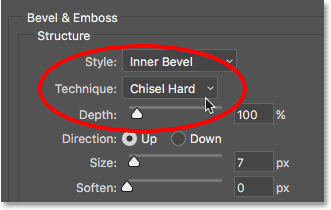
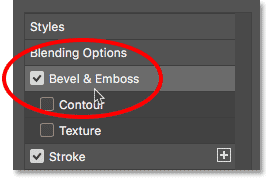
Step 13: Add Bevel & Emboss: On the left side of the Layer Style window there is a list of effects to choose from. Select it by clicking on Bevel & Emboss:
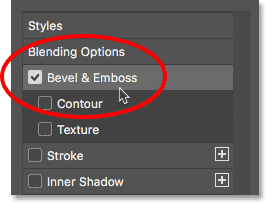
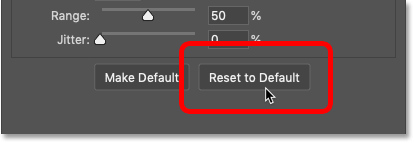
Click the Reset to Default button to clear the previous custom settings:
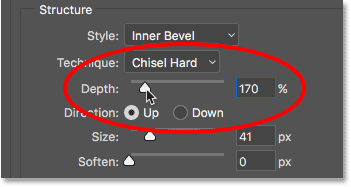
Step 14: Change the Technique to Chisel Hard: In the Structure section, make sure the Style is equal to the Inner Bevel. Then change the Technique to Chisel Hard:
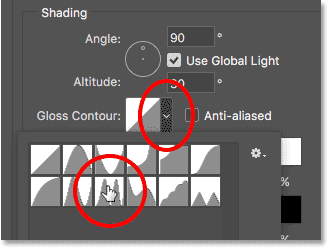
Step 15: Change Gloss Contour to Ring – Double:
In the Shading section, click on the small arrow to the right of the thumbnail. Be sure to click on the arrow, not the image. Then double-click on Ring – Double to select (third thumbnail from left, bottom row):
Step 16: Change the Angle and Enable Anti-Aliasing: In the Shading section, set the angle to 120 degrees. Then select the Anti-aliased option to smooth the uneven edges.
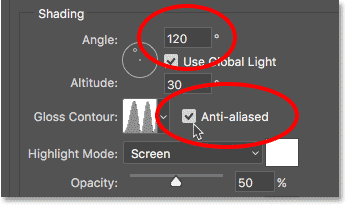
Step 17: Adjust Highlight and Shadow Opacity to 75%: To add more contrast to the effect, increase the Highlight and Highlight Opacity to 75%:
The results so far are as follows:

Step 18: Increase the Size value to fill in the letters: Increase the Size in Bevel and Emboss to make the text look more golden. The easiest way to do this is to first click on the Size value box to activate it. Then use the Up Arrow key on the keyboard to increase the value. As you increase the value you will see changes. The value of Size depends on the size of the text. 41 pixels is suitable for our work:
![]()
You can see the result below:

Step 19: Increase the Depth Value: Increase the Depth value. This option increases the brightness and contrast of the letters. We set the Depth value to about 170%.
You can see the result so far:

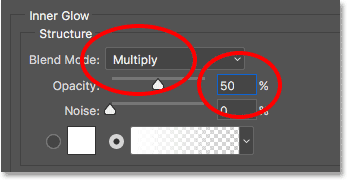
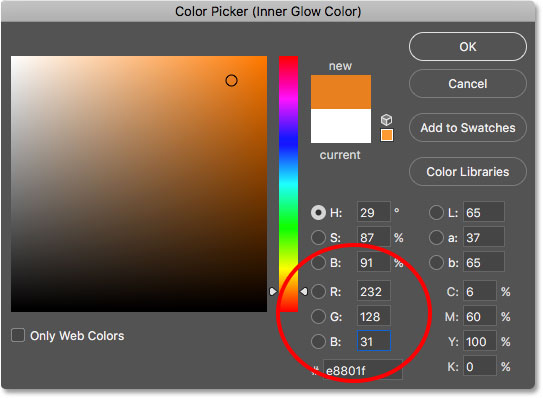
Step 20: Add Inner Glow layer effect : Add the Inner Glow layer effect by clicking on its name on the left side of the Layer Style dialog box.

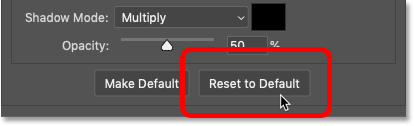
Then clear all previous settings by clicking Reset to Default.
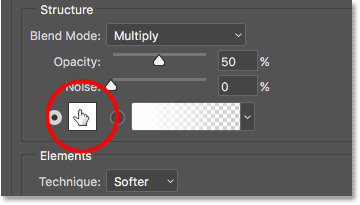
Change the Blend Mode in Inner Glow from Screen to Multiply. Set the Opacity to 50%:
Click the color sample to change the color of the radiation:
In Color Picker, set R to 232, G to 128, and B to 31. Then click on Color Picker OK:
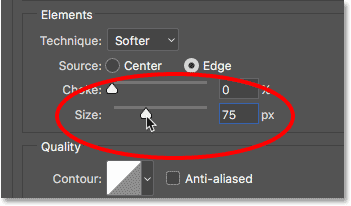
Finally, increase the radiation size until the letters are completely filled. Here we set the Size value to 75 pixels:
Then click OK to close the Layer Style dialog box. The golden effect should now look like this:

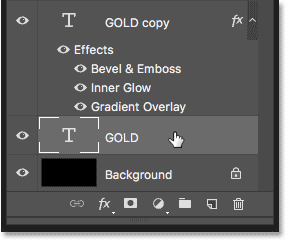
Step 21: Select the main text layer: In the Layers panel, click on the main text layer to select:
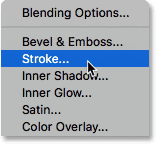
Step 22: Add a Stroke around the letters: Click the Layer Styles icon at the bottom.
![]()
Then select Stroke:
In the Layer Style dialog box, press the Reset to Default button to clear the previous Stroke settings:
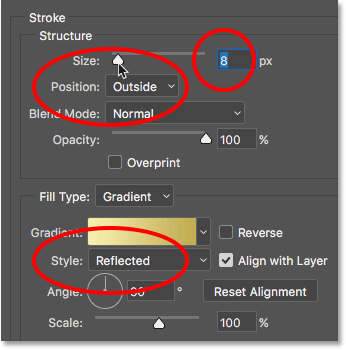
Step 23: Fill the Stroke using the default golden gradient: Change the Fill Type from Color to Gradient. Then click on the small arrow to the right of the swatch gradient and select the “Gold” gradient you saved earlier:
Step 24: Adjust Style, Position and Size in stroke: Change the Gradient Style from Linear to Reflected. Then set the Position Outside and increase the Size to 8 pixels:
The result is as follows:

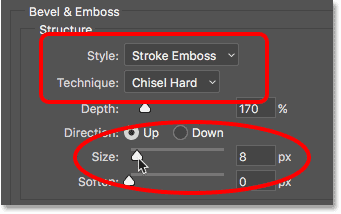
Step 25: Apply Bevel & Emboss on the stroke: We are going to add another Bevel & Emboss effect, not to the letters but to the stroke. Click Bevel & Emboss on the left side of the Layer Style dialog box:
As we intend to use more of the same settings as before, do not click Reset to Default this time. Instead, simply change the Style from Inner Bevel to Stroke Emboss. Technique should be set to Chisel Hard. Set the Size to the size you selected for Stroke, it was 8 pixels for us:
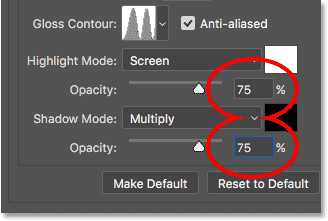
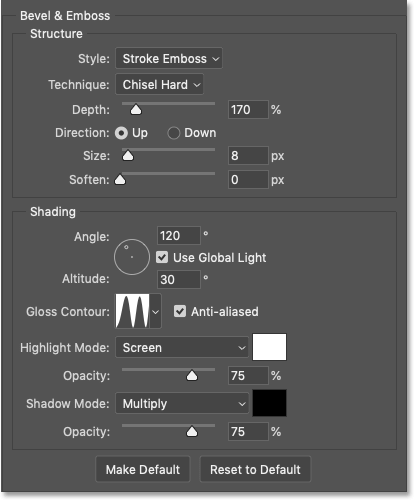
Check Bevel & Emboss settings again. Make sure all Bevel & Emboss settings are the same as before. If for some reason they are not similar, you should change them:
Depth: 170%
Angle: 120 °
Gloss Contour: Ring- Double
Anti-Aliased: Checked
Highlight Opacity: 75%
Shadow Opacity: 75%
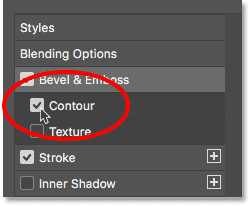
Activate the Contour option
Below Bevel & Emboss on the left side of the Layer Style dialog box is an effect called Contour. Click on the checkbox to enable it. This increases the brightness around the stroke:
The result so far is as follows:

Step 26: Apply the Outer Glow effect: As the last effect, we add a dim light around the text, as if the light is reflected from the golden letters. Click Outer Glow on the left side of the Layer Style dialog box:

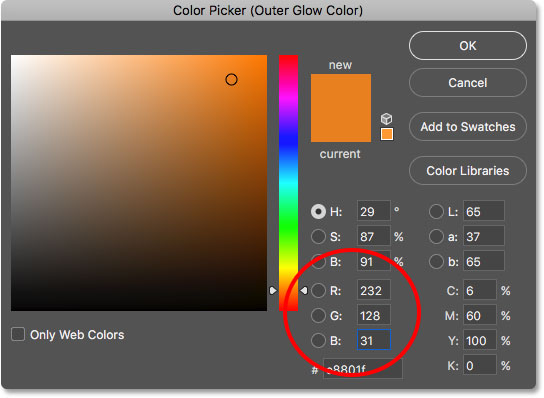
Adjust the radiation opacity to ٪ 40 and then click on the color sample:
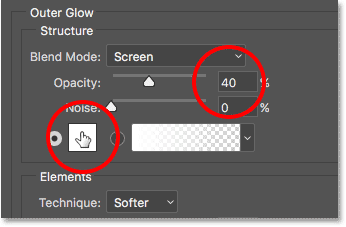
In Color Picker, set R to 232, G to 128, and B to 31, and then click OK:
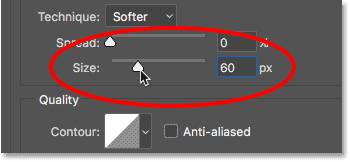
Finally, increase the size of the radiation to about 60 pixels:
Here we are done with the effects, so click OK to close the Layer Style dialog box. You can see the result of applying the effects below:

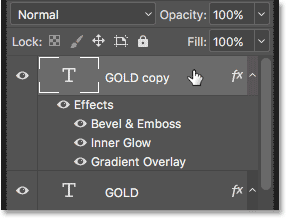
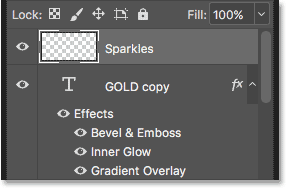
Step 27: Select the “GOLD copy” layer: Finish the golden text effect by adding glitter to the letters. To do this, we need to add a separate gloss to each layer.
In the Layers panel, click on the “GOLD copy” layer (top layer):
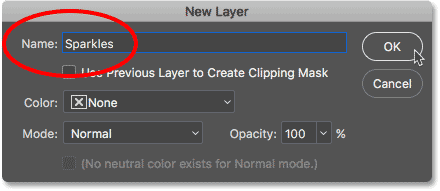
Step 28: Add a new layer above the text: Press and hold the Alt key on Windows and the Option key on Mac. Then click on the Add New Layer icon:
![]()
In the New Layer dialog box, type the layer name “Sparkles” and click OK:
Photoshop adds a new blank layer called “Sparkles” at the top of the text:
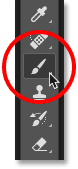
Step 29: Select the Brush tool: Use one of the Photoshop brushes to create a glow. Select the Brush Tool from the Toolbar:
Step 30: Select the “Crosshatch 4” brush from Assorted Brushes: The brush we need to shine is Crosshatch 4%, which is included in Photoshop as part of the Assorted Brushes set. But Assorted Brushes do not load automatically, so we have to load the set ourselves. And this is another difference between Photoshop CC and CS6.
In Photoshop CC 2018, Adobe has redesigned the brush panels. Therefore, use the following steps to load the brush based on the Photoshop version.
How to load different brushes in Photoshop CC
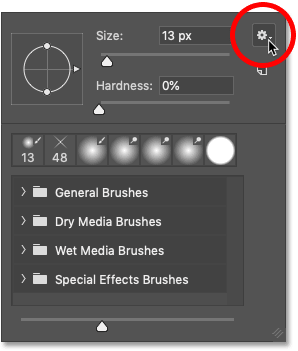
In Photoshop CC, where the Brush Tool is being selected, right-click in Windows and in Mac control click the document to open the Brush Preset Picker. Then click on the menu icon at the top right:
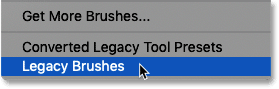
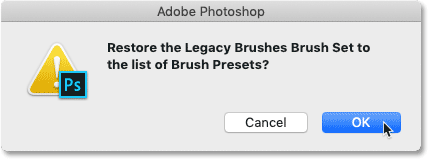
Select Legacy Brushes from the menu:
Click OK to load Legacy Brush:
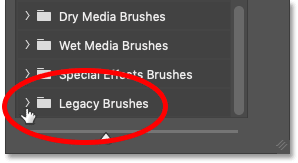
Go back to the Brush Preset Picker, scroll to the bottom of the new Legacy Brushes folder, and open it:
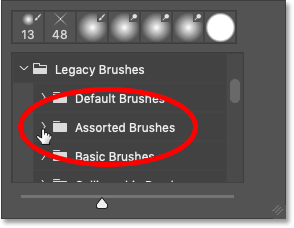
Inside the folder, open the Assorted Brushes folder:
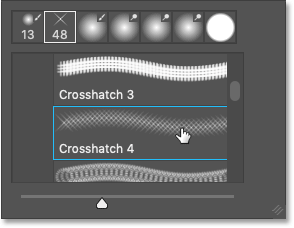
Then find Crosschatch 4 Brush in the list of different brushes. Double-click on the thumbnail to select it and close the Brush Preset Picker:
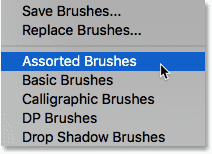
How to load different brushes in Photoshop CS6
In Photoshop CS6, where the Brush Tool is being selected, right-click in Windows and in Mac control click the document to open the Brush Preset Picker.
Then click on the menu icon at the top right:
![]()
Select Assorted Brushes from the menu:
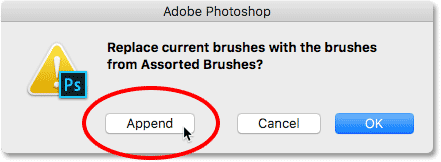
Photoshop asks you to replace your current brushes with new ones. To add them to existing brushes, select “Append”:
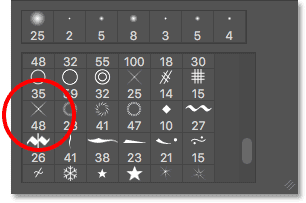
Go back to Brush Preset Picker, look for 48 pixels Crosshatch 4 in the list. Look for an “X” -shaped brush with the number 48 below it (48 means that the default brush size is 48 pixels).
Double-click on the thumbnail to select the brush and close the Brush Preset Picker:
Step 31: Sampling the golden color to use the glow: Select a color for the glow by sampling the color of the text. Press and hold the Alt key on Windows and the Option key on Mac to temporarily go from the Tool Brush Tool to the Eyedropper Tool and then click on the light gold color to be sampled. Here we select a light region from the letter “O”:

Step 32: Click on letters to add random glitter:
In Windows, release the Alt key and in the Mac release the Option key to return to the Brush Tool. Then click on a few random dots around the text to add shine.
To create variety, change the brush size by pressing the open and closed bracket keys. The left bracket key makes the brush smaller and the right bracket key makes it larger.
Do not add too much shine. If you are not satisfied with it after adding the glow, press Ctrl + Z in Windows Command + Z on Mac to cancel, and then try again. Here, we added two glows to “G”, a smaller glow at the end of the letter “L”, and a number to the left of the letters “D”:
