


5 ways to improve your WordPress security
Five ways to improve your WordPress security
WordPress is the most popular content management system (CMS), with 43.2% of all websites running on its software. Unfortunately, its popularity attracts all kinds of cybercriminals who exploit the platform’s security vulnerabilities. As a result, WordPress security is more vulnerable than ever.
This is not to say that WordPress has a terrible security system – security breaches can also happen due to users not being aware of security. Therefore, it is better to implement preventive security measures before your website becomes a hacker’s target.
We will discuss five ways to improve WordPress security and protect your site from cyber-attacks. This article will cover best practices and tips – with or without WordPress plugins. Some of the methods apply to platforms other than WordPress.
Best practices for improving WordPress security
This section will discuss five general WordPress security tips that do not require advanced technical knowledge and high-risk investments. Even a beginner can do these simple tasks like updating WordPress software and removing unused themes.
1. Update your WordPress version regularly
WordPress releases regular software updates to improve performance and security. These updates protect your site from cyber threats.
Updating the WordPress version is one of the easiest ways to improve WordPress security.
However, nearly 50% of WordPress sites run on an older version, making them more vulnerable.
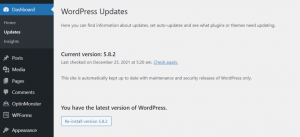
To check if you have the latest version of WordPress, open your WordPress admin and go to Dashboard -> Updates in the left menu panel.
If it shows that your version is not up to date, we recommend that you update it as soon as possible.
Keep an eye on upcoming update release dates to ensure your site isn’t running an outdated version of WordPress.
We also recommend updating the themes and plugins installed on your WordPress site. Older themes and plugins may conflict with the updated core WordPress software, causing errors and being prone to security threats.
Follow these steps to get rid of old themes and plugins:
- Go to your WordPress admin panel and go to Dashboard -> Updates.
- Go to the Plugins and Themes section and check the list of themes and plugins ready for an update. Note that they can be updated at once or separately.
- Click on Update Plugins:

2. Use the WP-Admin secure login credentials
One of the most common mistakes users make is using simple and predictable usernames, such as “admin,” “administrator,” or “test.”
This puts your site at risk of brute-force attacks. In addition, attackers also use this attack to target WordPress sites that do not have strong passwords.
Therefore, we recommend making your username and password unique and more complex.
Alternatively, follow these steps to create a new WordPress admin account with a new username:
1. From your WordPress dashboard, go to Users -> Add New:
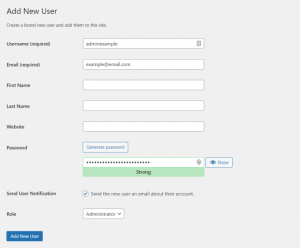
2. Create a new user and assign the Administrator role to it. Add a password and when done, press the Add New User button.
Include numbers, symbols, and upper and lower case letters in your password. We recommend using more than 12 characters because longer passwords are much harder to crack.
Expert advice: The longer the password, the more secure it is.
However, strong passwords don’t have to be long and complicated – use special symbols and numbers instead of well-known letters. For example, @bAm@41! Instead of Alabama! Easy to remember and harder to break.
Alternatively, use a pattern on the keyboard instead of actual words, such as qpzmwoxn. Additionally, combine the two to create a stronger password.
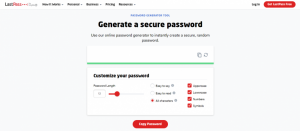
If you need help creating a strong password, use online tools like LastPass and 1Password. You can also use their password management service to store strong passwords securely. That way, you don’t have to memorize them.
After creating a new WordPress admin username, you need to delete your old admin username. Here are the steps to do this:
1. Login with your new WordPress username.
2. Go to Users -> All Users:
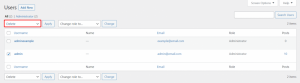
3. Select the old management account you want to delete. Change the Bulk Actions drop-down menu to Delete and click Apply.
To keep your site secure, scanning the network before logging in is important. If you are unknowingly connected to Hotspot Honeypot, a network operated by hackers, you risk leaking login information to operators.
Even public networks like school library Wi-Fi may not be as secure as they seem. Hackers can intercept your connection and steal unencrypted data, including login credentials.
For this reason, we recommend using a VPN when connecting to a public network. It provides a layer of encryption to the connection, making data harder to intercept and protecting your online activities.
3. Set Safelist and Blocklist for an admin page
Enabling URL locking protects your login page from unauthorized IP addresses and brute force attacks.
You need a web application firewall (WAF) service like Cloudflare or Sucuri.
Using Cloudflare, a zone lock rule can be configured. Specifies the URLs you want to block and the IP range allowed to access these URLs. Anyone outside the specified IP range cannot access them.
Sucuri has a similar feature called URL blocklisting.
First, you add the URL of the login page to the block list so that no one can access it. Then, list the IP addresses allowed to access the secure login page.
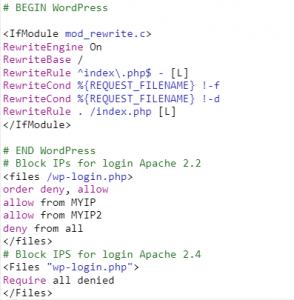
On the other hand, by configuring the htaccess file. Your site restrict access to your login page. Go to your root directory to access the file.
Important: Before making any changes, we strongly recommend you to .htaccess file. Make a backup copy. If something goes wrong, you can easily restore your site.
Adding this rule to .htaccess will restrict access to your wp-login.php to only one IP. Therefore, attackers cannot access your login page from other locations.
# Block WordPress xmlrpc.php requests
<Files xmlrpc.php>
order deny,allow
deny from all
allow from 000.00.000.000
</Files>
This rule should be placed after the # BEGIN WordPress and # END WordPress commands, as shown below.
This rule applies even if you don’t have a static IP, as you can restrict logins to your ISP’s shared range.
You can also use this rule to restrict other authenticated URLs such as /wp-admin.
Expert advice: Note that blocking is only effective against known threats.
Hackers can specifically design malware to avoid detection by tools that use a blocklist system. While the safelist offers stronger security, it can also be more complicated to implement, especially if you want a third party to do it – they need information about all the apps you use. .
4. Use trusted WordPress themes
Nulled WordPress themes are unauthorized versions of original themes. Usually, these themes are sold at a lower price to attract users. However, they usually have many security issues.
Often, nulled theme providers are hackers who have hacked the original theme and inserted malicious code, including malware and spam links.
Additionally, these themes can be backdoors for other exploits that can compromise your WordPress site.
Since nulled themes are distributed illegally, their users do not receive any support from the developers. If your site has any issues, you need to figure out how to fix them and secure your WordPress site.
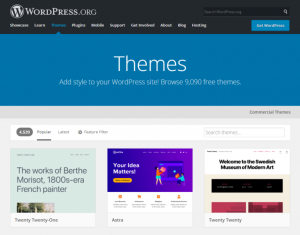
We recommend choosing a WordPress theme from its official repository or trusted developers to avoid security attacks.
Alternatively, check out third-party themes on official theme marketplaces like ThemeForest, where thousands of premium themes are available:
5. Install the SSL certificate
Secure Sockets Layer is a data transfer protocol that encrypts data exchanged between a website and its visitors, making it more difficult for attackers to steal important information.
Additionally, SSL certificates boost a site’s search engine optimization (SEO) and help it attract more visitors.
Websites with an SSL certificate installed use HTTPS instead of HTTP, so they’re easy to spot.
Most hosting companies include SSL with their plans.
After installing an SSL certificate on your hosting account, activate it on your WordPress website.
Plugins like Really Simple SSL or SSL Insecure Content Fixer can handle the technical aspects and activation of SSL with a few clicks.
The premium version of Really Simple SSL can enable HTTP Strict Transport Security headers that enforce the use of HTTPS when accessing the site.
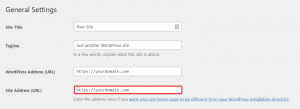
Once done, change your site URL from HTTP to HTTPS.
To do this, go to Setting -> General and find the Site Address (URL) field to change its URL
Conclusion
Cyber attacks may take many forms, from malware injection to DDoS attacks. WordPress websites, in particular, are a common target for hackers due to the popularity of the CMS. So WordPress security is constantly at risk. In this article, we discussed five ways to secure WordPress. Good luck!