


27 Ways to Fix the Blue Screen of Death on Windows 10
If your computer is experiencing a blue screen error, use this guide to troubleshoot and fix the problem in Windows 10. Blue screen of death (BSoD) has other terms such as “blue screen,” “stop error,” or “system crash.” It may occur after a critical error occurs that Windows 10 is unable to handle and resolve automatically.
The blue screen of death error in Windows 10 may appear due to an error in the Windows operating system or hardware problems. To fix this error, you can use solutions such as updating drivers, running a disk scan, using the System File Checker and Check Disk tools, running Windows performance enhancement settings, and removing programs that cause this error.
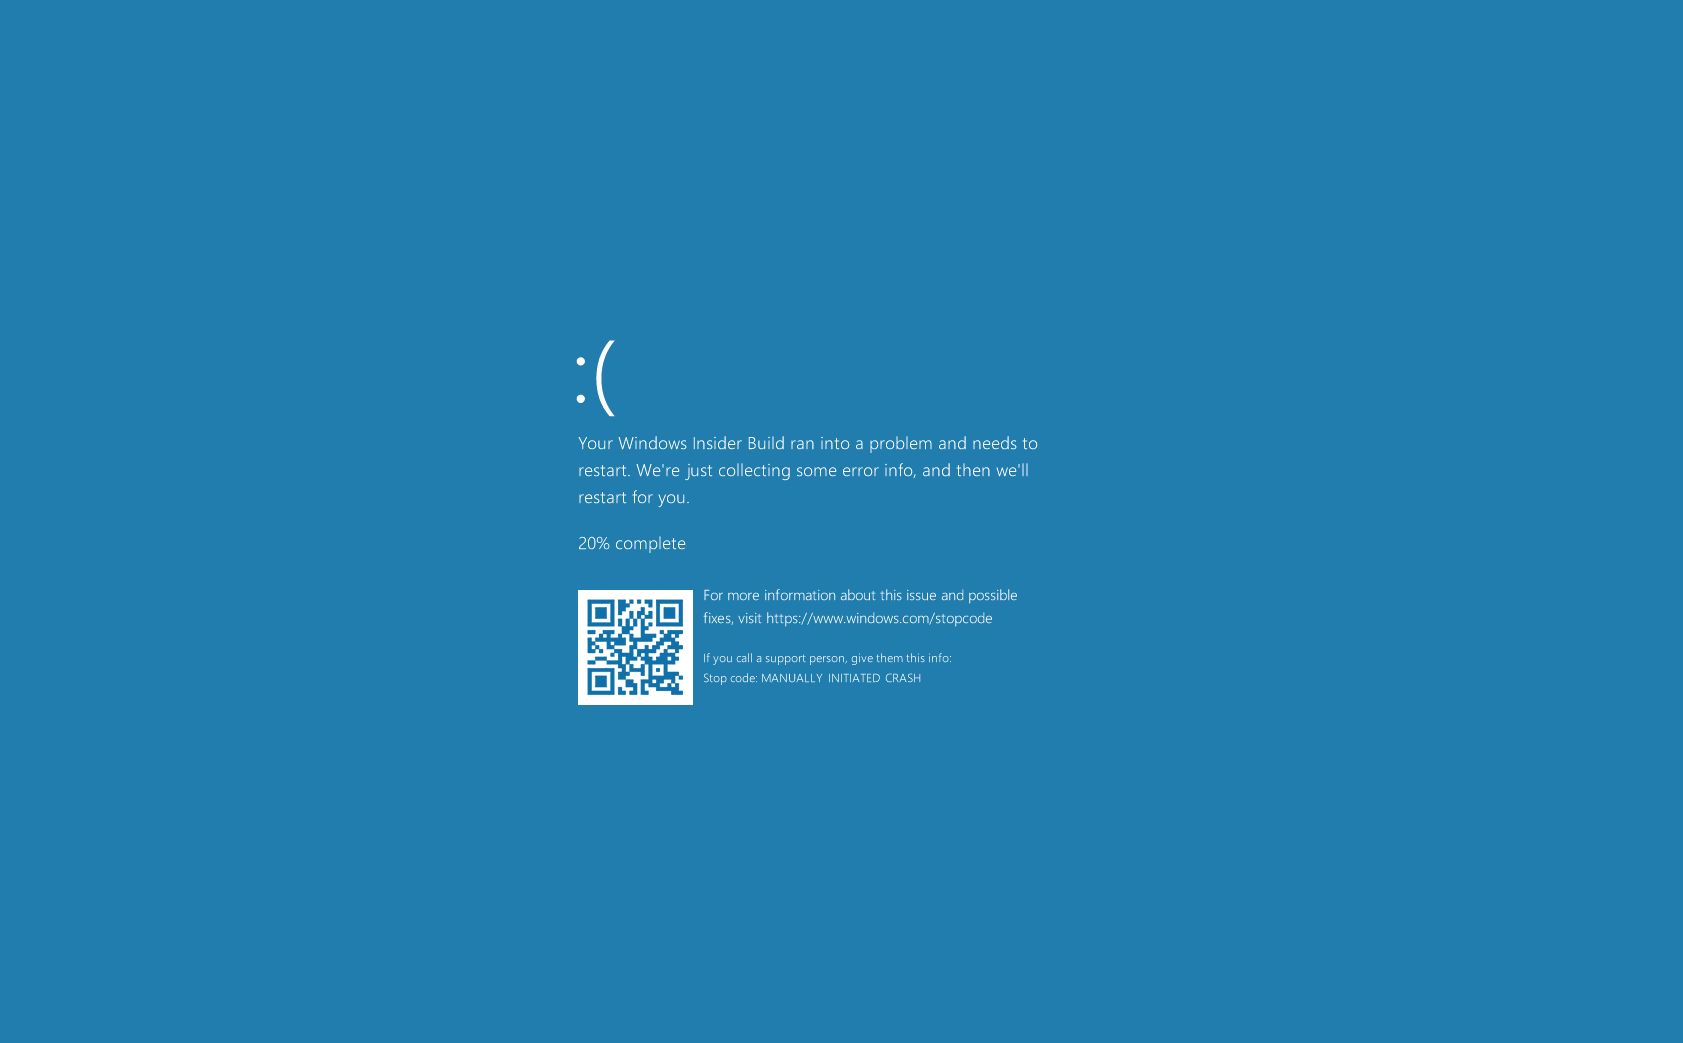
Usually, you encounter a blue screen error during the Windows 10 update process, when you turn on your computer, or randomly when you are actively using the device. The most critical problem is that you will not see anything except a sad emoji and a blue background and will not have enough information. You will see a message in the system that says:
Your PC ran into a problem and needed to restart. We’re just collecting some error info and will continue for you.
It means that “your computer has encountered a problem and needs to be restarted. We’re gathering some error information and will reboot for you later.”
or conventional error codes (such as VIDEO_TDR_TIMEOUT_DETECTED, PAGE_FAULT_IN_NONPAGE_AREA, CRITICAL_PROCESS_DIED, SYSTEM_SERVICE_EXCEPTION, DPC_WATCHDOG_VIOLATION or IRQL_NOT_LESS_OR_EQUAL). Or hexadecimal codes like 0x000000D1, 0x0000000A, or 0x0000007B look like writing on the wall to normal users.
Although a stop error doesn’t have a clear answer, it’s almost always a problem with a quality or feature update for Windows 10, a newly installed driver, an incompatible program, or a hardware-related issue.
If you have also faced this problem, don’t worry. We teach you how to troubleshoot and fix Windows 10 blue screen errors.
How to fix the blue screen error when upgrading to Windows 10
When upgrading to a new version of Windows 10, a blue screen error may appear for various reasons. For example, it could be due to a compatibility issue with an old app or security software. Or it may be damaged due to infected files in the current installation or installation media.
Usually, when an error occurs, the installation reverts to the previous building without explanation.
If you’re encountering errors during installation, removing unnecessary programs, cleaning infected downloads, disconnecting unnecessary peripherals, or cleaning, installing Windows 10 may fix the problem. (Clean Install means reinstalling the operating system or a program by completely deleting its previous version and all the files and settings related to it. By performing a clean install, the user is free from any software errors, as well as computer speed and performance problems which may exist due to the accumulation of unnecessary files and inappropriate settings in the operating system.
In a clean installation, operating system files and programs are completely removed from the device. In the next step, the operating system and desired programs are reinstalled from the installation media such as CD or flash drive. In other words, in a clean Install, all unnecessary computer files, settings, and software are removed, and only the operating system and required programs are installed on the device.)
Remove the incompatible program.
Removing a program may conflict with the installation of Windows 10, follow the steps below:
- Open Settings.
- Click on Apps.
- Click on Apps & Features.
- Select the problematic program and click the Uninstall button.
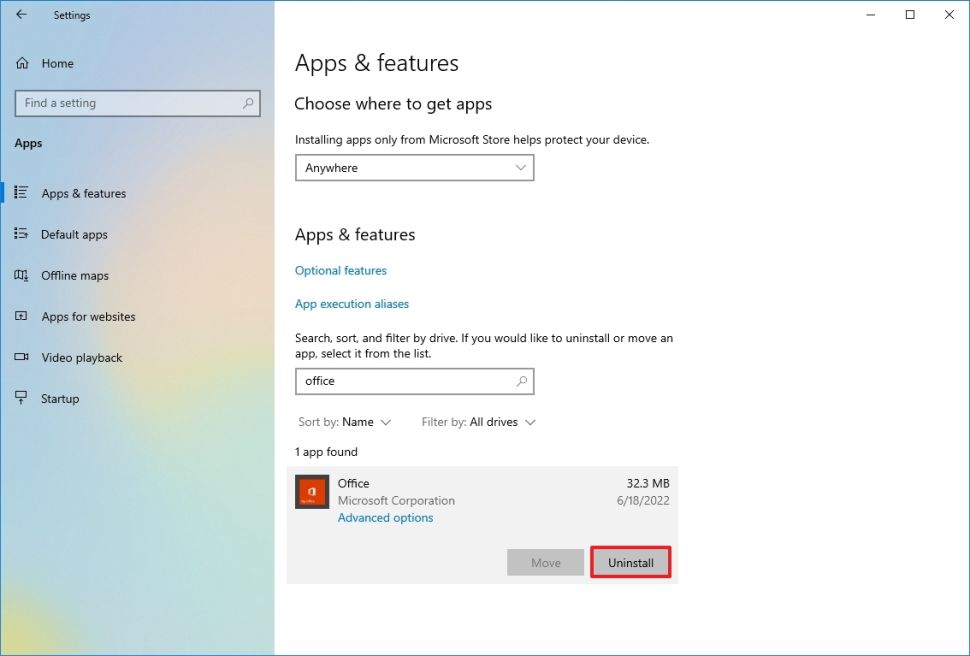
Click the Uninstall button again.
Note: If this is a classic desktop app, you may want to continue with the on-screen instructions to complete the uninstallation process. After completing the steps, you may need to repeat the instructions to remove additional programs and upgrade once more. After the update, you can install the apps again.
Download the installation files again.
Sometimes, if you use the Windows Update option to upgrade your device, the installation files may get corrupted during the download process, and end up with a blue screen of death. In this case, you can use the settings program to delete the old files and let the system download the updated bits again.
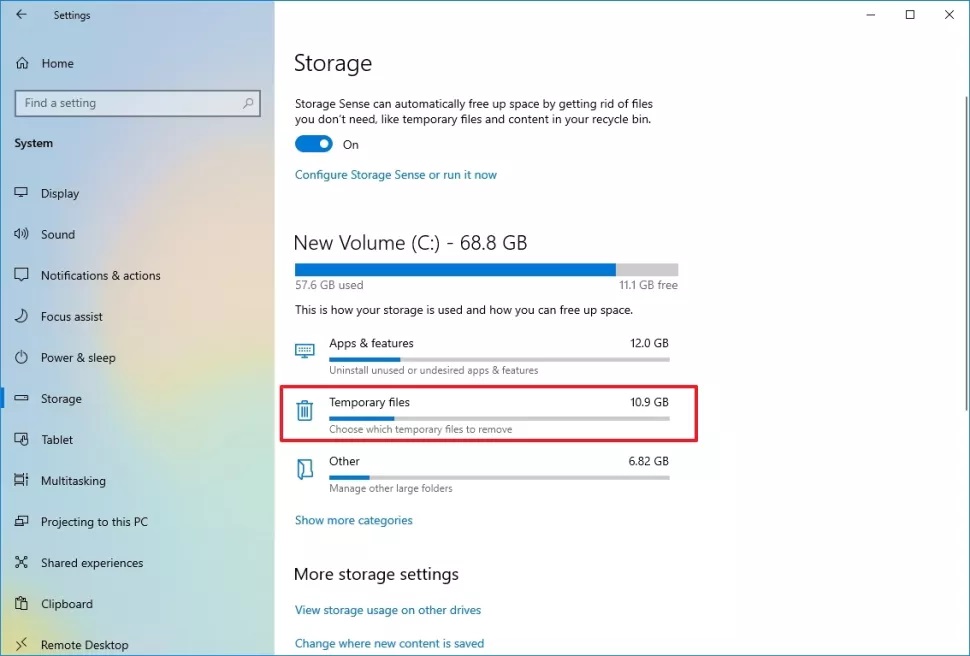
To re-download the update files through Windows Update, use the following steps:
Open Settings.
Click on System.
Click on Storage.
Under the main drive section, click on Temporary files.
Clear the previously selected options.
Check the “Temporary Windows installation files” option.
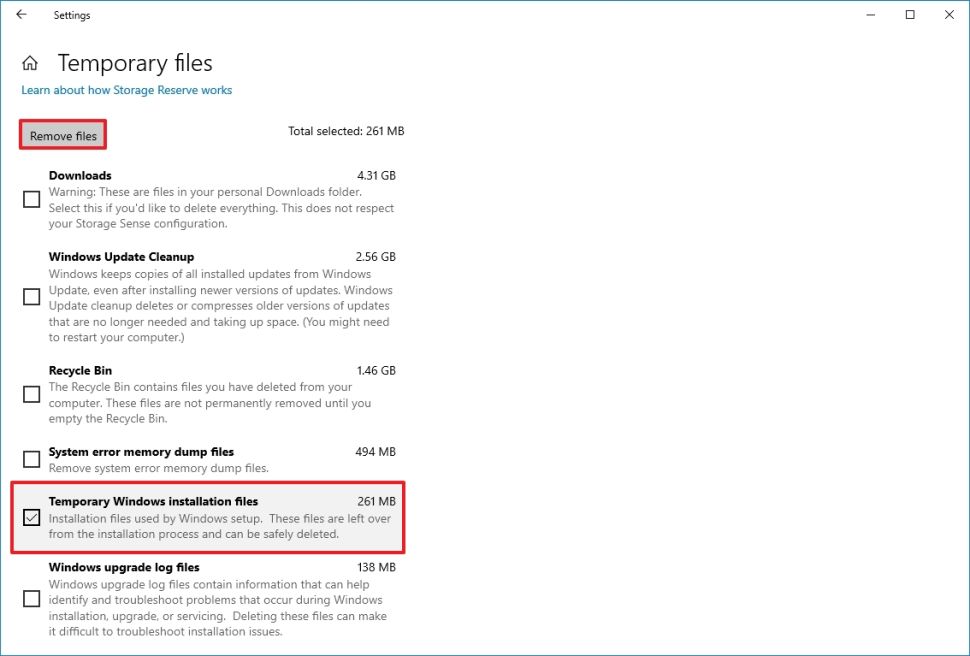
Click the Delete Files button. After completing the steps, open the Windows Update settings and follow the steps to upgrade the computer again.
Suppose you continue to have the same problem. In that case, you should consider using the Update Assistant tool to perform an alternative upgrade, or if that doesn’t work, try using the Media Creation Tool to create a new Windows 10 installation media.
Update problem analysis
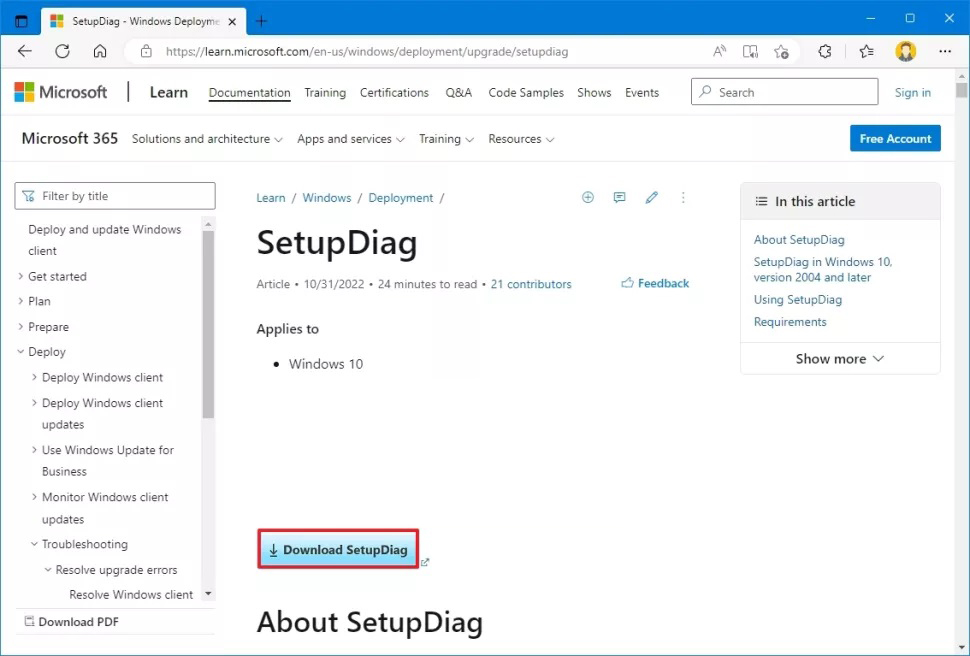
You can also debug blue screen errors with the “SetupDiag” tool. SetupDiag is a tool from Microsoft that is available as an optional download that helps diagnose and determine the reason for an update or upgrade failure, this useful information can help solve almost any problem.
To use SetupDiag after a Windows 10 update failed with a blue screen, follow these steps:
- Open the SetupDiag download page.
- Click the Download SetupDiag button.
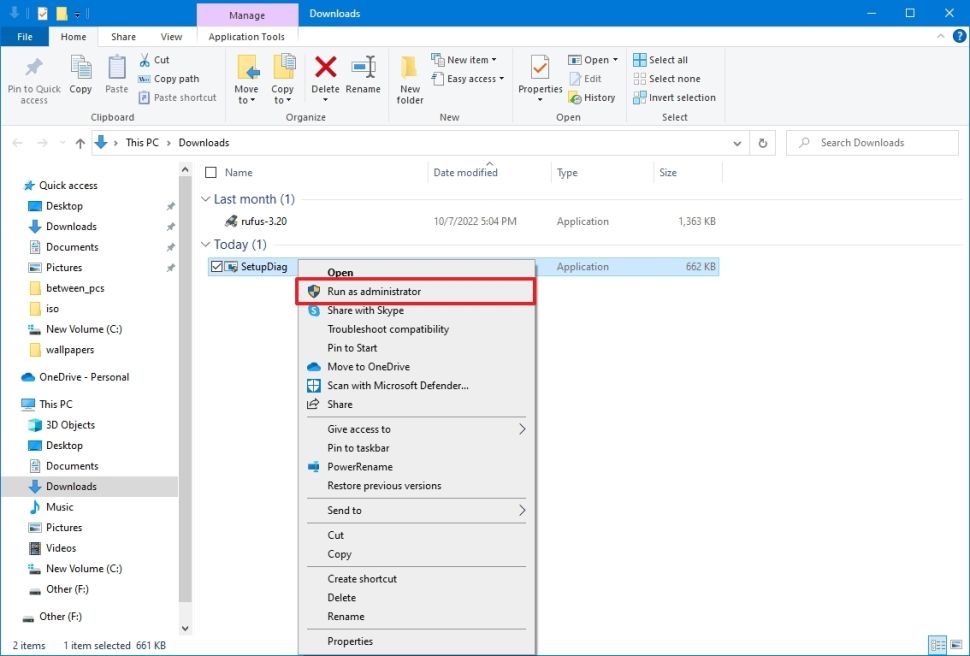
Select a destination folder to save the file. Click on the Save button. Open File Explorer. Open the folder where you downloaded the file. Right click on “SetupDiag.exe” and select “Run as administrator” option.
To open the SetupDiagResults.log file, right-click on it and select Open. After this step, the file’s default text editor opens with diagnostic results based on known rules.
If an error is detected, the logs provide you with information that you can easily understand why the device encountered a blue screen during the update, and if a problem is known, then you can follow the relevant steps. You will get it fixed.
Sometimes you won’t get an offer. If this happens, follow a link that may be in the log file or research your problem online using the error code or any other meaningful information. (See this guide for more instructions.)
Disconnect unnecessary accessories
Windows can also crash due to hardware issues. Therefore, it is always recommended to disconnect all unnecessary peripherals, including external hard drives, printers, secondary monitors, phones, and other USB or Bluetooth devices, before starting to install Windows to reduce the chance of errors. The upgrade process only requires a keyboard, mouse, monitor and internet connection.
After installation, you can always reconnect the accessory. If the problem persists, it may be due to hardware issues or incompatibility with Windows. In this case, the problem can usually be solved by downloading and installing a newer version of the driver from the manufacturer’s support website.
If the computer is using the latest driver and the problem persists, it may be a compatibility issue with the new version of Windows 10 or the hardware needs to be replaced.
clean Install
The best way to upgrade to a new version of Windows 10 is to wipe everything and start over with a clean install. This process will help you avoid blue screen of death error and improve system performance and solve problems.
If you decide to do a clean install, you must first confirm that the computer will boot from USB. For this, it may be necessary
Change the boot order of the Unified Extensible Firmware Interface (UEFI) or Basic Input/Output System (BIOS) to set the correct boot order. Normally, the steps to open the motherboard firmware settings, to start the device, include pressing one of the function keys F1, F2, F3, F10 or F12, the Esc key or the Delete key. However, these settings are different for each manufacturer and even for each device model. If you’re unsure, it’s best to check the manufacturer’s support website for more detailed specifications.
Once in the firmware interface, open the “Boot” page, set the boot order to start from USB, and save the new changes. After the device boots from the flash drive, create a bootable installation media and use it to activate Windows 10, then continue with the steps below.
To clean install Windows 10 and avoid blue screen errors, perform the following steps:
Warning: If you plan to change your current settings, that can lead to problems and even data loss if not done correctly. It is recommended that you create a temporary full backup before proceeding.
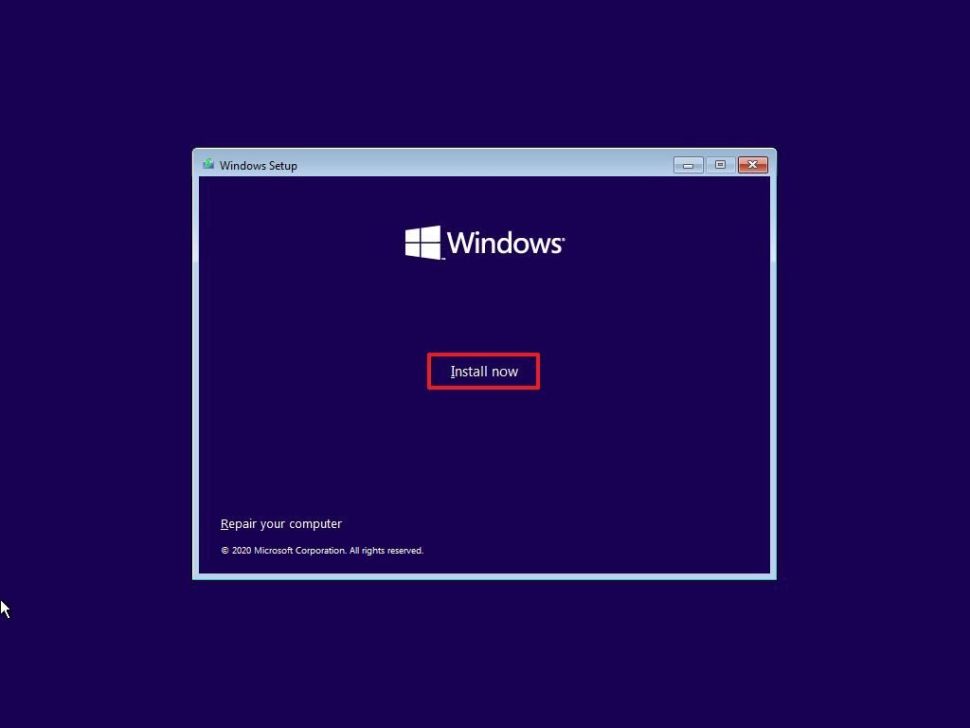
Boot the computer with the Windows 10 installation media. In Windows Setup, click the Next button.

Click the Install Now button.
If your computer is activated correctly, click on the “I don’t have a product key” option to continue.
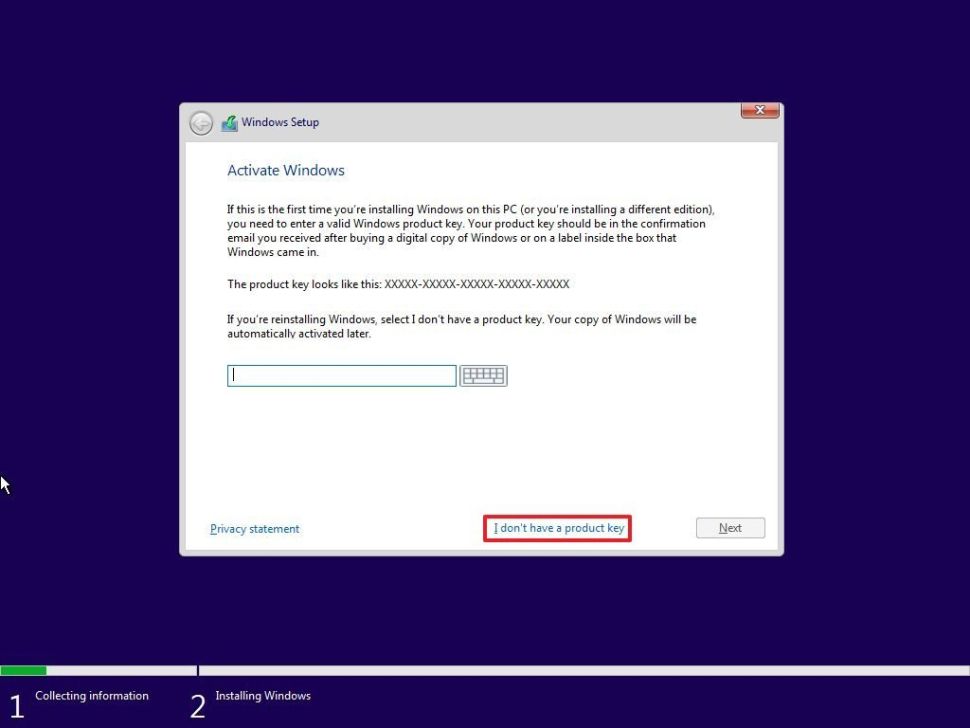
Select the version of Windows 10 (if available).
Note: This selection must match the version that the license activates. Otherwise, the product key will not work, and you may have to reinstall Windows.
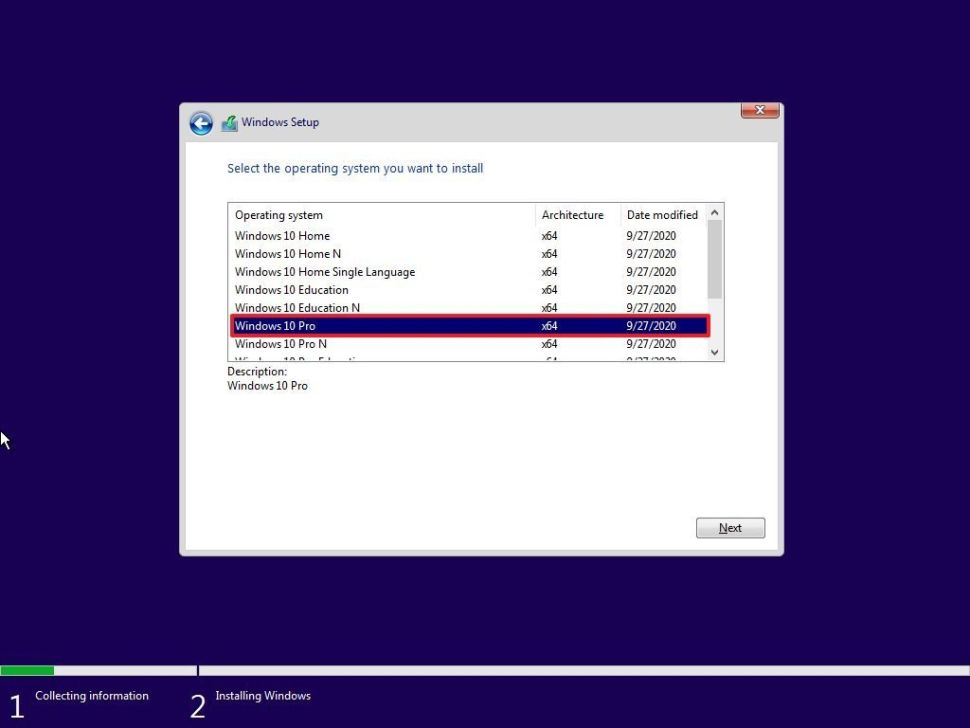
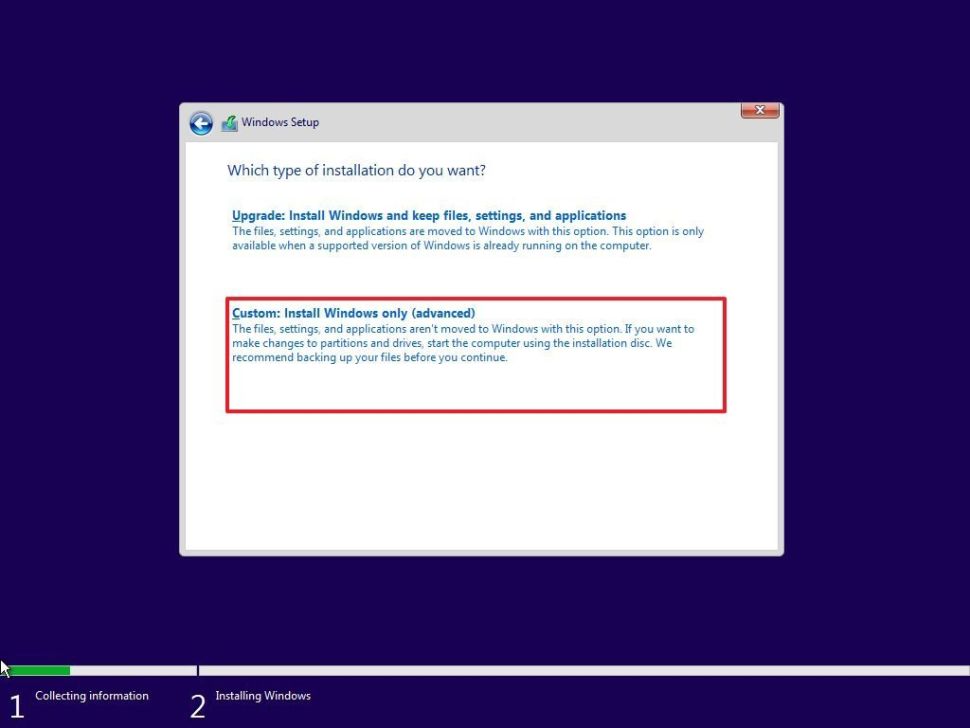
Click the following button. Select the “I accept the license terms” option to continue the operation. Click the Next button. Click on the “Custom: Install Windows only (advanced)” option.
Select the partition that contains the current Windows installation (usually “Drive 0”) and click the Delete button to delete the section on the hard drive. Note: If you have multiple cells on the primary hard drive (Drive 0), select and delete each one. The installation will automatically rebuild the required sections. You need not remove partitions from secondary drives to reinstall Windows 10.
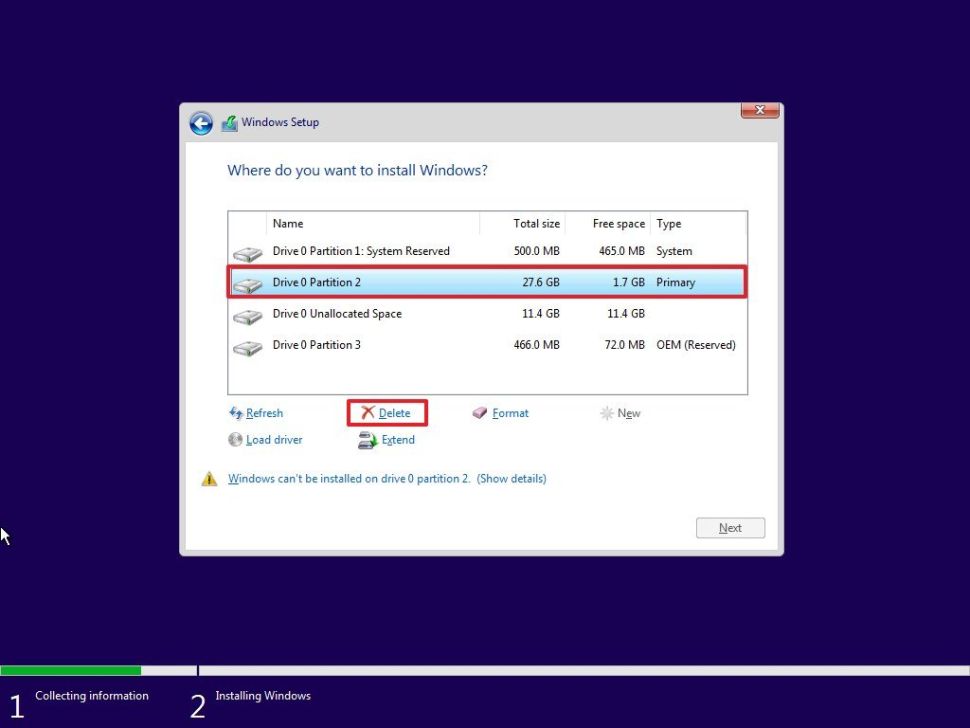
Go to the empty drive named “Drive 0 Unallocated Space” and select it. Click the following button. After completing the steps, the Windows 10 installation process will begin and many blue screen errors will be avoided. After installation, you must proceed to the Out-of-the-Box Experience (OOBE) to complete the PC setup, create a new user account, and select your preferred settings. You can use this guide to perform a complete Windows 10 installation.
After completing the steps, the installation of Windows 10 will start, and many blue screen errors will be avoided. After installation, you must proceed with the Out of the Box Experience (OOBE) to complete the initial PC setup process, create a new user account, and select desired settings. You can use this guide to perform a complete installation of Windows 10.
How to Fix Blue Screen Without Access to Desktop Error in Windows 10 If your computer won’t start properly anymore, you can use some advanced system features like system restore, safe mode, or advanced startup environment to solve the problem.
If the error occurred after you added new hardware, you can disconnect it and recheck to see if the new hardware is causing the computer to have this problem.
Fix the blue screen error with system restore
“System Restore” is a legacy feature that allows you to go back to a previous time when Windows 10 was working correctly, without analyzing your files.
The only downside to this feature is that you have to manually enable it before using it. If “System Restore” is already enabled and configured, you can use a “restore point” to stop the error.
Windows 10 has at least two ways to access System Restore through Advanced Startup, including the boot options menu or USB installation media. Choose one of the methods below and continue with the steps.
Access advanced restart via boot execution.
To set up advanced restart settings to access system recovery, use the following steps:
- Turn on your computer.
- As the Windows logo appears, hold the Power button to temporarily stop the running sequence.

Repeat steps 1 and 2. After the third pause, Windows 10 should open the Advanced Boot Environment and continue with the following steps to access System Recovery.
How to fix the blue screen error without accessing the Windows 10 desktop?
If your system does not turn on as usual, use advanced features such as safe mode, System Restore, or Advanced startup. Note that if this error occurred after adding new hardware, remove it and check again to see if the cause of this problem is your new hardware.
Fix BSoD problems with Safe mode.
Windows 10 also has a “Safe mode” where only essential drivers and services are loaded to access the desktop to help fix any issues, including system errors.
You can access Safe Mode by using the Advanced Setup menu at boot time or by using the Windows 10 installation media. (Choose one of the following options and continue with the following steps.)
Access advanced startup settings via an advanced restart
To access advanced settings and boot into safe mode, use these steps:
Turn on your computer. Press and hold the power button to stop the boot sequence as soon as the Windows logo appears.
Repeat steps 1 and 2 two more times. After the third pause, Windows 10 should open the advanced boot menu and proceed safely using the steps below.
Accessing Advanced Setup via USB, You can also access the Advanced Setup menu using USB installation media to enable safe mode using the following steps:
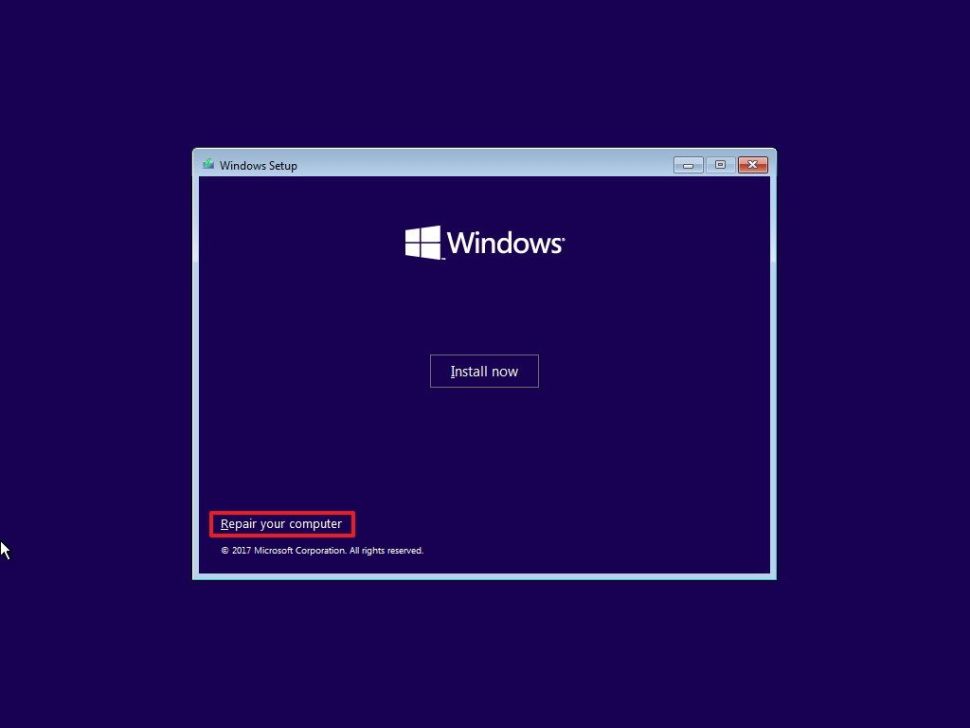
Boot your computer using the USB installation media. Click the NEXT button. At the bottom left, select Repair your computer.
After completing the above steps, proceed with the safe mode instructions below.
Use safe mode to fix the blue screen of death errors.
Use these steps to access safe mode and fix Blue Screen of Death issues and errors:
Click the Advanced Setup option. Note: If you access Advanced Startup from USB media, you will have the Troubleshoot option instead (see step 2). Click on the Troubleshoot option.

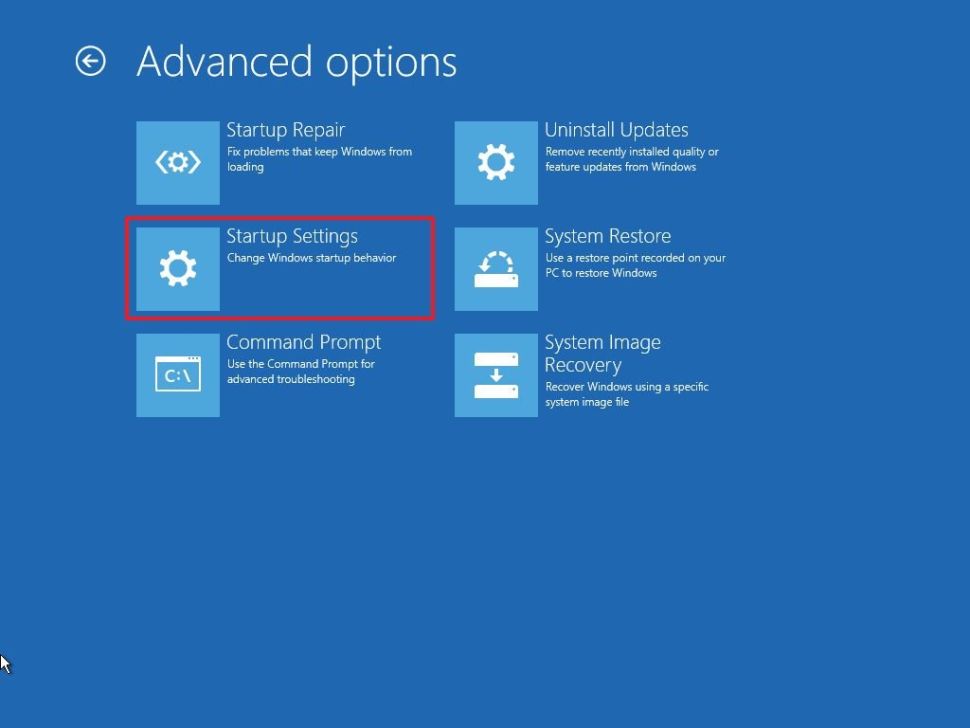
Click on Advanced options.
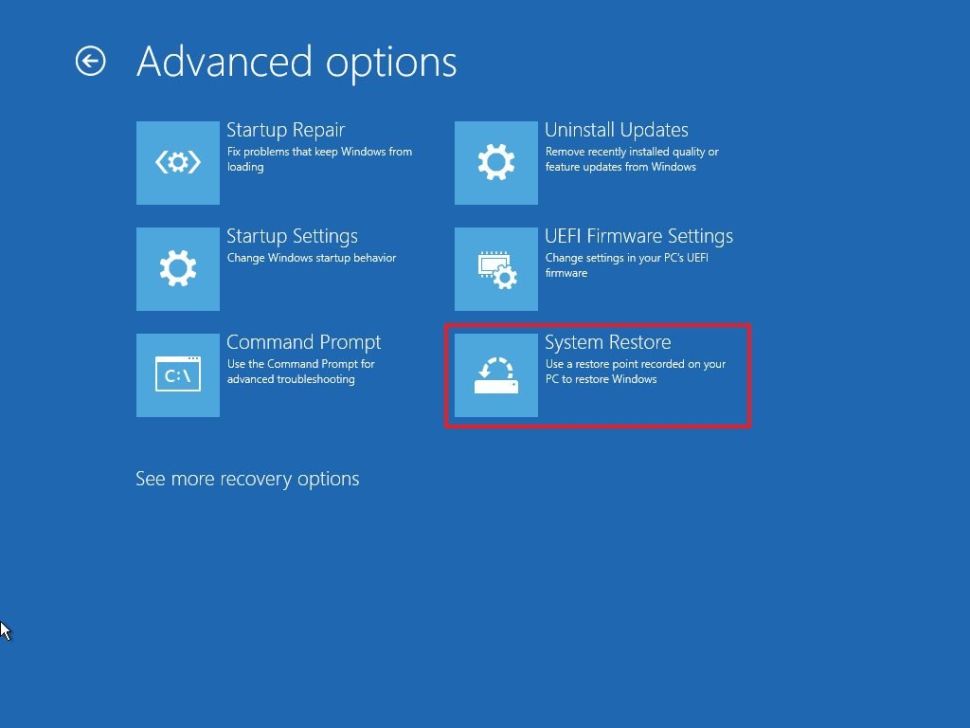
Click on the Startup Settings option.
Click the Restart button.
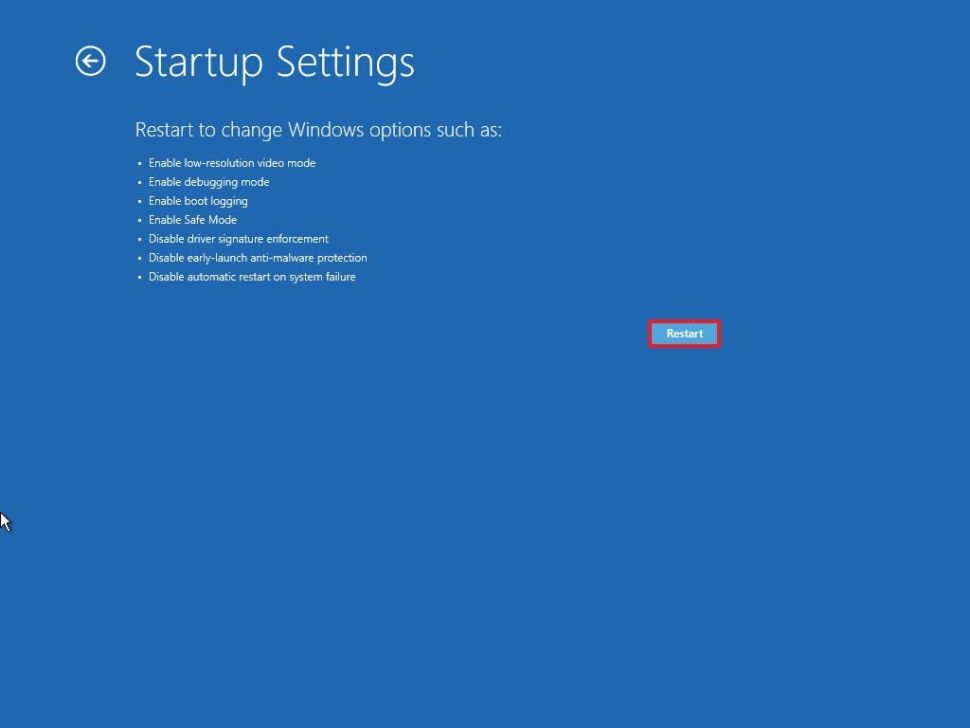
After restarting the computer, press the F4 (or 4) key to select the “Enable Safe Mode” option.

While in Safe Mode, you can use the following steps to remove updates and device drivers that may be causing problems.
Remove failed system updates
To remove a failed update in Windows 11, use the following steps:
Open Settings, go to Update & Security, and click View update history.
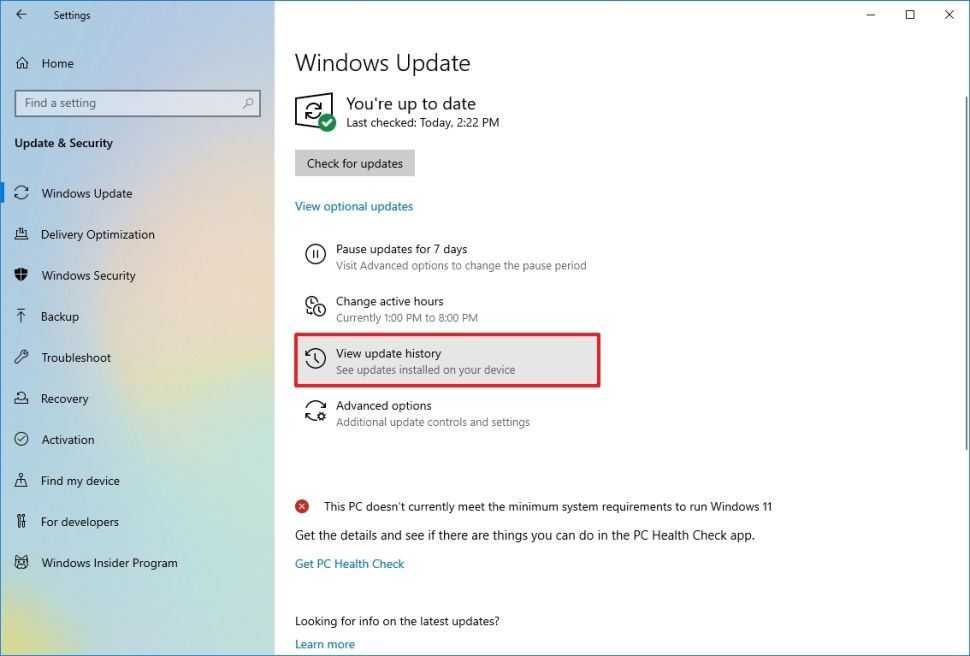
Click on Uninstall updates option.
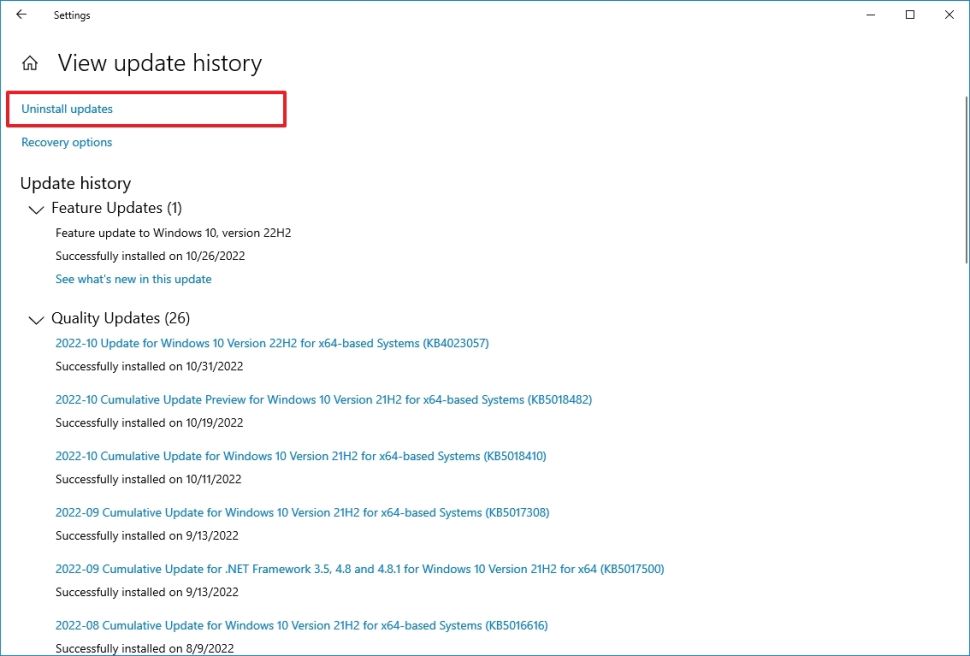
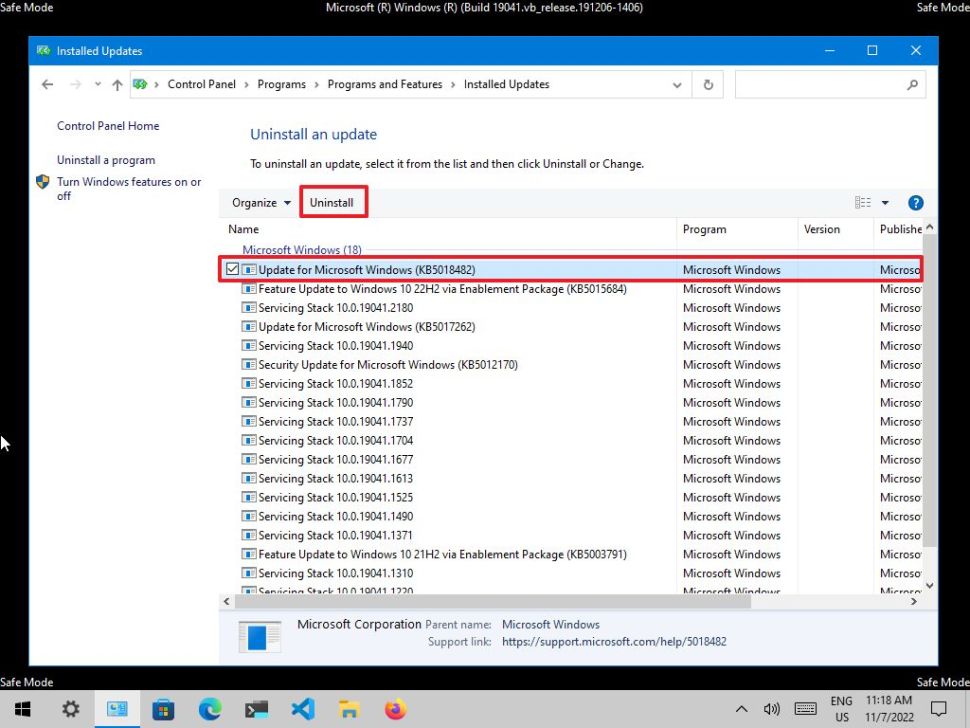
Note: If the Windows Update settings do not show an option to remove an update, then open Control Panel > Programs and Features > View installed updates and continue with the steps below. Select the most recent update (see the “Installed On” column). Click the Uninstall button.
After performing the steps below, restart the device and confirm that the error no longer occurs.
Remove corrupted drivers
To remove an incompatible driver in safe mode, use the following steps:
Open Start. Search for “Device Manager” and use the top result that appears to open the program. Expand the branch that caused the problem. Right click on the device and select Uninstall device.
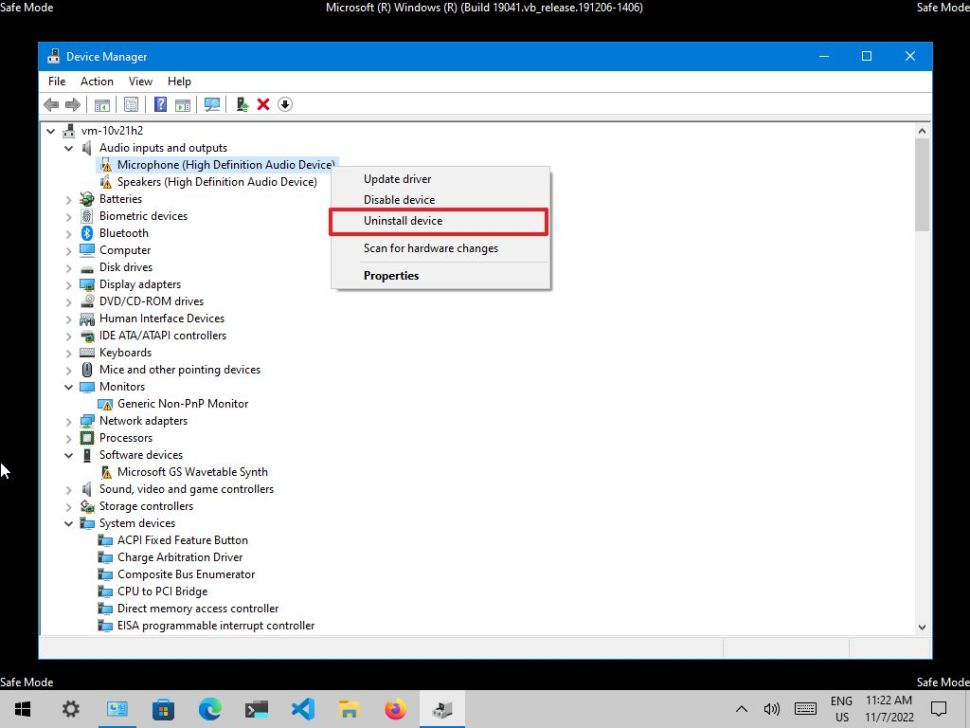
Click the OK button. Once you have completed the steps, restart the computer and determine if the bug check has been resolved.
If the computer no longer shows the BSoB error after uninstalling the update, it’s best to block the update or driver to prevent it from installing automatically in Windows 10 until a new update is available.
Fixed error checking problem with Event Viewer
If you can’t see the error code during the blue screen or you need more details about the problem, Event Viewer will log any hardware errors, driver errors, program errors, and other additional information that you can use to further diagnose problems. .
To fix blue pages with Event Viewer in Windows 10, use the following steps:
Open the Start program. Then search for “Event Viewer” and click on the top result to open the program. Open the “Windows Logs” group. Select the “System” category. Right-click on the “System” category and select the “Filter Current Log” option.
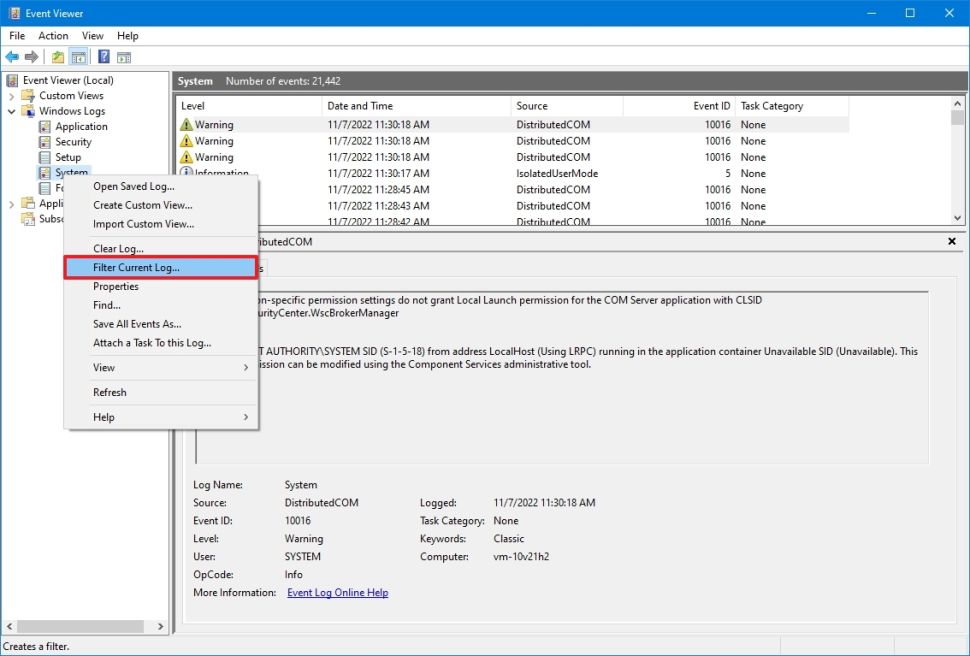
Click on the Filter tab. From the menu that opens, select Logged and select the time period in which the BSoD occurred. In the “Event level” section, check the Critical and Error options.
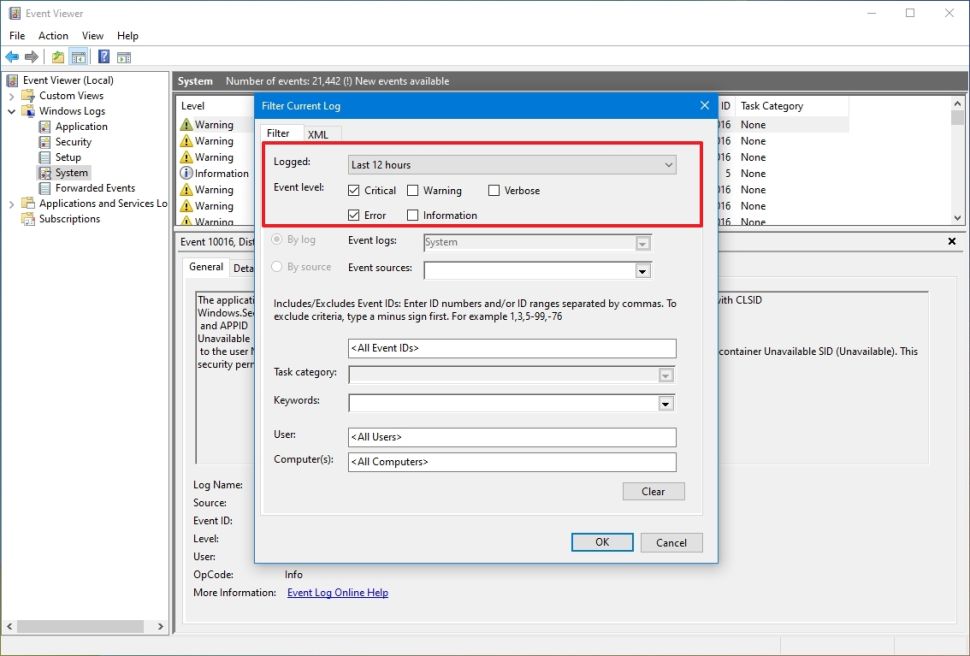
Click on the OK button. Double-click any log to find out more details about the problem.
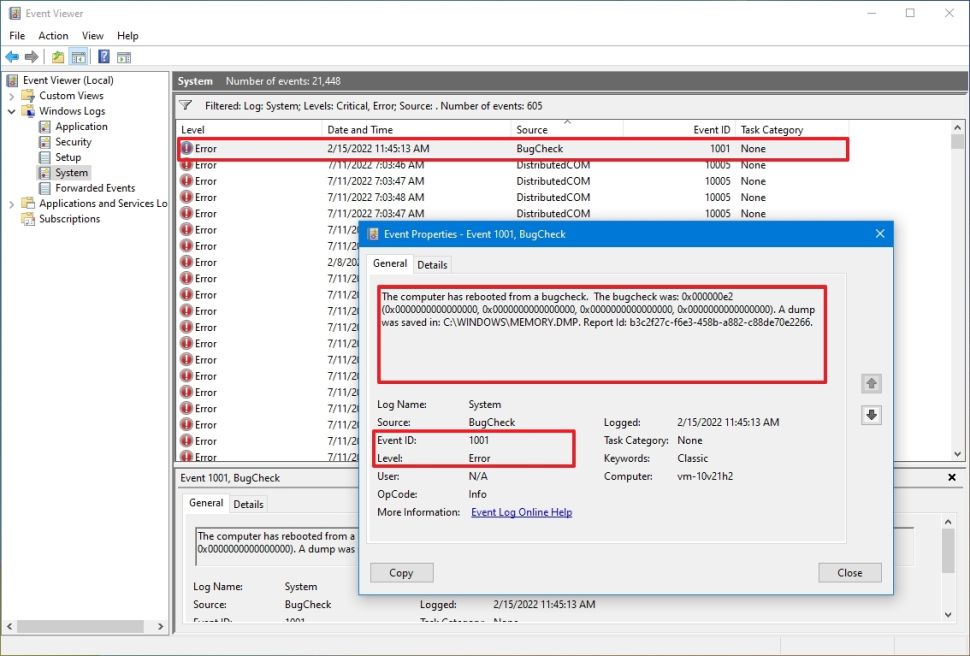
Check the event log details again.
tip:
When a blue screen is loaded, the system will create a memory dump file and the device will automatically restart. That is, if you have a list of errors that cause the computer to reboot immediately due to bug checking, the error causing the problem is likely to be the error that occurs after a critical Kernel-Power event.
In the event log, the “General” tab contains a short technical description of the error that may indicate a problem with the Blue Screen.
Fixed BSoD issue with advanced setup
Windows 10 also includes a feature to remove problematic updates directly from the advanced startup menu.
Select one of the advanced setup access options and follow the instructions to proceed to remove the quality or feature updates that are causing the Blue Screen of Death issue.
Advanced access to boot from boot
To access the advanced boot menu with the boot option, use these steps:
- Turn on your computer.
- As soon as the Windows logo appears, press and hold the Power button to stop the boot sequence.
Repeat steps 1 and 2 two more times.
After the third pause, Windows 10 should open the Advanced Startup environment, and then you can continue with the steps below to boot into Safe Mode.
Advanced startup menu access via USB
To access the advanced boot menu with USB installation media, use these steps:
Boot your system using the USB media and then click the NEXT button. In the lower left corner, click on Repair your computer option.

After completing the steps, please continue with Windows 10 Safe Mode instructions below.
Remove quality or feature updates
To remove the latest quality or feature update that is causing the blue screen of death, use the following steps:
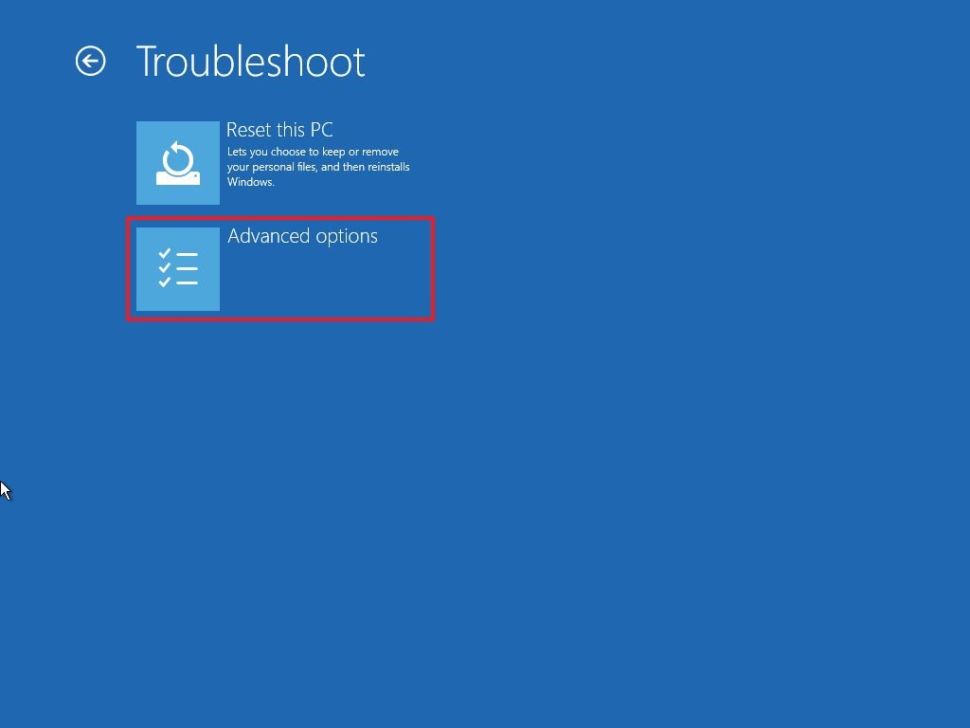
- Click on the Advanced Startup option. Note that if you are using a USB media, then you will have the Troubleshoot option instead of the Advanced Startup option.
- Click on the Troubleshoot option.
Click on Advanced options.
Click on the Uninstall Updates option.
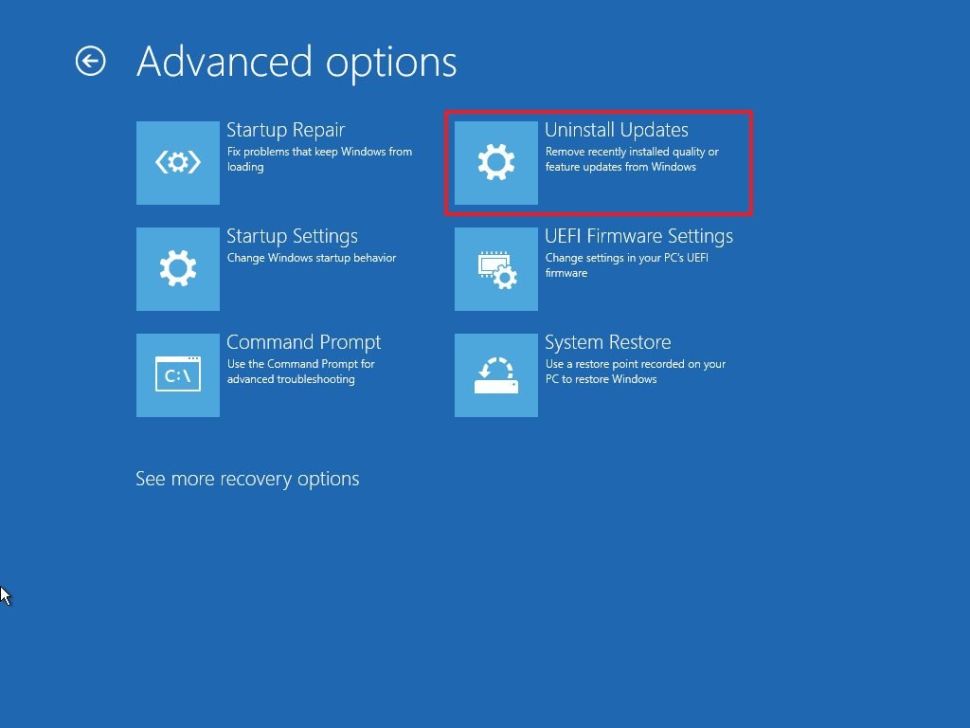
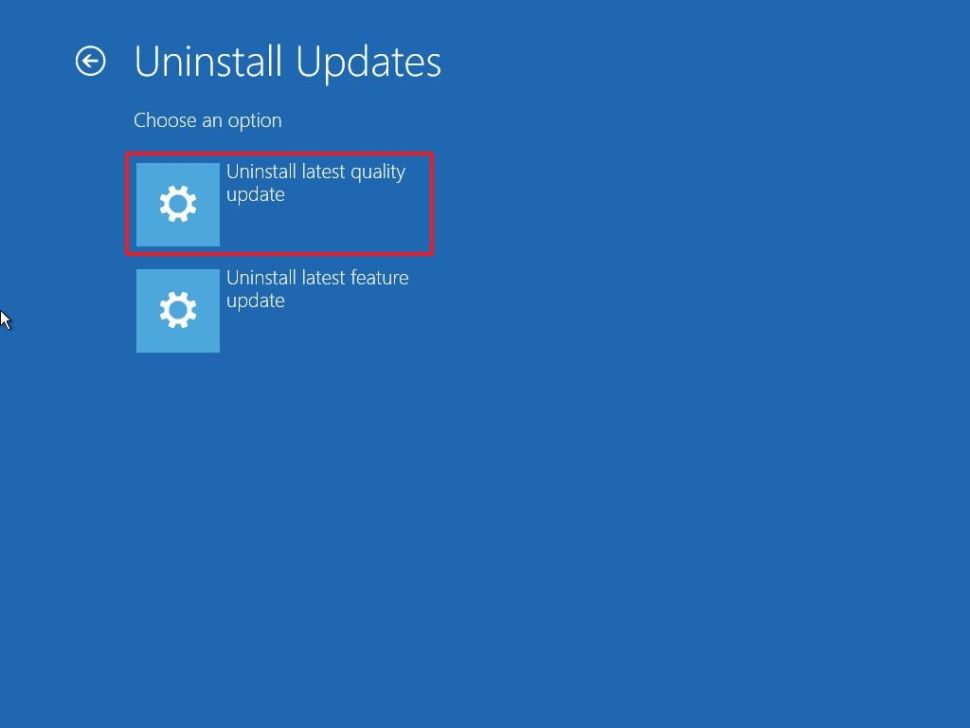
Click on Uninstall latest quality update to remove all recent monthly updates or click on Uninstall latest feature update option to return to the previous version.
Note: If you select the Uninstall latest feature update option, you can remove the latest Windows 10 update with the same steps.
To continue, select your user account and confirm the user account password, then click next and click Uninstall quality update.
Click Done and select Continue. After doing these steps, Windows 10 will automatically remove the cumulative update or new feature update and fix the blue screen problem in Windows 10.
Fix the blue screen error by accessing the desktop in Windows 10
If you encounter the Blue Screen of Death error message and do not have access to the desktop, the problem is usually due to the lack of system updates, a problem with the drive or a recently installed program.
Windows 10 update and drivers
If you have access to the desktop, installing the latest Windows 10 updates and drivers can help fix the blue screen error.
System update
Windows 10 periodically downloads and installs updates, but you may still need to manually check to download a needed update.
To download and install updates in Windows 10, use these steps:
Open the settings.
Click on Update & Security, then click on Windows Update, and then click on the Check for updates button.
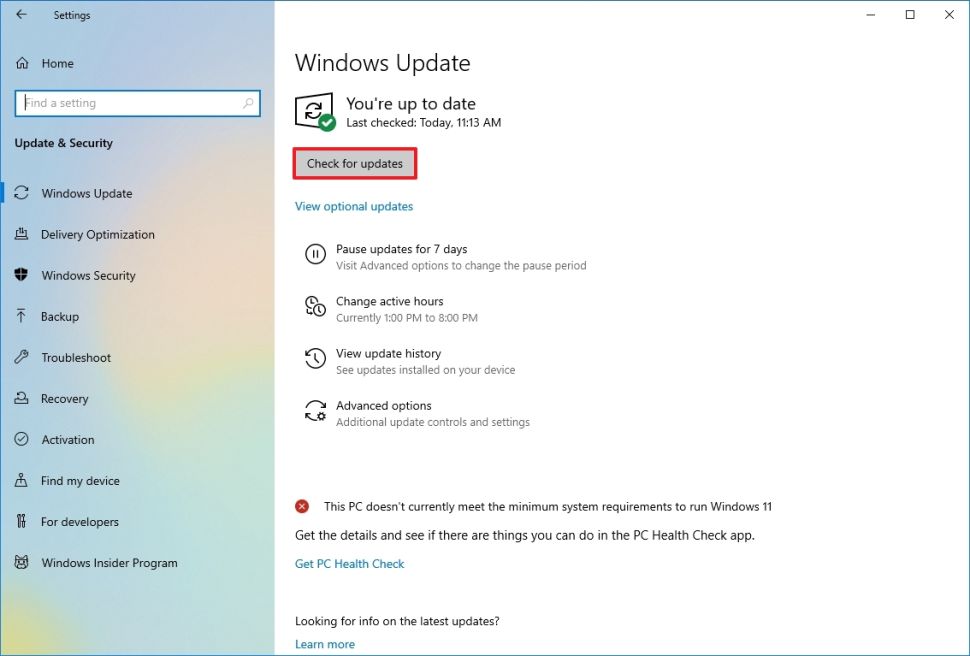
If an update is available but not downloading, try downloading and installing the missing quality update manually.
Driver update
When the problem is an old driver, you need to download and install the latest version.
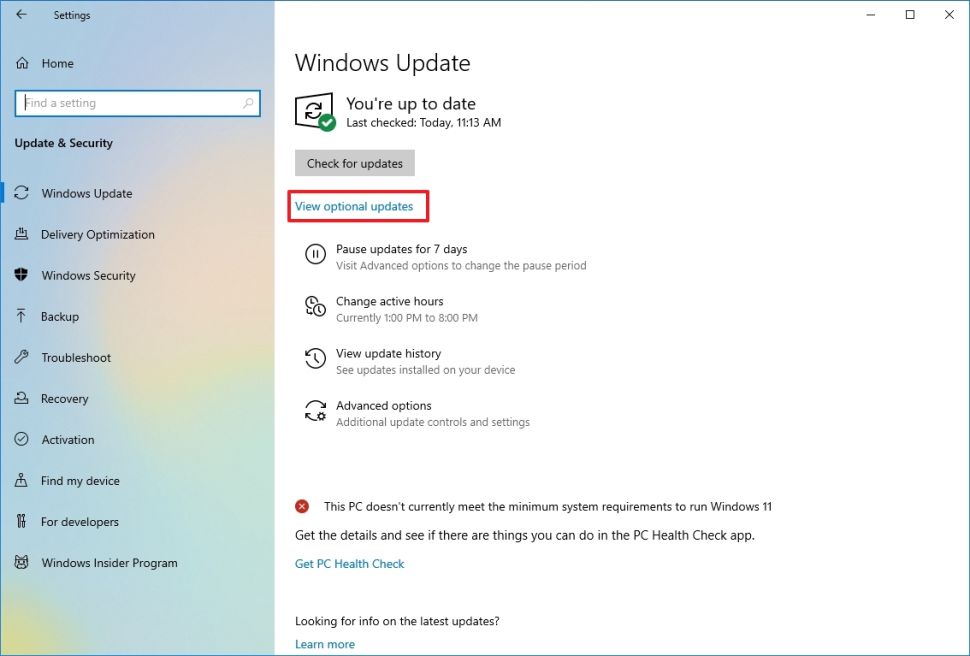
To install a newer version of the driver, use these steps:
Go to settings.
Click on Update & Security, then click on Windows Update. If available, click the Check for updates button and then click the “View optional updates” option. If this option is not available, you should know that Windows Update does not require any updates to configure your system.
Click on the Driver updates tab.
Select Update Driver.
Click on the download and install button. After completing the steps, the latest driver version should solve the problem. If no updates are available, you may need to check the manufacturer’s support website to download and install a newer driver by following their instructions. If the support website doesn’t have a version higher than the one you currently have, you might want to try the beta version of the driver as it may contain a preview of a fix that the company plans to release in a future version.
Remove problematic updates, drivers, apps
Software and hardware companies may also release buggy updates that cause problems like BSoD in Windows 10.
Remove system updates
To uninstall a buggy system update, use these steps to uninstall it:
Open the settings.
Click on Update & Security.
Click on “View update history” option.
Click on Uninstall updates option.
Select the most recent update (see the “Installed On” column).
After clicking the uninstall button, the completion of the steps will remove the problematic update and fix the blue screen of death error. You can also use these steps to prevent Windows Update settings from trying to install an update again.
Remove the device driver
To remove the debugged driver, use the following steps:
Open Start. Search for Device Manager and click on the top result to open the app. Right click on the device and select Uninstall device.
Picture
Click on the OK button. After completing the steps, you will no longer see the bug check error on your computer.
Return device driver
You may also be able to resolve the issue by rolling back to an earlier version of the driver until another update replaces the buggy update.
To roll back to the previous driver version in Windows 10, use these steps:
Open Start. Search for Device Manager and click the top result to open the console. Open the problem device category. Finally, right-click on Device and select Properties.
Click on the Driver tab. After that, click the Roll Back Driver button (if available) to roll back the driver. Important note: If this option is not available, the system does not support the previous version of the driver.
Choose one of the available options to answer the question. Click on the Yes button. After completing the steps, the older version of the driver will be applied to the system and will fix the system malfunctions.
Disable the device driver
If you can’t roll back the driver, another way to fix the blue screen error is to disable the hardware until a new update is available to fix the problem.
To disable specific hardware in Windows 10, use these steps:
Open Start and select Device Manager. Click on the top result to open the application. Open the device with the problem category and right click on Device and finally select Disable device.
Click on the Yes button. After completing the steps, system problems will no longer occur on your computer with the update.
Click the delete button again. Proceed through the steps on the screen (if applicable). After completing the steps, you will no longer encounter blue screen error codes on the device.
Run DISM and SFC tools
You can use two tools called DISM and SFC. Using these two tools, repair the damaged system files and fix the problem. In other words, these tools help you to quickly repair and restore your Windows to normal if you have problems. (You can use the System File Checker (SFC) tool along with the Deployment Servicing and Management (DISM) tool)
Repair image files with DISM
To repair an existing image using DISM, use these steps:
Open Start. Search for Command Prompt, right-click on the top result, and select Run as administrator. Type the following command to repair the Windows 10 image and press the Enter button:
DISM /Online /Cleanup-Image /RestoreHealth
After completing the steps, the tool will download and replace the damaged file system in the local Windows 10 image.
Fix blue screen error using SFC tool
To use the SFC command tool to repair the current installation using a local image (which has already been checked and repaired with the DISM tool), use these steps:
Open Start. Search for Command Prompt, right-click on the top result, and select Run as administrator. Type the following command and press Enter to repair your Windows 10 installation: SFC /scannow
Important: If errors are found, you may want to run the command several times to fix everything correctly.
After you go through these steps, SFC will use the local image files and repair any system files to fix the blue screen issue quickly.
View event log details
. In the event log, the “General” tab contains a brief technical description of the error, which may give you a hint about the problem to debug. If you cannot determine the cause based on that information, copy the description, source, and event ID and use them to search the Internet for a possible solution.
Scan for malware
One of the causes of the death screen can be the presence of malware in your system. To deal with this problem, you can use anti-malware for this. There are different anti-malware that you can use; One of the best anti-malware is malwarebytes version 4.30. If you used this version of the malware, restart the system and wait to see if your blue screen error is resolved.
conclusion
In this article, we talked about the blue screen completely and you could easily understand that the blue screen error indicates that a software or hardware is not working properly. You can use the solutions that we have given you in this article and fix your problem, but be careful that these solutions are not always the answer and you may still get the blue screen of death after going through all these solutions. Witness in your system. In this case, you can share with us in the comments section so that we can answer you as soon as possible.